Category Archives: SharePoint 2010 Client Object Model

KPI for SharePoint 2010 and 2013

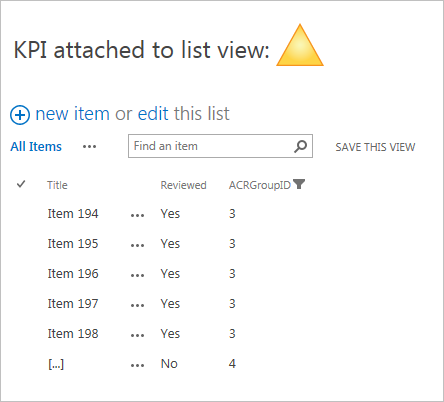
I received a question about the built in KPI in SP 2010. The user added the KPI to a list view that was filtered with a Query String Filter, but the KPI didn’t respect the filter and kept calculating based on the unfiltered view.

I don’t know if you can do anything about the built in KPI, but It’s a good opportunity to write some JavaScript!

Here is a solution you can drop in any list view to create a KPI that respects both Query String Filters and filters applied by the end user to the columns. The solution requires SP 2010 or 2013 (foundation or server), as it uses the JavaScript Client Object Model. It does NOT require jQuery.

IMG

Get the code for the file “SPJS-KPI.js” from here

Upload it to a document library where all users have read access, and add a HTML Form Web Part with this code in the list view or the web part page:

<table cellpadding="3" cellspacing="0">
	<tr style="font-size:24px;">
		<td valign="middle">KPI attached to list view:</td>
		<td valign="middle" id="kpi_1" style="height:55px;"><img style="margin:12px;" src="/_layouts/images/hig_progcircle_loading24.gif"></td>	
	</tr>

</table>
<script type="text/javascript" src="/SPJS/SimpleKPI/SPJS-KPI.js"></script>
<script type="text/javascript">

ExecuteOrDelayUntilScriptLoaded(function(){
	// KPI example 1
	var args = {
		// Placeholder for the KPI must be an existing HTML element in the page with this ID
		"placeholderID":"kpi_1",
		// Target list and base URL
		"listGUID":_spPageContextInfo.pageListId,
		"listBaseUrl":_spPageContextInfo.webServerRelativeUrl,
		// Target view - must be filled in to use "consumeFiltersFromList"
		"consumeFiltersFromViewGUID":"23233f84-531c-4096-b23b-d6711f117a2d",
		// URL Filter
		"URLfilterKey":"",
		"URLfilterTargetField":"",
		// KPI Indicator field and value
		"kpiIndicatorField":"Reviewed",		
		"kpiIndicatorFieldValue":true,
		// Text
		"noFilterMessage":"The URL filter \"{0}\" is missing.",
		"noItemsFoundMessage":"No items match the filter",
		// Threshold
		"greenThreshold":98,
		"yellowThreshold":80,
		// Icons
		"greenIcon":"/_layouts/images/kpidefaultlarge-0.gif",
		"yellowIcon":"/_layouts/images/kpidefaultlarge-1.gif",
		"redIcon":"/_layouts/images/kpidefaultlarge-2.gif"		
	};	
	spjs.kpi.init(args);	
}, "sp.js");
</script>

Update the link to the file “SPJS-KPI.js” in the code example.

Variables explained
  • placeholderID: This is the ID of a HTML element in the page where you want the KPI to appear.
  • listGUID: This is the list GUID of the list you want to attach the KPI to. If you are using a list view from the list itself (not a web part page), you can use the variable from the example. If not, add the GUID to the list here. To find the GUID, go to a list view, right click and view source. Look for “pageListId”.
  • listBaseUrl: If the KPI list is in the same site, use the variable from the example. If not, add the path like this: “/Sites/NameOfTheSite”
  • consumeFiltersFromViewGUID: To have the filter consume the filters from a list view, add the GUID of the view you are applying the filter to here. Find the list GUID by filtering the view and look at the URL. In SP 2010 you see “View=xxxxxxxx-xxxx-xxxx-xxxx-xxxxxxxxxxxx”, in SP 2013 you see it like this: InplviewHashxxxxxxxx-xxxx-xxxx-xxxx-xxxxxxxxxxxx. The GUID is where the x’es are.
  • URLfilterKey: If you are using an URL filter, this is the key from the URL like this: …/AllItems.aspx?key=value
  • URLfilterTargetField: This is the FieldInternalName of the field in the list where the filter is applied.
  • kpiIndicatorField: This is the FieldInternalName of the field you calculate the KPI from.
  • kpiIndicatorFieldValue: This is the value found in the field you calculate the KPI from. If it is a Yes/No column, use boolean value true or false.
  • greenThreshold: The percentage needed to show the green icon.
  • yellowThreshold: The percentage needed to show the yellow icon (the rest is red).
  • greenIcon, yellowIcon and redIcon: URL to the images.

Ask if you need help or you find a bug.

Alexander

Edit SharePoint Field properties in SP2010 and SP2013

Change log
August 1, 2014
Updated to v3.2 with these changes:
Fixed a bug where you could not change a text field that had a default value, or a choice field. The status would read “TRUE” indicating success, but the setting would not be changed. I have also changed the “TRUE” and “FALSE” message to “On” and “Off”.

April 2, 2014
Updated to v3.1 with these changes:
Added option to control ReadOnly and AllowDeletion.

I have previously posted a similar solution here. I have therefore started this solution in v3.0.

This solution lets you change field properties that are not accessible from list settings. Use it with caution as you can break a list or library if you change the wrong property. You should test it in a test list before you do any changes to a production environment.

Please note that this solution is for SP2010 and SP2013. You find a link to a similar solution for SP2007 in the top of this article.

How to set it up

Download the file “spjs_editFieldProperties.js” from here and add a HTML Form Web Part to a web part page in the site where you want to use it.

The HTML Form Web Part source should look like this:

<script type="text/javascript" src="/Scripts/jquery-1.10.2.min.js"></script>
<script type="text/javascript" src="/Scripts/ChangeFieldProperties/spjs_editFieldProperties.js"></script>

If you need to download jQuery, you find it here.

This is what it will look like:

IMG

Select list to see all fields:

IMG
Hover over the options to reveal the toggle buttons.

The options

I will not go into details on each of the options as it should be self explaining by the header. I will however mention a few of them.

ShowInFileDlg

This controls whether or not the field is shown in the Document Information Panel in Microsoft Word.

SourceID

In a scenario where you are using “Quick parts” to show metadata in a Word file, and you are copying the file to another library, you must change the “SourceID” in the destination library to match the value in the source library. If you do not, the “Quick part” will be disabled – leaving the value as plain text.

Let me know in the comments below if you have questions – and send me a beer form the “beer button” in the right side of the screen if you like and use the solution.

Alexander

CommentBox for SharePoint 2010 and 2013

This version is old – the latest version can be found here

I have updated my CommentBox for SharePoint solution to use the Client Object Model found in SP 2010 and 2013 to make it faster and smoother. This update does unfortunately not support SP 2007.

Change log
August 12. 2014
v2.2.1: Fixed error with TinyMCE not being reapplied to the textarea after cancel or submit.April 18. 2014
Fixed download link as there was something wrong with the folder rights to the original folder.April 4. 2014
Updated to v2.2:
Added option to store the comments in a list in the root site. The setting is controlled in the argument object like this:

var argObj = {
	"placeholderID":"cBox_A",
	"threadID":threadID,
	"storeCommentsOnRootSite":true,
	...
Please note that you must index the columns “Title” and “Parent” in the list “SPJS-CommentBox” to prevent errors when you reach 5000 comments in the list. This list is hidden from browsers, and you must add this index manually by entering list setup like this this URL: http://YourSiteURL.com/Lists/SPJSCommentBox

March 6. 2014
Updated to v2.1:
Added support for changing the TinyMCE language when using a local installed version of the TinyMCE solution. You must download the language package you want to use, and set the parameter “tinyMCE_Language” in the argument object. Refer the TinyMCE web page for details on downloading the language js file.

If you refer TinyMCE from //tinymce.cachefly.net all you have to do to change the language is to add a reference to the correct language.js file in the CEWP.

Updated to v2.01:
Fixed a bug where level 3 and deeper comments does not show when setting “threadInitiallyCollapsed” to true.

What is this solution used for?

You can add this solution to any page or form in a site to let users comment on the page or list item.

Here is an example thread

IMG

Hover over the comment to show the available options:

IMG
Here you see “Edit”, “Delete” and “Reply”. The available options will vary depending on the configuration.

Third party solutions:

This release utilizes Font Awesome Created by Dave Gandy and if you activate rich text input in the comments, TinyMCE from Moxiecode Systems AB

Some of the features
  • Multi level comments.
  • Option to use plain text or rich text input.
  • Moderators can be specified by group ID or user ID. Moderators (and site collection administrators) have full control and can edit or delete any comments.
  • Sorting ascending of descending.
  • Page size form 1-500 root comments. Load the next page by a click on a button.
  • Option to restrict write access to specified groups (by group ID)
  • You can have multiple parallel threads in one page.
  • And more…
Behind the scenes

The comments are stored in a list in the site where you set up the solution. This list is automatically created by the script, and is hidden from browsers. You can access it by navigating to “/Lists/SPJSCommentBox”. This list has a Title field for storing the page ID, a “Parent” field for the ID of the parent comment (if it is a reply), a “Comment” field to hold the actual comment, a “EMail” field and a “ProfileImg” field. There is no need to hand edit this list.

How to set it up
  1. Download “CEWP.txt”, “spjs-cBox.css” and “spjs-cBox_min.js” from here.
  2. If you like to use a local copy of Font Awesome, get it here, and follow the instructions found here.
  3. If you want to use a local copy of jQuery, get it here.
  4. If you want to use a local copy of TinyMCE, get it here, and follow the instructions found here.
  5. Upload “spjs-cBox.css” and “spjs-cBox_min.js” and any local versions of the above solutions to a document library or a folder created in the root of the site using SharePoint Designer. Ensure all users have read access to this library or folder.
  6. Edit the file “CEWP.txt” and change the links to target your local files. Update the configuration by looking at the CEWP code example below. Upload the file to the same location you created above.
    DO NOT add the code directly to the CEWP, but use the Content link option to link to the file. You can also add the code to the page using a HTML form web part or “Embed code”, but I prefer the Content link option as you can access the code without editing the page.
  7. Add the code to a page or form (like DispForm) using the preferred method and reload the page. You are prompted to create the list to hold all the comments, and after another page reload you are ready to add comments.
CEWP code
<div id="cBox_A"></div>
<link href="//netdna.bootstrapcdn.com/font-awesome/4.0.3/css/font-awesome.css" rel="stylesheet">
<link rel="stylesheet" href="/scripts/cBox/spjs-cBox.css">
<script type="text/javascript" src="https://code.jquery.com/jquery-1.11.0.min.js"></script>
<script type="text/javascript" src="/scripts/cBox/spjs-cBox_min.js"></script>
<script type="text/javascript" src="//tinymce.cachefly.net/4.0/tinymce.min.js"></script>
<script type="text/javascript">

var spjs_cBox_license = "Put your license code here";

var threadID = location.pathname;
if(GetUrlKeyValue("ID") !== ""){
	threadID += "?ID="+GetUrlKeyValue("ID")
}

var argObj = {
	"placeholderID":"cBox_A",
	"threadID":threadID,
	"multiInstanceMode":true, // Must be set to false when upgrading from v1.x
	"text":{
		"createdByPrefix":"Posted by ",
		"createdPrefix":" on ",
		"modifiedPrefix":"Modified: ",
		"modifiedByPrefix":" by ",
		"expandCollapse":["expand","collapse"],
		"newCommentText":"Leave a reply",
		"notSignedInText":"You must sign in to comment",
		"replyText":"Reply",
		"editText":"Edit",
		"submitText":"Submit comment",
		"canceText":"Cancel",
		"deleteThreadText":"Delete comment",
		"confirmDeletePrompt":"Please confirm that you want to delete the selected item and all replies below it.",
		"showMoreCommentsText":"Show more comments"
	},	
	"textareaVisible":true,
	"containerWidth":"550px",
	"replyLevels":3,
	"pageSize":25,
	"threadInitiallyCollapsed":false,
	"threadedCommentsIndent":15,
	"textareaHeight":100,
	"showProfileImage":true,	
	"showUserEmail":true,	
	"richTextInputUsingTinyMCE":false,
	//"tinyMCE_Language":"nb_NO", // New in v2.1
	"sendToRecycleBinWhenDeleting":true,				
	"sortAscending":false,
	"colorMyComments":false,
	"authorCanEdit":false,	
	"moderatorGroupIDorUserID":[],
	"restrictWriteAccessToGroups":[]
};

ExecuteOrDelayUntilScriptLoaded(function(){
	spjs.cBox.init(argObj);
},"sp.js");

</script>
Arguments details

Here is some details on a selection of argument properties.

  • placeholderID: This is the unique identifier for this instance. You must have a placeholder in the page with this ID – like the div in the top of the code example above. To use multiple instances, change the placeholderID and add placeholders in the page.
  • threadID: This is by default the relative URL of the page or list item. Change this if you like, but remember that you must use an unique identifier for each thread.
  • multiInstanceMode: Set this to true if you want to have multiple instances in one page. For users upgrading from a previous version this must be “false” for the comments to show up.
  • textareaVisible: This setting specifies whether the textarea should be visible initially, or to display a button to show it.
  • replyLevels: How deep can the replies go in one thread.
  • pageSize: How many root comments to show in each page. The more the comments, the longer the page takes to load.
  • richTextInputUsingTinyMCE: If set to true you must refer the TinyMCE solution.
  • tinyMCE_Language: For example “nb_NO”. Refer the TinyMCE web page for details on downloading the language js file.
  • sendToRecycleBinWhenDeleting: true to use recycle bin, false to permanently delete.
  • colorMyComments: Add a special css class “cBoxMyComments” to the comments created by the logged in user. You can edit this class in the file “spjs-cBox.css”
  • authorCanEdit: true to let the author edit their own comments. Delete is for moderator only.
  • moderatorGroupIDorUserID: Comma separated list of group ID (number) or user ID (number). To find the group ID go to “People and Groups” and click on the group you want the ID of. Look at the URL for this string: /_layouts/people.aspx?MembershipGroupId=5. To find the user id use the same approach by clicking on a user and looking for “ID=123” in the URL.
  • restrictWriteAccessToGroups: Comma separated list of group ID for the groups that is allowed to comment. Leave blank for no restrictions.
Are upgrading form version 1.x?

You must update all the files. Some of the files used in v1.x is no longer needed. You must also change the function call argument object as the configuration has changed. When all the files are in place, all you have to do is to rename the configuration list from “CommentBoxForSharePoint” to “SPJS-CommentBox”. When this is done all existing comments will reappear.

Obtain a license code

Go to the page Obtain license code.

Please let me know if you have trouble setting this up, or you have feature requests.

Alexander

SharePoint 2013 style tiles: Change the size and color of the tiles

Change log
June 8. 2014
Updated to v1.2.4 with these changes:

  • Fixed reversed TileHeight and TileWidth in the description for TileSize. Se below for instruction on how to update the list with the correct description.
  • Added ALT attribute top the image (if you use images for the tiles and not fontawesome).
  • Tidied up the code with JSLint and compressed it using packer by Dean Edwards.

December 7. 2013
Updated to v1.2.2 with these changes:
Added support for FontAwesome.io icons. Either go to the FontAwesome.io site and download the appropriate CSS file, or link it from bootstrapcdn like I have in this example:

<div id="spjs_tiles_placeholder" style="margin:10px;float:left;clear:both;"></div>
<link href="//netdna.bootstrapcdn.com/font-awesome/4.0.3/css/font-awesome.css" rel="stylesheet">
<link type="text/css" href="/Scripts/Tiles/SPJS-Tiles.css" rel="stylesheet">
<script type="text/javascript" src="/Scripts/Tiles/jquery-1.10.2.min.js"></script>
<script type="text/javascript" src="/Scripts/Tiles/SPJS-Tiles.js"></script>
<script type="text/javascript">
spjs.tiles.init("spjs_tiles_placeholder","MyTiles");
</script>

The setup list is automatically updated when you load the updated code. Refer the setup list field description for details on the setup and use of the FontAwesome icons.

November 23. 2013
Updated to v1.2.1 to support SP2013 publishing pages.

This post describes the updated version that has these new features
  • Variable tile size.
  • Custom tile color.
  • Option to refresh parent page when the dialog closes.
Variable tile size

IMG

Variable tile size with headings

IMG

Configuration list

IMG

No tiles configured

IMG

Upgrading from previous version

IMG

Update the configuration list

To force an update of the configuration list, add this to the URL in a page where you have the solution set up

…/site/default.aspx?SPJSTiles:UpdateList=1

*********************************************************************
Let me know if you like the solution, or you have feature requests.

Alexander

SharePoint 2013 style tiles

Change log
November 19. 2013
Updated to v1.2. Read this article for details.

IMG

If you like the “Promoted Links” tiles in SharePoint 2013, you will love this solution. It lets you create such tiles in SharePoint 2010 and 2013 from a custom list. The text, description, link and even the image can be set up with support for MUI to have it adapt to the selected language. The tiles can be positioned in multiple rows and columns to give the layout you want, and there is a separate CSS file if you want to tinker with the colors etc.

How to set it up

First you need to get the files “SPJS-tiles.css” and “SPJS-tiles.js” from here. Then download jQuery from here. Add these files to a folder created in SharePoint Designer, or to a document library where all users have READ ACCESS.

Add a HTML Form Web Part to the page where you want to have the tiles, and add this code to the source editor:

<div id="spjs_tiles_placeholder" style="margin:10px;float:left;clear:both;"></div>
<link type="text/css" href="/Scripts/Tiles/SPJS-Tiles.css" rel="stylesheet">
<script type="text/javascript" src="/Scripts/Tiles/jquery-1.10.2.min.js"></script>
<script type="text/javascript" src="/Scripts/Tiles/SPJS-Tiles.js"></script>
<script type="text/javascript">
spjs.tiles.init("spjs_tiles_placeholder","MyTiles");
</script>

You must changer the css file href and the script src to point to your local files. Do not refer the files from spjsfiles.com as this server is not rigged for serving scripts live.

Argument to the function “spjs.tiles.init”:
The first argument refers to the ID of the placeholder where you want the tiles to be placed. The second argument refer the the Title field in the setup list. You use this “keyword” to filter out the tiles you want to show in this instance. If you omit this argument, you will retrieve all tiles.

When you save this code, and reload the page, you should see this banner:
IMG

Click the button to create the configuration list. It will be placed in the same site as you triggered this script. You should be redirected to the list after it has been created. If this fails, you find the list in “All site content” as “SPJSTiles”.

The configuration list for my example image looks like this:
IMG

MUI support

The field description in the configuration list describes the format for enabling MUI support:

{"1033":"English value","default":"default value"}

You can add all the languages you have installed language packs for. Use “default” as a fallback if the language the user has selected has not yet been configured for the tile.

Leave questions and comment below.

Alexander

SPJS Charts for SharePoint: Export to Excel and SP2013 support

A few months ago I received this email from Aymeric:

Hi Alexander,

I’ve created a JS API to use with Sharepoint. You may want to have a look at it: http://aymkdn.github.com/SharepointPlus/
I think this library could be useful for some other people. It’s on GitHub so feel free to share any comments.

Thank you,
Aymeric

It took me “forever” to look at this API, but I finally had a go at it, and decided to use one of the methods: createFile in the SPJS Charts for SharePoint solution to be able to export the chart data to Excel as a CSV file.

New in v3.4 of SPJS Charts for SharePoint

You find the “Enable export to Excel as comma-separated values (CSV)” under the “Advanced options” section in the SPJS Charts for SharePoint GUI. When you enable this feature (done individually for each chart), you can hover over the chart to show a label in the bottom right corner of the chart. Hit this to create the file. When the file is successfully created, you are prompted to open it directly.

To achieve this I included the file “sharepointplus-3.0.3.js” in the CEWP code, and I created a function that exports the chart data as comma-separated values, which I then “inject” in a dedicated document library using Aymerics API method “createFile”. This document library is automatically created the first time you save a chart with the “Export feature” enabled.

You do NOT have to load the “sharepointplus-3.0.3.js” file if you do not intend to use the export to CSV feature. If you try to enable it, and “sharepointplus-3.0.3.js” is not loaded, you will get instruction on how to get hold of the file.

The exported files

The files are named from the path to the page where the chart is located, the chart id and the user ID of the user exporting the chart. This means that the library “SPJS_ExcelExports” will not get filled up as the file is overwritten for each time the user exports the same chart. If you want to keep the file, save it in another location, or at least save it with another name to prevent it from being overwritten.

Example of the CEWP code with “sharepointplus-3.0.3.js” loaded:

<style type="text/css">
div.chartLoadingOverlay{
	font-style:italic;
	color:gray;
	border:1px silver solid;
	background-color:#F5F5F5;
	line-height:250px;
	height:250px;
	width:500px;	
	text-align:center;	
	margin:2px;
}
</style>

<!-- The chart container is set up with an overlay to let the user know the chart is rendering -->
<div id="MyChart1">
	<div class='chartLoadingOverlay'>Loading chart please be patient...</div>
</div>

<script type="text/javascript">
/*****************************************************
		Address all containers
*****************************************************/
// All charts must be represented by a container with a unique id. 
// This container  must be present in the page
var arrOfChartContainers = ["MyChart1"];
var loadRC = false;
// Set this to true to allow for the use of variables in the "Filter setup textarea"
var allowEval = false;
// Set this to true to delay the loading of the chart.
var loadManually = true;
// You can override chart options set in the GUI
var chartOptionOverride = {"TheChartID":{"title":"This is the chart title!"}};
</script>
<script type="text/javascript" src="https://ajax.googleapis.com/ajax/libs/jquery/1.9.1/jquery.min.js"></script>
<script type="text/javascript" src="https://www.google.com/jsapi"></script>
<script type="text/javascript" src="/test/English/Charts/Javascript/SPJS_ChartsForSharePoint_v3.4.js"></script>
<!-- Used to enable export of chart data as CSV -->
<script type="text/javascript" src="/test/English/Charts/Javascript/sharepointplus-3.0.3.js"></script>
<!-- Used to enable export of chart data as CSV -->
<script type="text/javascript">
// This function will load the charts
function manualLoad(){
	loadManually = false;
	spjs_GenerateChart();
}

// Delay the call to the function by 10ms to give the overlay time to render 
setTimeout(function(){
	manualLoad();
},10);
</script>
SharePoint 2013

In v3.4 I have made a “quick pass” trough the code to fix some compatibility issues for SharePoint 2013.

Because this solution is funded with an occasional beer donation, I cannot fully test it as if it was a commercial product. Therefore I must rely on you guys to find the rest of the bugs. Post them here, and I’ll fix them as soon as I can manage.

Alexander

Lookup column relinker – cross site – for SharePoint 2007 and SharePoint 2010 – using JavaScript

Change log
May 28, 2014
Changes in v1.1 for SP 2010 / 13 and v1.2 for SP 2007:
Fixed a bug where the list guid was not wrapped using curly braces. This made Microsoft Word fail to load the document information panel when you had a cross site lookup column in that library. To fix this, relink the lookup column again using the updated version.

I have previously posted a solution that, among other features, lets you relink a lookup column. This article introduces a new tool that does lookup column relinking only.

SharePoint 2007
IMG

SharePoint 2010
IMG

Get the code here, and ensure you use the correct version.

The difference between the 2007 and the 2010 version is that in 2007, you must place the code in a web part in the site where the lookup column resides.

You can target another site, but must run the code in the site where the column you want to alter is located.

In the 2010 version, you can change the source web as long as you target a web within the site collection.

If you like the solution, buy me a beer using the Beer button on the top right of this page.

Alexander

vLookup for SharePoint 2010

16.02.2013 Updated to v1.3 with these changes:

  • Added more options to process the values pulled back from the query. In addition to the previous substring, you can now have prefix and suffix and additional date formatting options. Hover over the help icon to learn more. Please note that you must reconfigure any existing “substring setup” after upgrading to v1.3.
  • Added support for hyperlink columns.
  • Added count to the “Action menu”.
  • Fixed bug with “hide field” when using a text string enclosed in curly braces in the “In URL” configuration.

25.01.2013 Updated to v1.26 Added option to split the string by a specified separator, returning a selected array index.


30.11.2012 I have updated to v1.23 to fix a compatibility issue with Office 365 for SP2013.


18.11.2012 Updated to v1.22 and added some video tutorials:

Please note that this requires v1.22 of vLookup_sp2010.js

08.11.2012 v1.2 fixes some bugs and adds some new features.
Bugs fixed:

  • Removed an extra “/NewForm.aspx” from the url generated in the “addChild” function.
  • When creating a child in a subsite or a parent site, the setting of values from the “parent item” failed due to a wrong baseUrl parameter in the URL.

Features added:

  • As suggested by “advacomp”, added an option to use a text string to set a field in the child list. See instructions on the help icon in the “In URL” section of the setup.
  • Added an option in the GUI to hide the form label in DispForm and EditForm.

16.10.2012 v1.1 fixes a bug with wrong list ID appearing when you edit the configuration from DispForm or EditForm.


I have previously posted a solution for SharePoint 2007, and by request I have rewritten the solution for SharePoint 2010. Please note that this solution will NOT work for any SharePoint version prior to SharePoint 2010.

This solution, as the previous one, supports these “methods”:

  • Show all records: Returns a list view of all the records.
  • Sum: Sums the values for all the records.
  • Average: Sums the values for all the records, and devides the sum on the number of non-empty records.

In the 2007 version, the configuration was setup in a calculated column trough the list settings > edit field.

This new solution is much easier to set up as it has a GUI:
IMG

In this solution, the configuration is stored in a dedicated list – shared by all vLookup columns in the site. This eliminates the fiddly work of hand editing the configuration.

When you first setup this solution in a site, the configuration list is created automatically. This list is not to be hand edited, and you might optionally hide it from browsers trough SharePoint Designer. You must however ensure all users have read access to this list.

You can use this solution in plain list views, grouped views and in DispForm / EditForm (see note bout field type below).

When this solution is setup in a list view, it looks like this:
IMG

DispForm and EditForm:
IMG

IMG
Adding new “Tasks” in EditForm does not refresh the form, only the “vLookup items” – thus you does not lose unsaved data in your EditForm.

How to set up the solution
  1. Download the code for the file “vLookup_sp2010.js” from here.
  2. Download the file “spjs-utility.js” from here. Ensure you get the latest version (by date of the folder).
  3. If you prefer a local copy of jQuery, get it here.
  4. Upload this files to a library in your SharePoint site collection, or to a folder in the root site – created using SharePoint Designer.
  5. Add a column to your list / library where the FieldInternalName starts with “vLookup”. This is what triggers the solution. Note that it’s the FieldInternalName and not the Display name that must match.

    You can use both a calculated column or a single line of text column as “placeholder” for the “vLookup items”. If you use a calculated column, use a formula like this:

    =""

    The contents of the field will be overwritten anyway.

    To be able to have the solution work in EditForm, you must use a single line of text column as “vLookup field”. Note that you cannot use this field to store anything as the contents will be overwritten by the vLookup solution.
  6. Add a HTML Form Web Part to the bottom of your list view, DispForm or EditForm, and add this code trough the “Source editor”:

    <script type="text/javascript" src="/test/vLookupv2/Script/jquery-1.7.2.min.js"></script>
    <script type="text/javascript" src="/test/vLookupv2/Script/spjs-utility.js"></script>
    <script type="text/javascript" src="/test/vLookupv2/Script/vLookup/vLookup_sp2010.js"></script>

    IMG

    You use the exact same code for list views and for list forms.

Creating the configuration list

The first time you set up the solution, you will get this prompt:
IMG

Hit “OK” to create the list:
IMG

You will now get this prompt (provided your field is in the view):
IMG

You will now be presented with the configuration GUI:
IMG

This GUI is automatically presented while the configuration has not been created, or it contains errors that are detected by this solution. To reenter the configuration at a later time, add “vLookupSetup=1” to the URL like this:

// List view
.../Lists/MyList/AllItems.aspx?vLookupSetup=1
// DispForm
.../Lists/MyList/DispForm.aspx?ID=12&vLookupSetup=1

All the configuration option are explained by hovering over the question mark.

Creating new items in the “child list”

When you add items to the child list, and want to prefill values in your NewForm, you use the In URL section of the configuration to set the “from” and “to” fields.

You must add the same code to a HTML form web part below the form web part in NewForm as you have used in DispForm and list views. This code will pull in the values from the “parent list” and fill in the “child list”.

If you are “connecting” the two lists by a lookup column, ensure you prefill the lookup column like in the example in the top of this article.

MUI support

This solution supports MUI and you can set labels and column headers in multiple languages. Use “default” as “LCID” to have a default value and/or set up the correct LCID (matching your installed language packs) as alternate values.

Do you use this solution?
I spend a lot of time developing these free solutions. If you use it, please hit the PayPal button to send me a few bucks as motivation for releasing new solutions.