Category Archives: Javascript

List inspector – Ed MacIntosh

I received this code from one of my readers – Ed MacIntosh with this message:

Alex,
This is a great web part that someone at my company shared that I think your readers would really find useful.
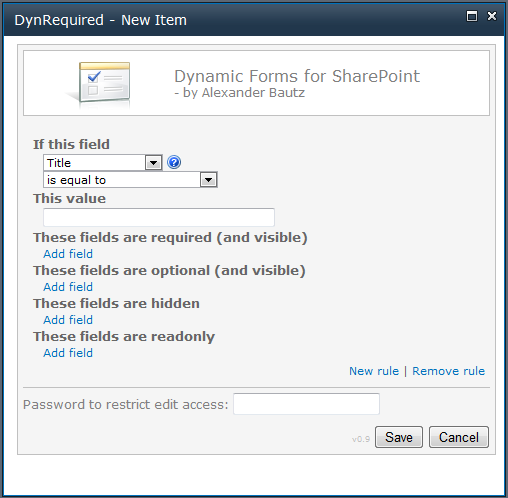
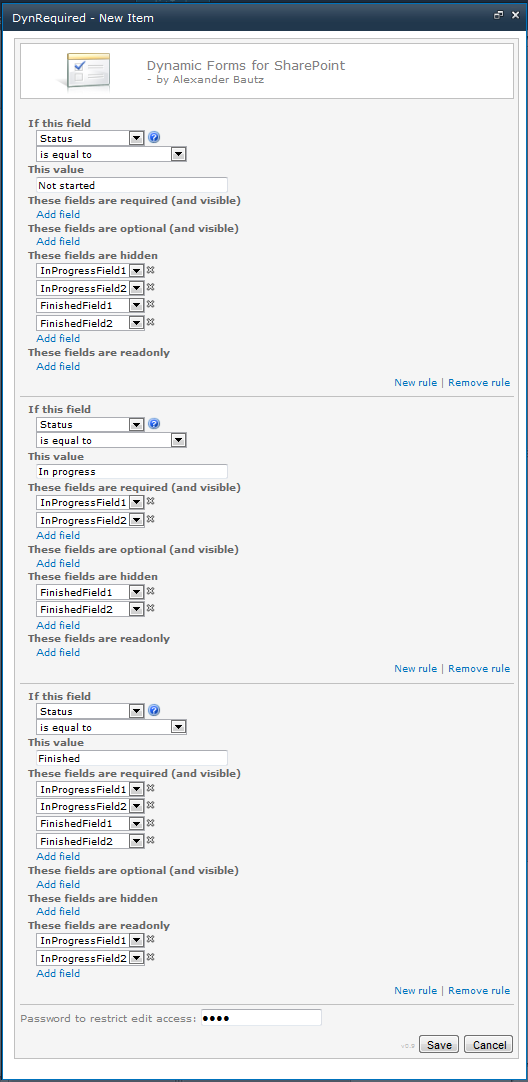
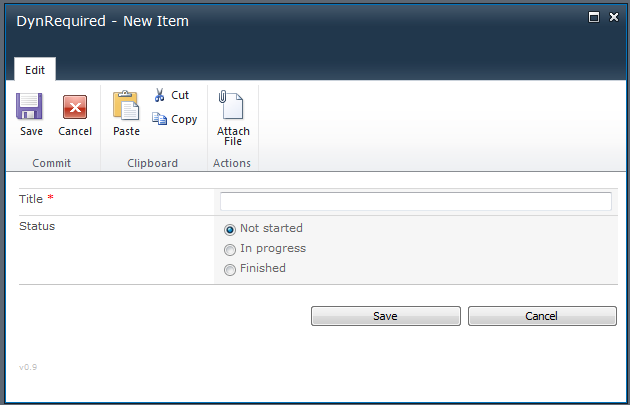
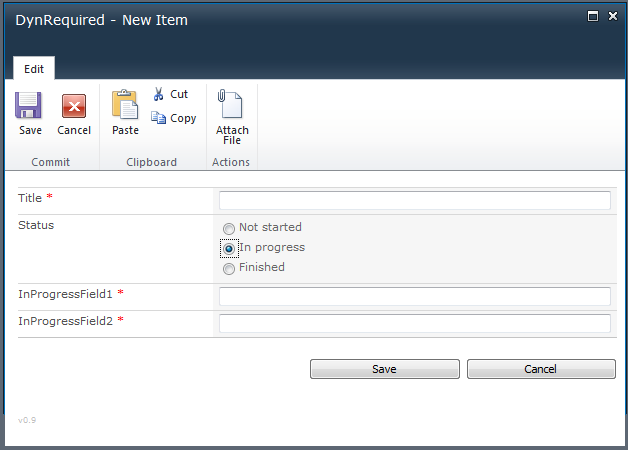
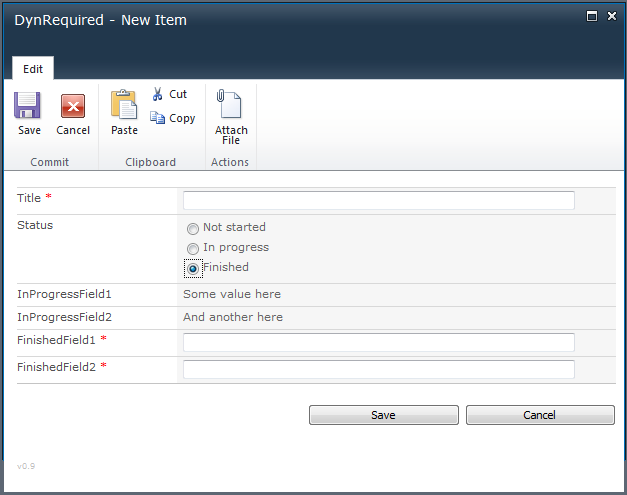
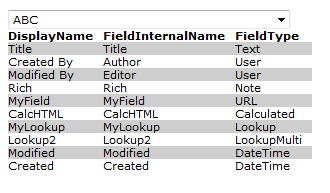
It provides a dropdown menu to choose a list in your site and upon selection displays the field name as next to the filed internal name for all fields in the list.

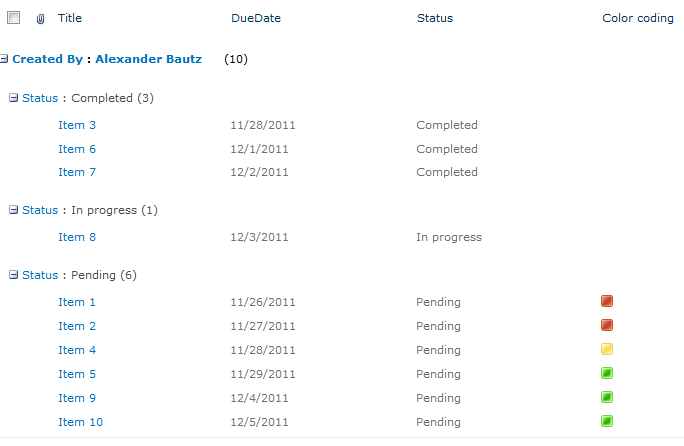
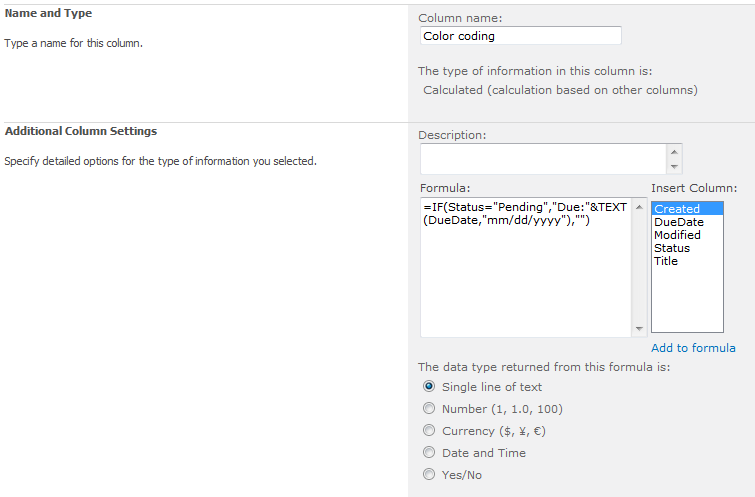
You drop it in a CEWP and it will let you pick any list in your site collection to list all columns by “DisplayName”, “FieldInternalName” and “FieldType” like this:
IMG

The only thing I have changed is the style of the table to “width:auto”, so all credit goes to Ed and his colleague.

<select id="spLists" onchange="displayFieldData(this.options[this.selectedIndex].value)"/>
<div id="spListsSelected"></div>
<table id="spListFieldTable" cellpadding="0" cellspacing="0" style="width: auto"></table>
<script type="text/javascript" src="https://ajax.googleapis.com/ajax/libs/jquery/1.6.4/jquery.min.js"></script>
<script type="text/javascript">
var siteURL = 'http://' + window.location.host + L_Menu_BaseUrl + '/_vti_bin/lists.asmx';
$(document).ready(function(){
	var soapEnv = "<soap:Envelope xmlns:xsi='http://www.w3.org/2001/XMLSchema-instance' xmlns:xsd='http://www.w3.org/2001/XMLSchema' xmlns:soap='http://schemas.xmlsoap.org/soap/envelope/'> 
					<soap:Body> 
					<GetListCollection xmlns='http://schemas.microsoft.com/sharepoint/soap/' /> 
					</soap:Body> 
					</soap:Envelope>";
	$.ajax({
		url: siteURL,beforeSend: function(xhr) {
			xhr.setRequestHeader("SOAPAction",
			"http://schemas.microsoft.com/sharepoint/soap/GetListCollection");
		},
		type: "POST",
		async: false,
		dataType: "xml",
		data: soapEnv,
		complete: processResult,
		contentType: "text/xml; charset="utf-8""
	});
});

function processResult(xData, status) {
	$("#spLists").append("<option>Select a List</option>");
	$(xData.responseXML).find("List").each(function() {
	var liHtml = "<option value='" + $(this).attr("Title") + "'>" + $(this).attr("Title") + "</option>";
	$("#spLists").append(liHtml);
	});
}

function displayValue(splistname) {
	$("#spListsSelected").text(splistname); 
}

</script>
<script type="text/javascript">
var arrSkipFieldTypesOf = ['Computed'];
var arrIncludeOverrideFields = ['Title','Author','Created','Modified','Editor'];
function displayFieldData(listname) {
	if(listname == "" || listname == undefined) return false;
	var soapEnv = "<soap:Envelope xmlns:xsi='http://www.w3.org/2001/XMLSchema-instance' xmlns:xsd='http://www.w3.org/2001/XMLSchema' xmlns:soap='http://schemas.xmlsoap.org/soap/envelope/'> 
					<soap:Body> 
					<GetList xmlns='http://schemas.microsoft.com/sharepoint/soap/'> 
					<listName>" + listname + "</listName> 
					</GetList> 
					</soap:Body> 
					</soap:Envelope>";
	$.ajax({
		url: siteURL,
		beforeSend: function(xhr) {
		xhr.setRequestHeader("SOAPAction",
		"http://schemas.microsoft.com/sharepoint/soap/GetList");
		},
		type: "POST",
		async: false,
		dataType: "xml",
		data: soapEnv,
		complete: processResult2,
		contentType: "text/xml; charset="utf-8""
	});
}

function processResult2(xData, status) {
	$("#spListFieldTable tr").remove();
	$("#spListFieldTable").append("<tr style='font-weight:bold;'><td style='padding-right:10px'>DisplayName</td><td style='padding-right:10px'>FieldInternalName</td><td style='padding-right:10px'>FieldType</td></tr>");
	$(xData.responseXML).find("Field").each(function() {
		if (($.inArray($(this).attr('Name'),arrIncludeOverrideFields)>-1) || ($(this).attr('FromBaseType')!='TRUE' && $(this).attr('Sealed')!='TRUE' && $(this).attr('DisplayName')!=undefined && $.inArray($(this).attr('Type'),arrSkipFieldTypesOf)==-1)) {
			var trHtml = "<tr>";
			trHtml += "<td style='padding-right:10px'>" + $(this).attr("DisplayName") + "</td>";
			trHtml += "<td style='padding-right:10px'>" + $(this).attr("Name") + "</td>";
			trHtml += "<td style='padding-right:10px'>" + $(this).attr("Type") + "</td>";
			trHtml += "</tr>";
			$("#spListFieldTable").append(trHtml);
		}
	});
	$("#spListFieldTable tr:odd").css("background-color","rgb(206,206,206)");
}
</script>

Alexander

SPJS Charts for SharePoint v3.x

10.12.12 I introduced a new bug in v3.3.7 that broke the filter if you did NOT use “filterAdditionalCharts”. This should be fixed in v3.3.8.


13.11.2012 Updated to v3.3.7 to fix a bug regarding “filterAdditionalCharts” in the Custom CAML filter setup. This was broken in v3.3.6 – thanks to Paul Brown for notifying me.

Please note that you now have to supply the parameter for each filter in the filter setup. Click the “Instructions” link above the filter setup textarea for details.


20.09.2012 Updated to v3.3.5
06.09.2012 Updated to v3.3.1. This update is an attempt to fix an issue where you apply multiple formatters on the same column, and only the last one sticks.
18.07.2012: Updated to v3.3 and added a few new features. See this article for details.
07.06.2012: Updated to v3.2.2 to add support for special characters like single quote and “&” in the filter options. See change log.
29.05.2012: Updated to v3.2.1 to fix a bug. See change log.
31.03.2012: Updated to v3.2.
Added filter wildcard to allow “Show all” when using dropdown filter. See “Filter setup Instructions” in the “Edit chart GUI”.
See change log for details on some small bugfixes.
21.02.2012: Updated to v3.1.5. See change log.
14.02.2012: Updated to v3.1.4. See change log.
13.02.2012: Updated to v3.1.3. See change log.
06.02.2012: Updated to v3.1.2. See change log.


06.02.2012: Updated to v3.1.1 to avoid using eval. Read more in the article. Thanks to Christophe for pointing me to the “jQuery.parseJSON()” method – I was not aware that jQuery had this built in.


This article will freshen up on the setup of the solution and will describe the changes in v3.1

Keywords: New chart types, multiple dropdown filters and variables in the custom CAML query.


I have “silently” released version 3 of the “Charting for SharePoint using Google Visualization API” solution in November 2011. You find it here. The 3.0 release was not so mush about new functionality, but focused more on tidying up the GUI to make it easier for the user to understand the configuration options.

In the work with v3.0 i realized that i did not have any distinct name for the solution, and I decided to name the solution SPJS Charts for SharePoint.

A full walktrough of the configuration options in v3.0 can be found in this book from O’Reilly. The book is a collection of articles from Nothing But SharePoint. The article you find in this book (Publication Date: February 24, 2012) has not been published elsewhere.
The setup

To start using this solution, you only need the rights to create a list (will be done automatically by this solution), upload files and add a CEWP or a HTML form web part to a page.

After the initial setup, all you need is contribute rights to edit charts.

The setup process contains four steps:

  1. Download the file “SPJS_ChartsForSharepoint_v3.x.js” and “CEWP.txt” from here from here. You can choose between the uncompressed (124KB) “SPJS_ChartsForSharePoint_v3.1.js” and the packed, smaller version version (64KB) “SPJS_ChartsForSharePoint_v3.1_min.js”. The latter is packed using packer. You find the CEWP code and the script file in separate folders. The folder name will reflect the script version. Ensure you download the latest version, and that you read the change log.
  2. Upload the file “SPJS_ChartsForSharepoint_v3.x.js” to a document library, or put it in a folder created with SharePoint Designer for safer storage. Ensure all users have read access to the file.
  3. Copy the link to the file “SPJS_ChartsForSharepoint_v3.x.js” and replace the example path in the CEWP code so that it reflects your local copy.
  4. Either upload the CEWP code to the same folder as the file “SPJS_ChartsForSharepoint_v3.x.js” and use the content link option in a CEWP to link to the code, or use a HTML form web part and insert the code directly in the “Source editor”.

Reload the page, and if it is the first time it is run in the site, the solution will prompt you to create the configuration list. If you are upgrading from an earlier solution, you are prompted to update the configuration list. Both actions require no more than a click on the OK button to complete.

If you are upgrading AND you have a multi language setup:
Ensure you have selected the “native” language for the site collection before you complete the update of the configuration list. If you fail to do so, the update will not take effect and the prompt will not go away.
These are the changes in v3.1
Chart types

Switched GeoMap for GeoChart and added BubbleChart and SteppedAreaChart.

Dropdown select filters

In the previous versions, you could create ONE dropdown filter above the chart. In v3.1 you can have multiple. The setup of the filter have changed, and those updating from a previous version will have to redo the filter setup (you will get an error message telling you that the filter setup is wrong).

IMG
The chart example above has this filter setup to create the “Year dropdown”:

IMG
You can have multiple filters created in the same way, Click “Instructions” above the Filter setup textarea to expand this description:

Use an object literal like this:
[{“label”:”Year”,”urlKey”:”year”,”options”:[{“f”:”2011″,”v”:”2011″},{“f”:”2012″,”v”:”2012″,”selected”:true}]},{“label”:”Status”,”urlKey”:”status”,”options”:[{“f”:”Not started”,”v”:”0″},{“f”:”In progress”,”v”:”1″,”selected”:true}]}]

The object properties:
label: The label in front of the dropdown.
urlKey: The parameter in the url that identifies the value.
f: Friendly name for the option. Can be the same as “v”.
v: Internal name for the option. Can be the same as “f”.
selected: true if the option should be preselected.

When you have written or prefilled the filter (by selecting it from the “Prefill textarea from choice field-dropdown”), you must add the appropriate CAML in the “Custom CAML-query” textarea. You can start by clicking “Build CAML from selected filters” below the Custom CAML-query textarea to have the raw CAML autogenerated.

Note that you must change the text “FieldInternalNameToMatch” in the Custom CAML-query textarea to the correct FieldInternalName.

The new filter method can use eval1, and thus you can have parts of, or even the complete filter as a variable in the CEWP. To do this, you create a variable in the CEWP code and inserts the variable name in the “Filter setup” textarea. Please note that the CAML is “static” and you must insert the corresponding {filter:urlKey} in the Custom CAML-query textarea to pick up the filters.

1. This feature has changed from v3.1 to v3.1.1 and must now be turned on (off by default) to allow “eval”. This is a security risk, but if you want to have the filter setup as a variable in the CEWP code, add this setting to the CEWP:

var allowEval = true;
Variables directly in the custom CAML

Another new feature is the ability to use variables directly in the CAML. Construct the variables in the CEWP code like an object named “spjsCAMLvariables”, then insert {variable:variable_name} in the Custom CAML-query textarea where you want the variable to be inserted. “variable_name” represents one property from the object “spjsCAMLvariables”.

In the following example i have used it to filter a calendar to show this weeks items.
In the CEWP code you insert code like this to get the two variables “thisWeekMonday” and “thisWeekSunday”:

// Get todays date
var today = new Date();
// Find monday in current week
while(today.getDay()!==1){
	today.setDate(today.getDate()-1); 
}
// Create two date objects - one for Monday and one for Sunday
var monday = new Date(today);
var sunday = new Date(today.setDate(today.getDate()+6));
// Convert the dates to ISO8601 format: yyyy-mm-dd for use in CAML
var thisWeekMonday = monday.getFullYear().toString()+"-"+(monday.getMonth()+1).toString()+"-"+monday.getDate().toString();
var thisWeekSunday = sunday.getFullYear().toString()+"-"+(sunday.getMonth()+1).toString()+"-"+sunday.getDate().toString();
// the object used in the Custom CAML-query
var spjsCAMLvariables = {"thisWeekMonday":thisWeekMonday,"thisWeekSunday":thisWeekSunday};

Insert the variables in the Custom CAML-query textarea like this:

<Where>
<And>
<Geq>
<FieldRef Name='StartDate' /><Value Type='DateTime'>{variable:thisWeekMonday}</Value>
</Geq>
<Leq>
<FieldRef Name='StartDate' /><Value Type='DateTime'>{variable:thisWeekSunday}</Value>
</Leq>
</And>
</Where>

Hit “Save” and your chart will always show the current weeks items.


The Google Visualization API team periodically releases a new version of the Google Visualization API. While the Visualization API team thoroughly tests each new version, bugs may still exist in any new release. You can test the release candidate before it becomes official by setting a variable in the CEWP code like this:

var loadRC = true;
Note on configuration option:
I have changed from “eval” to “jQuery.parseJSON” to handle the configuration options. The new method is a bit more picky on the syntax of the parameters and you must ensure to use double quotes and not single quotes for the option value.

Example:
Wrong syntax
colors:[‘red’,’#004411′]
Correct syntax
colors:[“red”,”#004411″]


If you use this solution, please consider buying me a beer!

Alexander

Dynamic Forms for SharePoint

29.05.2012 I have published a production release here

You can no longer leave comments in this article. Please post any comments or questions in the one linked above.


29.01.2012 I have done some work during this weekend, and i see that i have underestimated the complexity dealing with other than “is equal to” in this solution. I will see what i can do about that, and will post a new version as soon as i can manage. In the meantime, stick with “is equal to”.

Please note that this solution is under development – and is still BETA. I’m almost certain I’ll have to change the configuration options – and this will break the existing “filters”. Please bear this in mind when testing this solution.

Alexander


22.01.2012
I have redone the script due to some bugs in the initial release. It should still be considered as a “beta”, but i hope as many as possible can test it and let me know the result.

I have not added any functionality over the initial release as i want to ensure the parts already in it works as expected before doing so. I have however noted these requests:

  1. DispForm support
  2. Set field value / clear field value

Alexander


I posted a teaser for my latest project in December. Now I thought it was time to post a working solution!

This solution will let you add dependent logic to your forms.
For example you could have a Yes/No check box determines whether some fields as required or not, or the status selector in a Tasks list can toggle which fields are visible or read only when you change from “In progress” to “Completed”.

Please note that the initial release is set to v0.9. I expect you to find some bugs! Please test it and comment below if you find something wrong, or you have a feature request.

All screenshots are from SharePoint 2010, but this solution is designed for both SharePoint 2007 and SharePoint 2010. I have tested it in IE7, IE9, FireFox 9.0.1 and Google Chrome 16.0.912.75.

How to set it up

Download the file “DynamicFormsForSharePoint.js” and “spjs-utility.js” from here. Please note that you will need the version dated 18.01.2012 or newer of “spjs-utility.js”. You find the files in folders with corresponding names. You also need jQuery – download i here. You may use the latest version, but i prefer v1.6.4 as it is faster in some areas. Please note that not all of my other solutions will work with jQuery v1.7x.

Put these files in a document library or a folder created with SharePoint Designer. Ensure all users have read access to this location.

This solution is set up by referring a script from NewForm and EditForm of the lists where you want the solution activated.

Add a CEWP to NewForm and EditForm like this

SharePoint 2007
Go to NewForm and EditForm and edit the URL by adding toolpaneview=2 behind the URL in this format:
…/NewForm.aspx?toolpaneview=2
…/EditForm.aspx?ID=12&toolpaneview=2

Press Enter and you should be able to add a CEWP to the page. Put the CEWP below the form web part.

SharePoint 2010
In the list view, click “List” on the List Tools menu. Then select “Form Web Parts” and pick NewForm and Editform from there and add a CEWP to the page. Put the CEWP below the form web part.

I recommend using the Content link option in the CEWP to refer the code like the example below. The CEWP code should be put in a text file (txt) or an aspx file like in the example below. This file should be put in the same location as you put the file “DynamicFormsForSharePoint.js”. You could also put the code directly in a HTML Form web part as this web part is handled in a slightly different manner in SharePoint 2010, and therefore does not mess with the script generated HTML.

CEWP setup in SharePoint 2010
IMG

The code the file CEWP.js.aspx

<script type="text/javascript" src="https://ajax.googleapis.com/ajax/libs/jquery/1.6.4/jquery.min.js"></script>
<script type="text/javascript" src="/test/Scripts/DynRequired/spjs-utility.js"></script>
<script type="text/javascript" src="/test/Scripts/DynRequired/DynamicFormsForSharePoint.js"></script>

You must change the script src to all files so that they refer your local files.

These three scripts are all that goes in the CEWP – all configuration is done in a graphical user interface.

Behind the scenes

When this solution is first setup in a site, the configuration list is created automatically. This list is not to be hand edited, and it can be hidden using SharePoint Designer if you like.

When you configure the solution for a specific NewForm or EditForm, the configuration is stored using the site-relative URL of the form as an identifier. When a user loads the form in a browser, this configuration is read from this location and the rules are applied “on the fly”.

How to configure the solution

Note:
When manipulating required fields, you must NOT set the fields as required under list settings in SharePoint. Let this script handle it.

When the solution is set up, the only thing giving it away is the little version number in the bottom left corner of the form:
IMG
You click this version number to enter the configuration. Note that this version number is visible only if the solution has not yet been set up, or the logged in user is the one that configured the solution for this particular form in the first place.

You can however enter the edit mode manually by appending to the URL like this:NewForm.aspx?setup=1 or EditForm.aspx?ID=10&setup=1

If you set up a password protection for the configuration, you are prompted for the password when entering the edit mode:
IMG
This dialog is bypassed if there are no password.

You then enter the configuration:
IMG

You can use these field types as “triggers”:
Yes/No, Drop-Down Menu, Radio Buttons, Checkboxes (allow multiple selections) and Single line of text.

You can use the following operators to match their value

  • is equal to
  • is not equal to
  • is greater than
  • is less than
  • is greater than or equal to
  • is less than or equal to
  • begins with
  • contains
Example

The Configuration
IMG

This configuration will result i these changes to the form
IMG

IMG

IMG


Let me know if you get this solution working. I’ll update the article with any missing parts tomorrow, so please let me know if you find any bugs in the solution, or missing steps in the article.

Alexander

Approve multiple documents or list items in one operation with client side code

I got this request from Larry:

Good day A, Have a question. Is there an easy way to add to the SP 2010 ribbon an approve all button. I hate having to select each item and manually approve each one. I have found some script but they are deployed on central admin. I would like to a void that.

thanks

It’s not like i didn’t have anything to do, but he bought me a beer…

Here we go

This one uses the Client Object Model in SharePoint 2010 and is therefore usable in SharePoint 2010 only.

The code adds a custom button to the “Ribbon.Document” or “Ribbon.ListItem” that calls a script on the items selected using the in line checkbox.

Get the file “ApproveSelected.js” from here
Get jQuery from here

Put the files in a document library or in a folder created with SharePoint Designer. Ensure all users have read access to the location.

Insert a CEWP in the list view where you want this feature to be activated. Use the “Content Link” option in the “Edit web part” panel of the CEWP to link to the CEWP-code that you have put in a text file in the same location as the “ApproveSelected.js”.

Use this code:

<script type="text/javascript" src="https://ajax.googleapis.com/ajax/libs/jquery/1.6.4/jquery.min.js"></script>
<script type="text/javascript" src="/test/Scripts/ApproveSelected/ApproveSelected.js"></script>
<script type="text/javascript">

var tabBtn = {
	"btnLabelApprove":"Approve selected",
	"btnLabelReject":"Reject selected",
	"groupLabel":"Approve or reject"
};
var workingOnItNotification = 'Processing items...';
var doneNotification = '{0} items processed';
</script>

Change the path to the file “ApproveSelected.js” to match your local copy. If you prefer to use a local copy of jQuery, change that path to.

You may also change the variables if you want another text in the button or the notification messages.

It should look like this in the list view

Inactive
IMG

Active
IMG

NOTE
The button will disappear if the screen width is to narrow. The built in ribbon buttons will “shrink” to fit a narrow screen – this one will not.

Extras

This code uses a new “hack” to overcome the missing “list toolbar” when adding another webpart to the page. I’ll do a separate little article on that one.

Enjoy!
Alexander

Pull user list property from people picker and write to separate textfield

I have previously posted a solution for pulling the email address from a people picker. This is an updated version that lets you pull any user list property (this is the built in user list in SharePoint and NOT the SharePoint Server Shared Service Provider profile) from the people picker and write it to a separate text field.

Unlike the previous solution, this one is designed for multi select people pickers.

How does it work

This solution binds to the blur event on the picker input field, and on the click event on the Check Names and Browse button. It checks to see that the picker selections resolve, and then pulls the login name form the selections. It then uses the function “getUserInfo_v2” from the file “spjs-utility.js” to get the user list information for the current selection.

The function “getUserInfo_v2” may not return all fields from the user list. If you miss some fields, you can add them to the array “arrOfFields”. Go here to learn how to find the FieldInternalName of the fields

How to set it up

Go here and download the latest version of “spjs-utility.js”

Add a CEWP below the list form in NewForm or EditForm. Read here how to add a CEWP in SharePoint 2007. In SharePoint 2010 you can add the CEWP by selectiong “Form Web Parts” from the list ribbon menu.

Insert this code in it. In line 05: replace “from” and “to” with your FieldInternalNames, and the “propertyName” with the one you want to retrieve. The “multiValueSeparator” is the separator between multiple values (if the picker is a multi select).

&lt;script type=&quot;text/javascript&quot; src=&quot;https://ajax.googleapis.com/ajax/libs/jquery/1.6.4/jquery.min.js&quot;&gt;&lt;/script&gt;
&lt;script type=&quot;text/javascript&quot; src=&quot;/test/Scripts/spjs-utility.js&quot;&gt;&lt;/script&gt;
&lt;script type=&quot;text/javascript&quot;&gt;

pullEmailFromPickerOnChange({from:'MyPeoplePicker',to:'Title',propertyName:'Title',multiValueSeparator:'; '});

/******************************************************
		Do not change anything below this line
*******************************************************/
fields = init_fields_v2();
function pullEmailFromPickerOnChange(obj){
	var toFind, arr, data, val;
	$(document).ready(function(){
		toFind = &quot;div.ms-inputuserfield&quot;;
		if(!browseris.ie5up &amp;&amp; typeof(_fV4UI)==='undefined'){
			toFind = &quot;textarea&quot;;
		}
		$(fields[obj.from]).find(toFind).bind('blur',function(){
			$(fields[obj.to]).find('input').val('');
			arr = pullUserInfoFromPicker(obj.from,obj.to,obj.propertyName);
			$.each(arr,function(i,data){
				if(data[obj.propertyName]!==undefined){
					val = $(fields[obj.to]).find('input').val();
					if(val!==''){
						val += obj.multiValueSeparator;
					}
					$(fields[obj.to]).find('input').val(val+data[obj.propertyName]);
				}
			});
		});
		$(fields[obj.from]).find('img').bind('click',function(){
			setTimeout(function(){
				$(fields[obj.to]).find('input').val('');
				arr = pullUserInfoFromPicker(obj.from,obj.to,obj.propertyName);
				$.each(arr,function(i,data){
					if(data[obj.propertyName]!==undefined){			
						val = $(fields[obj.to]).find('input').val();
						if(val!==''){
							val += obj.multiValueSeparator;
						}
						$(fields[obj.to]).find('input').val(val+data[obj.propertyName]);
					}
				});
			},500);
		});
	});
}

function pullUserInfoFromPicker(finFrom,finTo){
	var result,	isResolved;	
	result = [];
	$(fields[finFrom]).find('.ms-formbody').find(&quot;div[id='divEntityData']&quot;).each(function(){
		isResolved = ($(this).attr('isresolved').toLowerCase()=='true')?true:false;		
		if(isResolved){	
			result.push(getUserInfo_v2($(this).attr('description')));				
		}			
	});
	return result;
}
&lt;/script&gt;

Change the script src to match your location of “spjs-utility.js”. If you prefer to use a local copy of jQuery, go here to download v1.6.4. I have not had the time to make it work with jQuery 1.7x so you must use v1.6.4 for now.

Alexander

Truncate text in list view and add mouseover preview

Change log
19.06.2015
v1.2 for SP2007: By request fixed a bug occurring when using this in a list view with multiple web parts from the same list (same fieldinternalname), and the column position of the field is not the same for all the web parts.

19.07.2014
v1.2 for SP2010 and 2013: Small update to address a bug in IE9 and add support for paging in SP2013. Please note that I have not gone all in here – it is updated only to try to fix these bugs so there might be bugs I have not addressed. Use this code as a starting point and adapt it as you like.

08.12.2011
I have updated to v1.1 to fix a bug preventing the use of FieldInternalName for addressing the fields. Thanks to Ed MacIntosh (@cosmo132) for finding the bug.

I have previously done this article Multi line text field in list view: Shorten text and add hovereffect to view full text.

This post is an updated version to support both SharePoint 2007 and SharePoint 2010.

Features

This solution will shorten any text column (single line or multi line) in a list view to a preset length, and append “…” to indicate that the text is truncated. If the text is shorter than the “trigger length”, the cell is skipped.

How to set up

Go get jQuery v1.6.4 from here.
Note that this is NOT the latest version. I have not had the time to find out why v1.7+ does not work.

Download the code for the file “TruncateTextInListView.js” from here Note the different versions for SharePoint 2007 and SharePoint 2010.

Upload both files to a shared document library – or a folder in the root of the site (created with SharePoint Designer). Ensure all users have read access to the location.

Put a CEWP below the list view web part, and insert this code:

<script type="text/javascript" src="/test/English/Javascript/jquery-1.6.4.min.js"></script>
<script type="text/javascript" src="/test/English/Javascript/TruncateTextInListView.js"></script>
<script type="text/javascript">
	
function init_TruncateText(){
	truncateText('MultilineText',50,'');
}

</script>

Note:
You must change the “src” attribute of the script tags to point to your local copies of jQuery and “TruncateTextInListView.js”.

Parameters for the function “truncateText”

  • fieldName: The FieldInternalName for single line text fields or display name for Multi line text fields.
  • initialLength: The number of character to display.
  • inPlaceHoverText: This argument is optional and can be a text to show in place of the original text – like “hover to read”.

Ask if something is unclear.

Alexander

Compare date with today: status indicator in list view

Change log
May 03. 2013
Changes in v1.3:
Changed how the dateformat is read from “settings.dateFormat” to handle formats with four digit yyyy.

10.11.2012 Updated to v1.2 to add mouseover displaying days, hours and minutes. This update also includes the time portion of the “DueDate” in the calculation. Please note that the calculated column code must be changed if you want the time taken into account.

The CEWP code has not changes since the last release, but if you want to override the English text used in the mouseover, include this in your CEWP code (or modify in the file “HighlightRowByDueDate.js”:

var prefix = ["Due in ", "Overdue by "];
var tDays = ['day','s'];
var tHours = ['hour','s'];
var tMinutes = ['minute','s'];

30.11.2011 I had a bug that made it work for grouped views only. This is fixed in v1.1.
Only the code for the file “HighlightRowByDueDate.js” needs updating. Sorry for the inconvenience.


The first solution i posted in this blog was the Compare DueDate with Today in list view.

I have redone the solution and added support for SharePoint 2010 grouped views.

I have NOT included the mouseover “overdue by” text. If there is a demand for it, i could add it back in.

IMG

How to use

You put a CEWP below the list view web part. The actual code has been put in a separate file for use in multiple lists. The “function call” itself is placed in a CEWP below the list view web part.

The code for the file “HighlightRowByDueDate.js” is found here

Download the code and put in a text-file and place it in a shares document library (all users must have read access), or in a folder created in SharePoint Designer.

You should also put the CEWP-code in a text file in the same location and use the “Content Link” field in the “Edit web part” panel of the CEWP. This is most important in SharePoint 2010.

CEWP code

<script type="text/javascript" src="https://ajax.googleapis.com/ajax/libs/jquery/1.8.2/jquery.min.js"></script>
<script type="text/javascript" src="/test/English/Javascript/HighlightRowByDueDate.js"></script>
<script type="text/javascript">
/* Hightlight row by due date
 * ---------------------------------------------
 * Created by Alexander Bautz
 * alexander.bautz@gmail.com
 * https://spjsblog.com
 * ---------------------------------------------
 * This script depends upon functionality provided by jQuery - http://jquery.com
 * ---------------------------------------------
 * v1.2 - 10.11.2012
*/

function init_highlightOverdue(){
	var settings = {greenDays:'', // Green color for everything not yellow or red
					greenColor:"<img src='/_layouts/images/imnon.png' border='0'> ", // green image
					yellowDays:1, // Yellow color one day after due date has passed
					yellowColor:"<img src='/_layouts/images/imnaway.png' border='0'> ", // yellow inage
					redDays:2, // Red color two days after due date has passed
					redColor:"<img src='/_layouts/images/imnbusy.png' border='0'> ", // red image				
					dateFormat:'mm/dd/yy',
					identifierText:'Due:',
					replace:true};
	highlightOverdue(settings);
}
</script>

NOTE

You must change the “src” in the script tag referring the script “HighlightRowByDueDate.js” to reflect your local copy.

Parameters explained

  • greenDays: either an empty string ” to indicate “green for everything not yellow or red” or an integer (positive or negative) to indicate the “offset” to highlight green.
  • greenColor: The image or text / HTML yo mark the items as “green”.
  • yellowDays: The number of days (positive or negative) to offset the yellow marker.
  • yellowColor: The image or text / HTML yo mark the items as “yellow”.
  • redDays: The number of days (positive or negative) to offset the red marker.
  • redColor: The image or text / HTML yo mark the items as “red”.
  • dateFormat: The date format used in your calculated column (see details below).
  • identifierText: The lead-in text in the calculated column. This value is used to identify the cells to “treat”.
  • replace: true or false – should the “image” replace the text in the cell, or prepend to the value.

The calculated column

The “trigger” for the script is the lead in text in the calculated column – this text must match in the calculated column AND in the attribute “identifierText” in the settings object in the CEWP.

Note the text “Due:” in the calculated column in this example:
IMG

Note: The calculated column must be in the view to make the solution work.


Let me know if something is unclear

Alexander