All posts by Alexander Bautz

Hit counter and star rating for SharePoint

Change log
June 06. 2013
I have updated the code to v2.3 to fix some problems with “countOneHitPerUser”, “countOneHitPerUserPerDay” and “oneRatingPerUser” setting not working. Thanks to Jeroen for pointing this out.

April 23. 2013
I have updated the code to use spjs-utility.js and to support newer versions of jQuery. I have tested with v1.91. v2.0 has not been tested.

04.09.2011
I have changed code to allow turning off the star-rating function. The version number is 2.1.

The file “HitCounterAndStarRatingForSharePoint.js” and the CEWP code has changed.

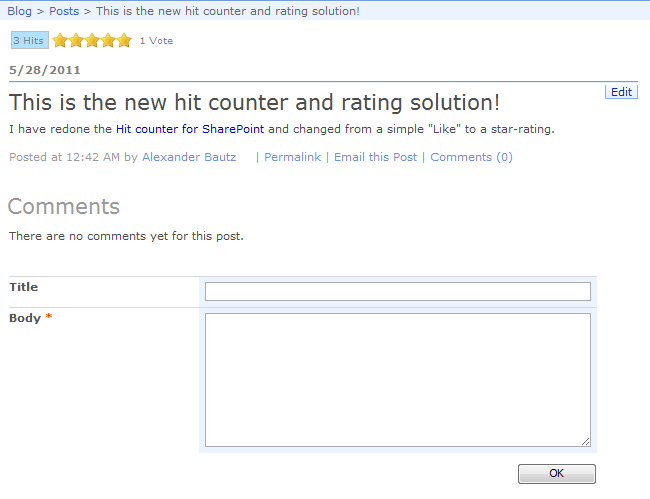
I have redone the Hit counter for SharePoint and changed from a simple “Like” to a star-rating.

I have done a total rebuild of the code and this new release will perform better in lists with a large number of hits.

Note: If your pages will have more than a few thousand hits, you most likely would want to hide the “hitcount” from the users. This has to do with the fact that rendering the number of hits in the browser requires the data to be pulled down to the client for counting.

As an example, 8000 “hits” will be a 2-3MB download to the client just to display the itemcount.

If you hide the counter from the user, you can still display the itemcount by looking at the “HitCounter-list” directly.

I would love to have a webservice that could return the itemcount from a given CAML query without having to pull down the entire XML-blob to the client. If someone has the knowledge to make such a webservice i would be more than happy to make it available here.

Here how it could look like in a blog:
IMG

How to setup the solution:


Step 1:
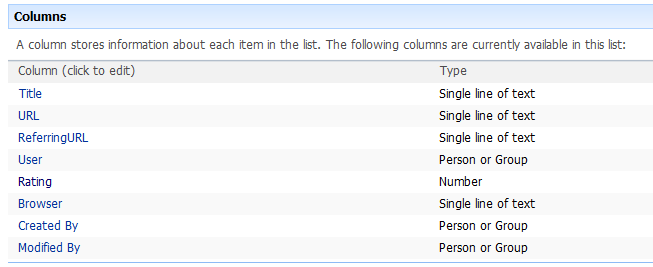
Create a list to hold the ratings. This list could be shared by all sites in a site collection if you point to it in the CEWP configuration option “counterListBaseUrl” and ensure all site users have write permission. The list should have these fields:
IMG


Step 2:
Download the code for the file “HitCounterAndStarRatingForSharePoint.js” and the images star_off.gifstar_on.gifstar_selected.gif from here, and spjs-utility.js from here

Put them in a document library where all users have read permission. If you are using SharePoint Designer you could put the files in a folder on the site collection root for safe storage.


Step 3:
Insert a CEWP with this code where you want the hitcounter/rating to appear:

Updated with reference to spjs-utility.js

<span id="hitAndLike"></span>
<script type="text/javascript" src="/test/English/Scripts/HitAndStar/jquery-1.9.1.min.js"></script>
<script type="text/javascript" src="/test/English/Scripts/HitAndStar/spjs-utility.js"></script>
<script type="text/javascript" src="/test/English/Scripts/HitAndStar/HitCounterAndStarRatingForSharePoint.js"></script>
<script type="text/javascript">
	var argObj = {counterListName:'HitCounter',
				  counterListBaseUrl:'/test/English/Blog/',
				  countHits:true,
				  hitCounterVisible:true,				  
				  countOneHitPerUser:false,
				  countOneHitPerUserPerDay:false,
				  hitSuffix:['Hit','Hits'],				  	  
				  isDispForm:true,
				  activateRating:true,
				  starImageSrc:['/test/English/blog/Scripts/HitCounter/star_off.gif',
				  				'/test/English/blog/Scripts/HitCounter/star_on.gif',
				  				'/test/English/blog/Scripts/HitCounter/star_selected.gif'],
				  starCount:5,
				  starMouseoverArr:['Very poor','Poor','Good','Very good','Fantastic'],
				  oneRatingPerUser:false,
				  ratingCountSuffix:['Vote','Votes'],
				  alreadyRatedMouseover:"You have already given this item {starCount} stars!",				  
				  debug:false};
	hitCounter(argObj);
</script>

NOTE:
Change the script src to reflect the location of your local file.

Note for SharePoint 2010 users:
You cannot put this code in the CEWP directly because of a “bug” in how the CEWP content is handled when editing the page. It basically incorporates the HTML generated by the script and thus corrupts the CEWP code.

To overcome this you must put the CEWP code in a text-file alongside the file “HitCounterAndStarRatingForSharePoint.js” and linking to it using the “Content link” option in the CEWP.

Configuration option:

  • counterListName: The GUID or the “DisplayName” of the hit counter list.
  • counterListBaseUrl: The baseUrl of the “HitCounter” list.
  • countHits: true or false. If false, no hits are recorded. Use this setting if you want star rating only.
  • hitCounterVisible: true or false. If false, the item count is not displayed to the end user. This setting is recommended if you expect a lot of hits and/or your users are on a low bandwidth connection. See note in the top of the article.
  • countOneHitPerUser: true or false. If true, only one hit will ever be recorder for an unique user. If false (and the next parameter also is false) all refreshes of the page will record a new hit in the “HitCounter” list.
  • countOneHitPerUserPerDay: If true, only one hit per day will be recorded for any unique user.
  • hitSuffix: An array with the hit suffix in singular and plural form.
  • isDispForm: true or false. If true, the item ID will be used to distinguish between records in the “HitCounter” list.
  • activateRating New in v2.1: true or false. Turns the star-rating part on or off.
  • starImageSrc: An array containing the relative URL to the 3 images representing the statuses “off”, “on” and “selected”.
  • starCount: The number of stars in you “rating control”. You can have as many as you like.
  • starMouseoverArr: An array of strings describing the rating steps. The text is displayed on mouse over on the star.
  • oneRatingPerUser: true or false. If true, one user can rate an item once.
  • ratingCountSuffix: An array with the rating suffix in singular and plural form.
  • alreadyRatedMouseover: The mouseover if a user has already rated an item. The text “{starcount}” will be replaced with the users rating.
  • debug: true or false. If true, a debug section will be displayed in the top of the screen providing all the configuration options and all variable used by the solution.

Learn how to find the list GUID or the ListBaseUrl

This solution is tested in SP2007 and in SP2010 with IE9.0, Firefox 4.0.1 and Chrome 11.0.696.68.

Copyright and disclaimer

I hope you all enjoy this code and please report any bugs in the comment section below.

Regards
Alexander

PS!

If you like this solution, please consider donating a few dollars to fund some flowers to my wife who must endure my continuous blogging…


Charting for SharePoint using Google Visualization API: Update 05.05.2011


I have posted a new version of the “Charting for SharePoint using Google Visualization API” – v2.8.5. The changes are described here, but the background story and the code is found in original article. This post describes the new features and changes from v2.8.

You should read the original post found here, and the update for v2.8 posted here.


Changes from v2.8:

  1. Removed option to “listen to” specific list filter columns using “{list:FieldInternalName}”
  2. Added option to “consume” a list view web part filter (read from the URL). You can now have the chart “connected” to a list view. Further details below. This new feature requires existing users to manually add one column to the configuration list: “ConsumeFilterFromListView”.
  3. Fixed a bug regarding the use of “&” in a custom filter field which broke the CAML
  4. Added a “counter” to display the total number of items below the chart
  5. Added a few “options” to be set in the CEWP code: “showFilterInfo”, “showItemCount”, “itemCountPrefix”, “itemCountSuffix”, “labelIfEmpty”. All these have a default value and are optional.
  6. Added option to pull the CAML from an existing list view to use as “Custom CAML”

Details on item number 2:

In v2.8 i introduced an option to “hook into” the list view veb part filter for specific columns. In this release this is removed and replaced with an option to “connect to” a list view web part and consume all filters applied to any column.

This has a few limitations:
It reads the filter values from the URL and therefore only one list view webpart can coexist with the chart. If more than one list view web part is placed alongside a chart, it would not know which list the filter came from.

To use this option, check this box:
IMG

This requires existing users to add one column to the configuration list: “ConsumeFilterFromListView”. For new users this field will be added automatically when creating the configuration list. The chart configuration list should look like this:
IMG

Details on item number 4:

I have added a “counter” to display the total number of items below the chart:
IMG
This counter can be switched off – see next item.

Details on item number 5:

These variables can be added to the CEWP code:

  • showFilterInfo: true [default] or false. Controls the visibility of the “filter label” below the chart when using a filter.
  • showItemCount: true [default] or false. Controls the visibility of the item count below the chart.
  • itemCountPrefix: A string to put in front of the item count. Default empty string.
  • itemCountSuffix: A string to add after the item count. Default ” items”.
  • labelIfEmpty: A string representing the default label for empty values. Default is “(empty)”.

Example CEWP code:

&lt;div id=&quot;MyChart1&quot;&gt;&lt;/div&gt;
&lt;div id=&quot;MyChart2&quot;&gt;&lt;/div&gt;
&lt;script type=&quot;text/javascript&quot;&gt;
/*****************************************************
		Address all containers
*****************************************************/
// All charts must be represented by a container with a unique id. This container  must be present in the page
arrOfChartContainers = [&quot;MyChart1&quot;,&quot;MyChart2&quot;];

var showFilterInfo = true;
var showItemCount = true;
var itemCountPrefix = &quot;A total of &quot;;
var itemCountSuffix = &quot; items&quot;;
var labelIfEmpty = &quot;(no value)&quot;;

&lt;/script&gt;
&lt;script type=&quot;text/javascript&quot; src=&quot;http://ajax.googleapis.com/ajax/libs/jquery/1.5.2/jquery.min.js&quot;&gt;&lt;/script&gt;
&lt;script type=&quot;text/javascript&quot; src=&quot;http://www.google.com/jsapi&quot;&gt;&lt;/script&gt;
&lt;script type=&quot;text/javascript&quot; src=&quot;/test/English/Charts/Javascript/v2.8.5/ChartUsingGoogleVisualizationAPI.js&quot;&gt;&lt;/script&gt;

Details on item number 6:

Use this link to pull the CAML from the list view:
IMG
Select a view in the “View selector” and click this link to pull it into the textarea.


Please post a comment if you have questions.

Alexander

Redirect from NewForm to DispForm or EditForm

Change log
July 29. 2013
I have fixed the code example as there were missing some backslashes for escaping quotes in a string. Thanks to Gary Poirier for alerting me.
03.03.2012
Updated the solution to use spjs-utility.js for compatibility with newer versions of jQuery. See download link below.
24.04.2011
I have added a few lines to take into account the dialog’s in SP2010.

I have done a few articles on this subject earlier, but here is another method which is simpler to use. What it does is to modify the form action in NewForm to redirect you to DispForm or EditForm after the form has been submitted. You are redirected without the ID parameter in the URL. When in DispForm or EditForm, the lack of an ID parameter triggers a query to find the last item added to the list by the current user.

This code examples refers jQuery from Google’s site. All other code is kept in the CEWP.

Note:
This example uses the parameter “_spUserId” which is provided by SharePoint and represents the logged in user’s ID. This code will not work for anonymous users.

Learn how to insert CEWP on NewForm, DispForm or EditForm

Start by adding this code in a CEWP below NewForm.aspx:

<script type="text/javascript" src="https://ajax.googleapis.com/ajax/libs/jquery/1.7.1/jquery.min.js"></script>
<script type="text/javascript">

function PreSaveAction(){
	var URL = location.pathname.replace('NewForm.aspx','DispForm.aspx');
	if(GetUrlKeyValue('IsDlg')==='1'){
		URL+="?IsDlg=1";
	}
	$("#aspnetForm").attr('action',location.pathname+"?Source="+URL);
	return true;
}

</script> 

This code will send you to “DispForm” when submitting the form. To have it redirect you to EditForm, replace “DispForm” with EditForm” in line 05.

In DispForm.aspx (or EditForm.aspx), add this code in a CEWP below the form:

<script type="text/javascript" src="https://ajax.googleapis.com/ajax/libs/jquery/1.7.1/jquery.min.js"></script>
<script type="text/javascript" src="/YourLocalScriptRepository/spjs-utility.js"></script>
<script type="text/javascript">
// List GUID or list display name of the current list
var thisListGuid = '{A162F3E2-32D8-4CA2-B849-14879CDC5494}';

// This code runs only if the ID parameter is omitted
if(GetUrlKeyValue('ID')===''){
	var lastID = getLastItemID();
	if(lastID!==''){
		var newURL = location.pathname+"?ID="+lastID;
		if(GetUrlKeyValue('IsDlg')==='1'){
			newURL+="&IsDlg=1";
		}
		location.href=newURL;
	}
}

/********************************************
	Do not modify anything below this line
*********************************************/
function getLastItemID(){	
	var queryBuffer = [];
		queryBuffer.push("<Where><Eq><FieldRef Name='Author' LookupId='TRUE' /><Value Type='User'>"+_spUserId+"</Value></Eq></Where>");
		queryBuffer.push("<OrderBy><FieldRef Name='ID' Ascending='FALSE' /></OrderBy>");
	var res = spjs_QueryItems({listName:thisListGuid,query:queryBuffer.join(''),viewFields:['ID'],rowLimit:1});
	if(res.count<0){
		alert("An error occurred. Most likely the parameter \"thisListGuid\" is wrong.");
	}else if(res.count>0){
		return res.items[0].ID;
	}else{
		return '';
	}
}
</script>

You find spjs-utility.js here. Ensure you get the latest version

If you prefer to use a local copy of jQuery, download it from here.

In line 05 you must provide the list GUID (recommended) or the display name of the current list. Learn how to find the list GUID

Ask if anything is unclear
Alexander

Toggle appended comments in multi line fields

I got this request from Tim:

Tim Says:
Is there a way to hide the appended comments to a multipe line field with version control. Actually can it a a click hide/show, and can it display the last comment by default? click it the see all pervious comments.

Larry got a bit on the way, but the appended comments are a bit different in a plain text field and in a rich text field. This approach splits up the comments and wraps them in new div’s to handle the visibility.

The end result looks like this:
DispForm:
IMG
EditForm:
IMG

Put this code in a CEWP below the form in DispForm.aspx or EditForm.aspx

&lt;script type=&quot;text/javascript&quot; src=&quot;https://ajax.googleapis.com/ajax/libs/jquery/1.5.2/jquery.min.js&quot;&gt;&lt;/script&gt;
&lt;script type=&quot;text/javascript&quot;&gt;
fields = init_fields_v2();

toggleAppendOnMultiline('MyRichText');
toggleAppendOnMultiline('MyPlainMultiLine');

function toggleAppendOnMultiline(fin){
var currField = $(fields[fin]);
var rich = (currField.find('.ms-formbody div:last').parent().find('div').length&gt;1)?true:false;
	if(rich){	
		var allArr = currField.find('.ms-formbody div:last').parent().find('div').remove();
	}else{
		var all = currField.find('.ms-formbody div:last').remove();
		var allArr = all.html().split(/&lt;br&gt;/i);
	}
	var buffer = [&quot;&lt;table style='width:410px'&gt;&lt;tr&gt;&lt;td valign='top' style='font-size:0.7em;width:99%'&gt;&quot;];
	$.each(allArr,function(i,part){
		var disp = &quot;block&quot;
		if(i&gt;0){
			disp = &quot;none&quot;;
		}
		buffer.push(&quot;&lt;div class='&quot;+fin+&quot;_dummyHide' style='display:&quot;+disp+&quot;'&gt;&quot;);
		if(rich){
			buffer.push($(part).html());
		}else{
			buffer.push(part)
		}
		buffer.push(&quot;&lt;/div&gt;&quot;)
	});
	buffer.push(&quot;&lt;/td&gt;&quot;);
	if(allArr.length&gt;1){
		buffer.push(&quot;&lt;td title='Toggle visibility' onclick='toggleShowAll(this,&quot;&quot;+fin+&quot;_dummyHide&quot;)' valign='top' style='cursor:pointer;'&gt;&quot;);
		buffer.push(&quot;&lt;div style='white-space:nowrap;border:1px silver solid;padding:2px;background-color:#ffffff'&gt;&quot;);	
		buffer.push(&quot;&lt;img style='vertical-align:middle' src='&quot;+L_Menu_BaseUrl+&quot;/_layouts/images/tpmax1.gif' border='0'&gt;&quot;);
		buffer.push(&quot;&lt;img style='vertical-align:middle' src='&quot;+L_Menu_BaseUrl+&quot;/_layouts/images/tpmax1.gif' border='0'&gt;&quot;);
		buffer.push(&quot;&lt;/div&gt;&quot;);
		buffer.push(&quot;&lt;/td&gt;&quot;);
	}
	buffer.push(&quot;&lt;/tr&gt;&lt;/table&gt;&quot;);	
	currField.find('.ms-formbody').append(buffer.join(''));
}

function toggleShowAll(elm,id){
var img = $(elm).find('img');
	if(img.attr('on')!=='1'){
		img.attr('src',L_Menu_BaseUrl+&quot;/_layouts/images/tpmin1.gif&quot;);
		img.attr('on','1');
	}else{
		img.attr('src',L_Menu_BaseUrl+&quot;/_layouts/images/tpmax1.gif&quot;);
		img.attr('on','0');
	}
	$(&quot;div.&quot;+id+&quot;:first&quot;).nextAll().toggle();
}

function init_fields_v2(){
	var res = {};
	$(&quot;td.ms-formbody&quot;).each(function(){
	var myMatch = $(this).html().match(/FieldName=&quot;(.+)&quot;s+FieldInternalName=&quot;(.+)&quot;s+FieldType=&quot;(.+)&quot;s+/);	
		if(myMatch!=null){
			// Display name
			var disp = myMatch[1];
			// FieldInternalName
			var fin = myMatch[2];
			// FieldType
			var type = myMatch[3];
			if(type=='SPFieldNote'){
				if($(this).find('script').length&gt;0){
					type=type+&quot;_HTML&quot;;
				}
			}
			if(type=='SPFieldLookup'){
				if($(this).find('input').length&gt;0){
					type=type+&quot;_Input&quot;;
				}
			}
			// Build object
			res[fin] = this.parentNode;
			res[fin].FieldDispName = disp;
			res[fin].FieldType = type;
		}		
	});
	return res;
}
&lt;/script&gt; 

Please note line 5 and 6 – i have addressed my two fields by FieldInternalName there. In the images, the comments in the field “MyRichText” has been toggled visible.

Alexander

Charting for SharePoint using Google Visualization API: Update 27.03.2011

05.05.2011 I have released version 2.8.5. Read about it here


I have posted a new version of the “Charting for SharePoint using Google Visualization API” – v2.8. The changes are described here, but the background story and the code is found in original article. This post describes the new features.


1. Filter the chart using a choice column from the list

IMG
The dropdown is created from the choice options supplied in the list settings for that column. You set the filter in the GUI like this:
IMG
You must use “custom CAML” and select “Create a filter field above the chart using”. In the dropdown you will find all the single-choice columns in your list. Click on the text “Build CAML from selected filters” to create the appropriate CAML query.


2. Manually build the dropdown filter

If you want to make a dropdown filter for your chart, filtering by a text in a single line choice column you can create it like this. Click “Create a filter field above the chart using”, and select “manual filter setup”. You can then build the filter manually. See the description below the “filter options” textarea for formatting options for the dropdown.

When using a manual filter setup and using “Build CAML from selected filters”, you must change the “FieldInternalNameToMatch” with the proper FieldInternalName of your target field in the CAML. In this example, switch the text “FieldInternalNameToMatch” with “Region”.
IMG
IMG


3. Filter the chart using a value from the URL query string

Use {url:ParameterName} as placeholder in the CAML.
IMG
Before the list is filtered, the chart looks like this:
IMG
Pass the filter in the URL like this:
IMG
IMG


4. Filter the chart by filtering the “attached” view

This only applies if the chart is in a page with a single list view. It reads the filter provided by the list filter action and filters the chart accordingly. There are no real connection between the list and the chart – it merely reads the URL and looks for a filter value matching the placeholder in the CAML.

Use {list:FieldInternalName} as placeholder in the CAML.
IMG
Before the list is filtered, the chart looks like this:
IMG
Filter the list by the appropriate column to render the chart.
IMG
IMG


Important

Users upgrading from v2.7 must add three columns to the configuration list:

  • UseCustomQueryFilter: Yes/No column (boolean)
  • CustomQueryFilterField: Single line text
  • CustomQueryFilterChoices: Multi line plain text

For new users, this list is automatically created, but for users upgrading from older versions these fields must be added manually. In that case, compare your configuration list with this image:
IMG


Bugfixes:
If a column name had “&” or “/” in it, the chart “broke”. Thanks to Eric Guy for finding the bug.

I might very well have forgotten something in this walktrough so please post any comment or question below.

Alexander

Accordion for SharePoint forms v2.0

19.03.2011 v2.1 adds the ability to call a function after the section has expanded. You can specify a shared function that will be called on every section, and/or a function that is called on one specific section.

The CEWP code must be updated from v2.0 to include the new parameters.


This solution is used to break up a SharePoint form into sections – like in an accordion.
IMG

Features

  • Full SP2007 and SP2010 support for both lists and document libraries
  • Works for all standard field types (Custom field types are not guaranteed to work)
  • A field can be used in multiple section
  • You can have a section displaying all fields
  • You can have a section catching all orphans (fields that are not displayed in any other section). Useful if one adds columns to a list without updating the script call.
  • Highlights section if a field fails validation upon save
  • Use a URL query string parameter to expand a specific section

Browser compatibility tested in:

  • IE6 (Works in SP2007 only due to SP2010 incompatibility with IE6)
  • IE7
  • IE8
  • Firefox 3.6.13
  • Google Chrome 8.0.552.237
  • Safari 5.0.2

How to use this solution

Download the code for the file “AccordionForSharePointForms.js” from this location

Upload the file to your script repository. This can be a shared document library in the site where you will be using the solution (ensure ALL users have read access).

For each of the forms (NewForm.aspx, DispForm.aspx and EditForm.aspx) add a Content Editor Web Part (CEWP) below the form.

For SharePoint 2007

To put the page in edit mode, modify the URL like this:
/Lists/Accordion/NewForm.aspx?toolpaneview=2
/Lists/Accordion/DispForm.aspx?ID=1&toolpaneview=2
/Lists/Accordion/EditForm.aspx?ID=1&toolpaneview=2

For SharePoint 2010

IMG

Add this code block to the CEWP:

&lt;script type=&quot;text/javascript&quot; src=&quot;https://ajax.googleapis.com/ajax/libs/jquery/1.5.1/jquery.min.js&quot;&gt;&lt;/script&gt;
&lt;script type=&quot;text/javascript&quot; src=&quot;/test/English/Javascript/Accordion/v2.0/AccordionForSharePointForms.js&quot;&gt;&lt;/script&gt;
&lt;script type=&quot;text/javascript&quot;&gt;

var accConstructor = {sections:[{name:'First section',fields:['InMultipleSections','Column1','Column2'],mouseOver:'This is the first section',sectionStyle:'',clickFunction:''},
							{name:'Second section',fields:['InMultipleSections','Column3','Column4','Lookup1','MyMultiLookup'],mouseOver:'This is the second section',sectionStyle:'',clickFunction:'secondSectionClick(this)'},
							{name:'Third section',fields:['InMultipleSections','Title'],mouseOver:'This is the third section',sectionStyle:'',clickFunction:''},
							{name:'Forth section',fields:['Column5','Column6','MyPeoplePicker'],mouseOver:'This is the forth section',sectionStyle:'',clickFunction:''},
							{name:'Attachments',fields:['attachments'],mouseOver:'',sectionStyle:'',clickFunction:''}],
					  settings:{viewAllFields:{show:true,position:'bottom',name:'All fields',mouseOver:'This section shows all fields',sectionStyle:'',clickFunction:''},
					  orphanFields:{show:true,name:'Orphans',mouseOver:'All orphan fields',sectionStyle:'',clickFunction:''},
					  bgColor:'#8EB4E8',
					  hoverColor:'#FFF68F',
					  selectedColor:'#C6E2FF',
					  formBgColor:'#C6E2FF'},
					  clickFunctionShared:'clickFunctionShared(this)'};

function clickFunctionShared(elm){
	var acc = $(elm);
	// This code is run on click on any section
}

function secondSectionClick(elm){
	var acc = $(elm);
	var arrOfFields = acc.attr('fields').split(',');
	alert(&quot;The fields included in the second section is these:n&quot;+arrOfFields);
}
				  
init_buildAccordionForm(accConstructor,'1');
&lt;/script&gt;

This is explained in detail below.
You must change the “src” to “AccordionForSharePointForms.js” to match your local file. If you like to use a local instance of jQuery, change that as well.

You must also change this example to match your columns FieldInternalName.

The call to the function “init_buildAccordionForm” takes two parameters:
accConstructor: The object constructed in “var accConstructor”.
selectedAcc: Integer that specifies which section to preselect.

Variable “accConstructor” explained:

IMG

Attachments

I have added the attachment row as a “field” you can insert in a selected section. It is named “attachments”. Look at the example CEWP code and the image.

How to find the FieldInternalName

Go to your list. Open one existing list element in DispForm.aspx. Right click and select “View source”. Search for “FieldInternalName”. All fields should be found in this format:
IMG

Link directly to a section:

Specify the section to preselect in the URL like this:
http://*************/Lists/Accordion/NewForm.aspx?sAcc=3

Note:

This is true only for unmodified forms. If you have modified the form in SharePoint designer, you will have to look at the function “init_fields_v2()” in the code to adapt it to your custom form. You will find a bit more information here.

Overriding native SharePoint functions

To overcome some issues with rich text fields I had to override one function: RTE_OnFocus.
I have added one line to the bottom of the function:
g_elemRTELastTextAreaConverted=document.getElementById(strBaseElementID);

To catch “empty field validation” on date and time columns “pre save”, I had to override the function “PreSaveItem”. I have added one line to the top of the function:
preSaveHighlightAccOnValidation();

This will not interfere with the use of the function “PreSaveAction” often used to “do stuff” before save.

Finale notes

The solution is licensed under the MIT X11 license. You find the license agreement by clicking the little (c) to the left of the lower button row.

I have set the initial release to v2.0 as I have previously posted a similar solution.

Ask if anything is unclear
Alexander

Tabs for SharePoint forms v2.0

26.11.2011 I have updated the script to v2.4 to attempt to fix some problems withe overlapping tabs in IE7. I have moved the files to another server. Follow the link under the “How to use this solution” section below. I have added one new “attibute” under the settings section in the CEWP code: “baseTabColor”. See below for details.


24.03.2011 Updated the script to fix an issue with the attachments. They now appear at the bottom of every tab – like in a unmodified form. If there are no attachments, the field is hidden.

In the CEWP-code the example-tab containing the attachments has been removed.


19.03.2011 v2.1 adds the ability to call a function after the tab has expanded. You can specify a shared function that will be called on every tab, and/or a function that is called on one specific tab.


This solution has previously been published over at NothingButSharePoint


This solution is used to “tab” SharePoint forms. If you have a long form, you can group fields together and present them in tabs for a better overview.
IMG

Features

  • Full SP2007 and SP2010 support for both lists and document libraries
  • Works for all standard field types (Custom field types are not guaranteed to work)
  • A field can be used in multiple tabs
  • You can have a tab displaying all fields
  • You can have a tab catching all orphans (fields that are not displayed in any other tab). Useful if one adds columns to a list without updating the script call.
  • Highlights tab if a field fails validation upon save
  • Use a URL query string parameter to expand a specific tab

Browser compatibility tested in:

  • IE6 (Works in SP2007 only due to SP2010 incompatibility with IE6)
  • IE7
  • IE8
  • Firefox 3.6.13
  • Google Chrome 8.0.552.237
  • Safari 5.0.2

How to use this solution

Download the code for the file “TabsForSharePointForms.js” from this location

Upload the file to your script repository. This can be a shared document library in the site where you will be using the solution (ensure ALL users have read access).

For each of the forms (NewForm.aspx, DispForm.aspx and EditForm.aspx) add a Content Editor Web Part (CEWP) below the form.

For SharePoint 2007

To put the page in edit mode, modify the URL like this:
/Lists/Tabs/NewForm.aspx?toolpaneview=2
/Lists/Tabs/DispForm.aspx?ID=1&toolpaneview=2
/Lists/Tabs/EditForm.aspx?ID=1&toolpaneview=2

For SharePoint 2010

IMG

Add this code block to the CEWP:

&lt;script type=&quot;text/javascript&quot; src=&quot;https://ajax.googleapis.com/ajax/libs/jquery/1.5.1/jquery.min.js&quot;&gt;&lt;/script&gt;
&lt;script type=&quot;text/javascript&quot; src=&quot;/test/English/Javascript/Tabs/TabsForSharePointForms.js&quot;&gt;&lt;/script&gt;
&lt;script type=&quot;text/javascript&quot;&gt;

var tabConstructor = {tabs:[{name:'First Tab',fields:['InMultipleTabs','Column1','Column2'],mouseOver:'This is the first tab',tabStyle:'',clickFunction:''},
							{name:'Second Tab',fields:['InMultipleTabs','Column3','Column4','Lookup1','MyMultiLookup'],mouseOver:'This is the second tab',tabStyle:'',clickFunction:'secondTabClick(this)'},
							{name:'Third Tab',fields:['InMultipleTabs','Title'],mouseOver:'This is the third tab',tabStyle:'',clickFunction:''},
							{name:'Forth Tab',fields:['Column5','Column6','MyPeoplePicker'],mouseOver:'This is the forth tab',tabStyle:'',clickFunction:''}],
					  settings:{viewAllFields:{show:true,name:'All fields',mouseOver:'This tab shows all fields',tabStyle:'',clickFunction:''},
					  orphanFields:{show:true,name:'...',mouseOver:'All orphan fields',tabStyle:'',clickFunction:''},
					  breakTabRowAt:null,
					  baseTabColor:'#F5F5F5',
					  hoverTabColor:'#FFF68F',
					  selectedTabColor:'#B9D3EE',
					  formBgColor:'#C6E2FF'},
					  clickFunctionShared:'clickFunctionShared(this)'};

function clickFunctionShared(elm){
	var tab = $(elm);
	// This code is run on click on any tab
}

function secondTabClick(elm){
	var tab = $(elm);
	var arrOfFields = tab.attr('fields').split(',');
	alert(&quot;The fields included in the second tab is these:n&quot;+arrOfFields);
}

init_buildTabbedForm(tabConstructor);
&lt;/script&gt;

This is explained in detail below.
You must change the “src” to “TabsForSharePointForms.js” to match your local file. If you like to use a local instance of jQuery, change that as well.

You must also change this example to match your columns FieldInternalName.

The call to the function “init_buildTabbedForm” takes two parameters:
tabConstructor: The object constructed in “var tabConstructor”.
selectedTab: Integer that specifies which tab to preselect.

Variable “tabConstructor” explained:

IMG

New in v2.4:

baseTabColor: Set the default background color for the tabs. See CEWP code for example.

Attachments

I have changed the attachment handling in v2.2. Now attachments are left untouched and they will display at the bottom of all tabs. If there are no attachments, the field is hidden.

How to find the FieldInternalName

Go to your list. Open one existing list element in DispForm.aspx. Right click and select “View source”. Search for “FieldInternalName”. All fields should be found in this format:
IMG

Link directly to a tab:

Specify the tab to preselect in the URL like this:
http://*************/Lists/Tabs/NewForm.aspx?sTab=3

Note:

This is true only for unmodified forms. If you have modified the form in SharePoint designer, you will have to look at the function “init_fields_v2()” in the code to adapt it to your custom form. You will find a bit more information here.

Overriding native SharePoint functions

To overcome some issues with rich text fields I had to override one function: RTE_OnFocus.
I have added one line to the bottom of the function:
g_elemRTELastTextAreaConverted=document.getElementById(strBaseElementID);

To catch “empty field validation” on date and time columns “pre save”, I had to override the function “PreSaveItem”. I have added one line to the top of the function:
preSaveHighlightTabOnValidation();

This will not interfere with the use of the function “PreSaveAction” often used to “do stuff” before save.

Finale notes

The solution is licensed under the MIT X11 license. You find the license agreement by clicking the little (c) to the right of the tabs.

I have set the initial release to v2.0 as I have previously posted a similar solution.

Ask if anything is unclear
Alexander

Slideshow for SharePoint

This is a repost of one of my articles article originally posted over at NothingButSharePoint.com


This solution lets you setup a smooth scrolling slideshow with data from your SharePoint list or your picture library. This solution displays all items in the specified view.

You can customize the appearance of the slideshow web part by changing the size of the slide, the scroll direction (both in and out), border style, background color and image, slide time and display time etc. See bottom of article for full configuration details.

You can have multiple slideshow web parts in one page and have them scroll independently (it would be messy to look at, but you can do it…).

Tested in IE8, Firefox 3.6.13, Safari 5.0.3 and Chrome 9.0.597.98 in both SharePoint 2007 and 2010.

Screenshots from the slideshow

IMG

IMG

Move the mouse over the slide to pause

IMG
The dummy text is snagged from here and the images from Google’s picture search on color-in line drawings

The tool pane:
The button on the left brings you to “NewForm” for that specific list (not available if you are pulling images from an image library).

The middle ones are “Previous slide”, “Resume slideshow” and “Next slide”. The button on the right takes you to “DispForm” for that specific item.

The configuration options:

  • listGuid: The GUID of the list you will pull information from – see below for instructions getting this GUID
  • listBaseUrl: The base URL (site URL, not list URL) of the site containing the list to pull from
  • listViewGuid: The GUID of the view you will pull information from – see below for instructions getting this GUID
  • viewFields: An array of all the fields you want to include – using FieldInternalName
  • viewFieldsStyle: An array that corresponds with the above array. Used to set an individual CSS style of the value
  • imageMax: Object literal with the parameters “height” and “width”. This represents the max-height OR the max-width of images that are either pulled from a picture library, or from a hyperlink field configured as “Image”. This does NOT apply to images embedded in a rich text field. Use only one parameter at the time to keep the image aspect ratio. The one not specified should have the value null
  • containerID: A unique ID (unique in the current page) for the slideshow container.
  • containerHeight: Height in pixles
  • containerWidth: Width in pixles
  • containerBorderStyle: CSS style for the border of the container
  • containerBgColor: Background color of the container
  • containerBgImg: Background image to use for the container
  • inDir: The direction to scroll in the content (n,nv,ne,s,sv,se,v,e)
  • outDir: The direction to scroll out the content (n,nv,ne,s,sv,se,v,e or fade)
  • displayTime: How long to display each slide – in milliseconds
  • slideTime: The slide time – in milliseconds
  • readMoreLink: true or false
  • readMoreText: If the above parameter is true – the text or image to click to go to DispForm for the specific item
  • addNewLink: true or false
  • addNewText: If the above parameter is true – the text or image to click to add a new item to the list
  • emptyCaution: If the list view contains no items – this is the text displayed in the first (and only) slide

How to find the listGuid, viewGuid and FieldInternalName:
Go to the list view that will provide the input for your scrolling web part. Right click somewhere in the list view webpart and select “view source”. Search for “ctx.listname”, and you will find something like this:
ctx.listName = “{A4B4E15A-C5B0-47BC-A08B-739CD48FE58A}”;
ctx.view = “{B83E87C1-D25A-47DE-8196-A0A12DB89106}”;

The value for “ctx.listName” is used as “listGuid”, and the value for “ctx.view” is used as “listViewGuid” in the configuration.

To find the FieldInternalName of your field, go to DispForm on any element in the list, right click and select “view source”. You find the FieldInternalNames by searching for the “FieldName” (the display name) of your field. The FieldInternalName is found like this:

<!-- FieldName="My new field"
    FieldInternalName="My_x0020_new_x0020_field"
    FieldType="SPFieldText"
-->

The code

Download the code for the file “SlideshowForSharePoint.js” here

Store the file in a document library or a dedicated script repository in your site collection. Ensure all users have read access to this repository.

Place the CEWP where you want the slideshow to appear and add this code:

<script type="text/javascript" src="https://ajax.googleapis.com/ajax/libs/jquery/1.5.0/jquery.min.js"></script>
<script type="text/javascript" src="/test/English/Javascript/SlideshowForSharePoint/SlideshowForSharePoint.js"></script>
<script type="text/javascript">

var myScrSettings = {'listGuid':'A4B4E15A-C5B0-47BC-A08B-739CD48FE58A',
	'listBaseUrl':'/test/English',
	'listViewGuid':'5BD378F4-25D5-4880-9C5B-1667FE43978D',
	'viewFields':['Title','MultiLine','Image'],	
	'viewFieldsStyle':['padding:5px;font-size:16px','padding:5px;font-style:italic','text-align:center'],
	'imageMax':{height:150,width:null},
	'containerID':'myScrollableDiv',
	'containerHeight':270,
	'containerWidth':500,
	'containerBorderStyle':'border:6px silver double',
	'containerBgColor':'#CAE1FF',
	'containerBgImg':'/test/English/Javascript/SlideShowForSharePoint/bgImg6.png',
	'inDir':'e',
	'outDir':'v',
	'displayTime':3000,
	'slideTime':1500,
	'readMoreLink':true,
	'readMoreText':"<img title='Go to item' src='/_layouts/images/magnify.gif' border='0'>",
	'addNewLink':true,
	'addNewText':"<img title='Add new item' src='/_layouts/images/newitem.gif' border='0'>",
	'emptyCaution':"<div style='height:100%;width:100%;padding-top:140px;text-align:center'>There are no items to show here..."};
	
init_fillScrollableDiv(myScrSettings);
</script>
Change at least the listGuid, listViewGuid, viewFields and the “script src” to the file “SlideshowForSharePoint.js”

Regarding picture libraries:

You do not have to provide any entries in the array for the “viewFields” – leave it empty like this []. If you like to put additional fields above the image, add them to the array as shown above.

Ask if something is unclear
Alexander