Category Archives: Form modification

Edit the title property of a field to add custom tooltip

29.10.2009 Update: I have written a new article on how to add HTML-style tool tip – read it here.


I got a request for a method of adding a custom mouse-over tool tip on a field in a SharePoint form. Here is a quick example.

As always we start like this:
Create a document library to hold your scripts (or a folder on the root created in SharePoint Designer). In this example i have made a document library with a relative URL of “/test/English/Javascript” (a sub site named “test” with a sub site named “English” with a document library named “Javascript”):
IMG

The jQuery-library is found here. The pictures and the sourcecode refers to jquery-1.3.2.min. If you download another version, be sure to update the script reference in the sourcecode.

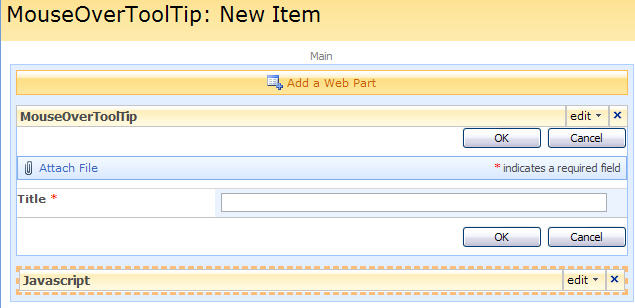
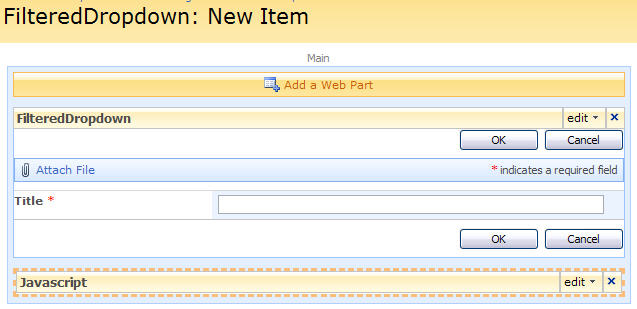
Add a CEWP below your list-form like this:IMG

And add this code:

<script type="text/javascript" src="/test/English/Javascript/jquery-1.3.2.min.js"></script>
<script type="text/javascript">
fields = init_fields();

$(fields['Title']).find('input').attr('title','This is a new mouse-over tooltip');

function init_fields(){
  var res = {};
  $("td.ms-formbody").each(function(){
	  if($(this).html().indexOf('FieldInternalName="')<0) return;	
	  var start = $(this).html().indexOf('FieldInternalName="')+19;
	  var stopp = $(this).html().indexOf('FieldType="')-7; 
	  var nm = $(this).html().substring(start,stopp);
	  res[nm] = this.parentNode;
  });
  return res;
}
</script>

The tooltip should look like this:
IMG

Ask if this example is not enough.

Alexander

Hide empty rows in DispForm

17.06.2010 Updated code to support this heading script: Headings in SharePoint Forms – jQuery

Have you ever wanted to hide rows from your DispForm if they are empty?

As always we start like this:
Create a document library to hold your scripts (or a folder on the root created in SharePoint Designer). In this example i have made a document library with a relative URL of “/test/English/Javascript” (a sub site named “test” with a sub site named “English” with a document library named “Javascript”):
IMG

The jQuery-library is found here. The pictures and the sourcecode refers to jquery-1.3.2.min. If you download another version, be sure to update the script reference in the sourcecode.

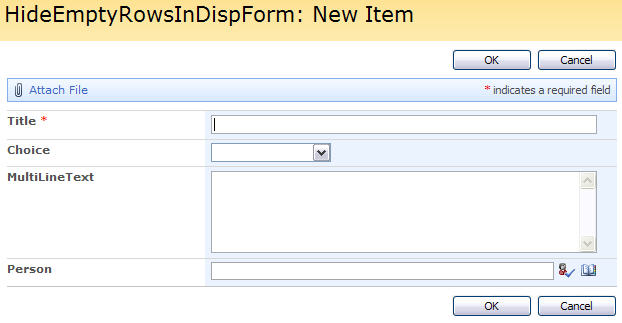
To begin with NewForm looks like this:
IMG

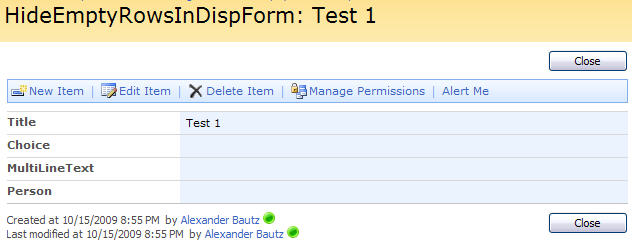
And your DispForm like this:
IMG

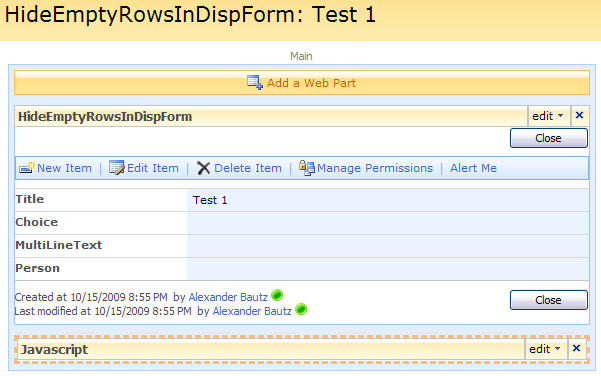
Add a CEWP below your DispForm list-form like this:
IMG

With this code:

$("td.ms-formbody").each(function(){
// Trim off all white spaces
var val = $(this).text().replace(/\s|xA0/g,'');
// Check the string length - if it's 0 hide the field
	// If it is not a heading - hide it
	if($(this).parents().html().match('FieldName="#H#')==null){
		if(val.length==0){
			$(this).parents('tr:first').hide();
		}
	}
});

Now your DispForm should look like this:
IMG

If you want to hide the table row based on other criteria, adapt the check in line 7 to fit your need – either it’s by length or it’s by string comparison.

Regards
Alexander

Accumulate selections from dropdown to mulitline textfield

19.02.2010: Updated the post with a code example for setting this drop downs as required (requested by Larry). You find the code at the bottom of the article.

28.12.2009: Updated to add support for an optional delimiter character. I have also updated the functionality so that the selection now is moved from the drop down to the “Accumulated selection” when selected (and back when removed from the selection).


This article demonstrates a solution for accumulating single choice selections from a drop down to a hidden multi-line text-field.

As always we start like this:
Create a document library to hold your scripts (or a folder on the root created in SharePoint Designer). In this example i have made a document library with a relative URL of “/test/English/Javascript” (a sub site named “test” with a sub site named “English” with a document library named “Javascript”):
IMG

The jQuery-library is found here. The pictures and the sourcecode refers to jquery-1.3.2.min. If you download another version, be sure to update the script reference in the sourcecode.

The sourcecode for the file “AccumulateSelectionsToMultilineText.js” is found below.

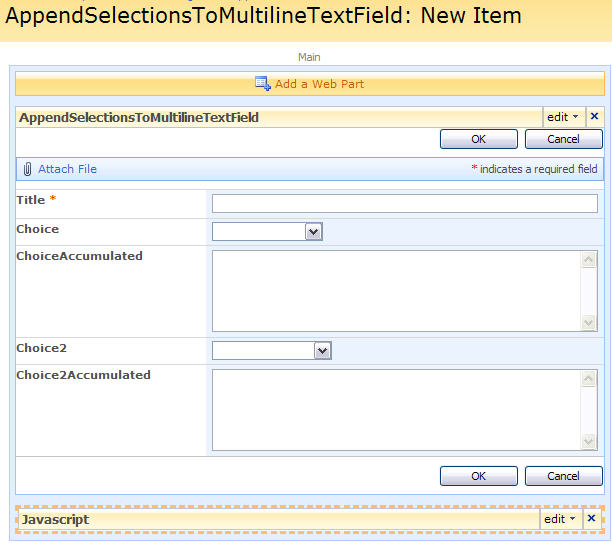
Add the columns to your list like the picture below. I have two Choice columns with some random choices and a multi-line plain text column to accumulate the selections in.

NOTE:
The default selection must be blank to be able to select the “first value” and accumulate it as the function triggers on change event on the Choice columns.

Add a CEWP below your NewForm list-form (and EditForm if you like) like this:
IMG

With this code:

<script type="text/javascript" src="/test/English/Javascript/jquery-1.3.2.min.js"></script>
<script type="text/javascript" src="/test/English/Javascript/AccumulateSelectionsToMultilineText.js"></script>
<script type="text/javascript">
// Array of fields to accumulate values from - format: FieldInternalName of select [delimiter] FieldInternalName of hidden accumulation field
arrFieldsToAccumulate = ['Choice|ChoiceAccumulated','Choice2|Choice2Accumulated'];
// Call function to iterate trough all constellations of fields and hidden accumulator-fields in array defined above
// The function "addAccumulateFunctionOnLoad" now takes one argument: sepChar. This is the  optional delimiter character to separate the selected values
addAccumulateFunctionOnLoad(';');
</script>

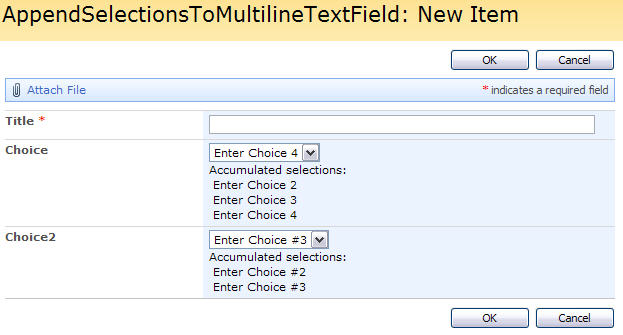
Your NewForm should now look like this:
IMG
Note: The 28.12.2009-update now moves the selection from the dropdown and to the “Accumulated selections”.

And your list view should look like this:
IMG

Some info:

  • The selected values are stored in custom div’s and added to the hidden multi-line text-field when clicking the “OK” button
  • The delimiter in the multi-line text-field is “n”, and the choices therefore is rendered in separate lines in the list-view and in DispForm.aspx
  • The code handles page reload due to form validation and “preserves” the values (it reads them back from the hidden field and rewrites the custom div’s)
  • Note that the actual selection-dropdown is cleared upon form submission
  • When in NewForm or EditForm, a click on one of the accumulated selected values removes the selected element

Sourcecode for the file “AccumulateSelectionsToMultilineText.js”:

/* Accumulate selections from dropdown to multi-line text-column
 * ---------------------------------------------
 * Created by Alexander Bautz
 * alexander.bautz@gmail.com
 * https://spjsblog.com
 * LastMod: 26.12.2009
 * ---------------------------------------------
 * Must include reference to jQuery
 * ---------------------------------------------
 *
 * Call from CEWP BELOW the list form in NewForm.aspx or EditForm.aspx with the code provided in the blog post.
*/
fields = init_fields();

function addAccumulateFunctionOnLoad(sepChar){
if(typeof(sepChar)=='undefined'){
	separatorChar = '';
}else{
	separatorChar = sepChar;
}

	$.each(arrFieldsToAccumulate, function(idx,item){
		var split = item.split('|');
		var from = split[0];
		var to = split[1];
		accumulateOnSelect(from,to);
	});
}

function accumulateOnSelect(fieldFrom,fieldTo){
	// Hide the "hidden" accumulation-input
	$(fields[fieldTo]).hide();
	// Add onchange on select
	$(fields[fieldFrom]).find('select').change(function(){
		if($(this).find('option:selected').val()!=''){		
			appendValuesFromSelect(fieldFrom);
		}
	});
	
	var selectFromTd = $(fields[fieldFrom]).find('.ms-formbody');
		selectFromTd.append("<span>Accumulated selections:</span>");
	var currentSelections = $(fields[fieldTo]).find(':input').val().split("n");
	$.each(currentSelections,function(idx,itemValue){
		if(itemValue!=''){
			var newSel = customAddSelection(fieldFrom,itemValue);			
			// Append new selection
			selectFromTd.append(newSel);
		}	
		// Remove the selected value from the drop down					  	
		selectFromTd.find('select option').each(function(){
			if(itemValue!=''){
				var iVal = handleSeparatorChar(itemValue,true);
				if($(this).val()==iVal){
					$(this).remove();
				}
			}
		});
	});	
addCustomClassAttr(fieldFrom);
}

function appendValuesFromSelect(fieldFrom){
	var selectFromTd = $(fields[fieldFrom]).find('.ms-formbody');
	var selectedOpt = selectFromTd.find('select option:selected');
	var selectedvalue = selectedOpt.val();
	if(selectedvalue!=''){
		var newSel = customAddSelection(fieldFrom,selectedvalue);
		// Append new selection
		selectFromTd.append(newSel);	
		// Remove the selected value from the drop down		  	
		selectedOpt.remove();
		// Add hover effect
		addCustomClassAttr(fieldFrom);
	}
}

function customAddSelection(fField,sValue){
sValue = handleSeparatorChar(sValue,false);
var newDiv = $("<div title='Click to remove from selection' " +
				"class='dummyClass_" + fField + "' " +
				"style='cursor:pointer;padding-left:4px'>" + sValue + "</div>");
// Add one time onclick even
newDiv.one("click",function(){removeSelectedDiv($(this))});
return newDiv;
}

function addCustomClassAttr(fieldFrom){
	$(".dummyClass_" + fieldFrom).hover(function(){
		$(this).addClass("ms-alternating");						
	},
	function(){
		$(this).removeClass("ms-alternating");	
	});	
}

function removeSelectedDiv(obj){
var objVal = obj.text();
var objVal = handleSeparatorChar(objVal,true);
obj.parents('td:first').find('select').append("<option value='" + objVal + "'>" + objVal + "</option>");
	obj.css({'background-color':'red'});
	obj.fadeTo(450,0,function(){obj.remove();});	
}

function handleSeparatorChar(str,remove){
var newStr = '';
	if(separatorChar==''){
		newStr = str;	
	}else{
		if(remove){
			newStr = str.substring(0,str.indexOf(separatorChar));
		}else{
			if(str.indexOf(separatorChar)>-1){
				newStr = str;
			}else{
				newStr = str + separatorChar;
			}			
		}
	}
	return newStr;
}

function PreSaveAction(){
	$.each(arrFieldsToAccumulate, function(idx,item){
		var from = item.split('|')[0];
		var to = item.split('|')[1];
		// Find all selected values
		var str = '';
		$(".dummyClass_" + from).each(function(){
			if($(this).text()!=''){
				str += $(this).text() + "n";
			}
		});
		// Insert the values in the hidden field	
		$(fields[to]).find(':input').val(str);
	});
return true; 
}

function init_fields(){
  var res = {};
  $("td.ms-formbody").each(function(){
	  if($(this).html().indexOf('FieldInternalName="')<0) return;
	  var start = $(this).html().indexOf('FieldInternalName="')+19;
	  var stopp = $(this).html().indexOf('FieldType="')-7;
	  var nm = $(this).html().substring(start,stopp);
	  res[nm] = this.parentNode;
  });
  return res;
}

Save the file as “AccumulateSelectionsToMultilineText.js” and upload to the document library or folder as described above.

How to set the fields as required:
Open the file “AccumulateSelectionsToMultilineText.js” and remove the function PreSaveAction(). Then you add this modified PreSaveAction(), and the lines for setting the red “required field” star after the label to the CEWP code.

You can NOT set the field as requires under list settings.

// Red star
$(fields['Choice']).find('.ms-formlabel h3').append("<span class='ms-formvalidation'> *</span>");
$(fields['Choice2']).find('.ms-formlabel h3').append("<span class='ms-formvalidation'> *</span>");

function PreSaveAction(){
var okToSave = true;
	$.each(arrFieldsToAccumulate, function(idx,item){
		var from = item.split('|')[0];
		var to = item.split('|')[1];
		// Find all selected values
		var str = '';
		$(".dummyClass_" + from).each(function(){
			if($(this).text()!=''){
				str += $(this).text() + "n";
			}
		});
		// Insert the values in the hidden field
		$(fields[to]).find(':input').val(str);
		// Remove validation message to avoid multiple messages
		$(fields[from]).find('.ms-formbody div.ms-formvalidation').remove();
		// Check if the "to-field" is empty, and that the field is set to required
		if(str=='' && $(fields[from]).find('.ms-formlabel span.ms-formvalidation').length==1){			
			// Add validation message
			$(fields[from]).find('.ms-formbody').append("<div class='ms-formvalidation'>You must specify a value for this required field.</div>");
			// Set "save item" to false
			okToSave = false;		
		}

	});
// Returns true or false
return okToSave; 
}

Please ask if something is not clear to you.

Alexander

Narrowing list form to one column

Updated 10.10.2009: To use this script with the script Headings in SharePoint Forms – jQuery you must set the parameter “stretch” for the heading script to false. You must also call the heading script before the “Narrowing list form to one column-script”.

I have made a tiny update to the heading script to support setting the backgound color when using it with “Narrowing list form to one column-script”.


I got a request for a solution to narrow down the list form to one column with the “formlabel” above the “formbody”.
This is actually a very simple task.

As always we start like this:
Create a document library to hold your scripts (or a folder on the root created in SharePoint Designer). In this example i have made a document library with a relative URL of “/test/English/Javascript” (a sub site named “test” with a sub site named “English” with a document library named “Javascript”):
IMG
The jQuery-library is found here. The pictures and the sourcecode refers to jquery-1.3.2.min. If you download another version, be sure to update the script reference in the sourcecode.

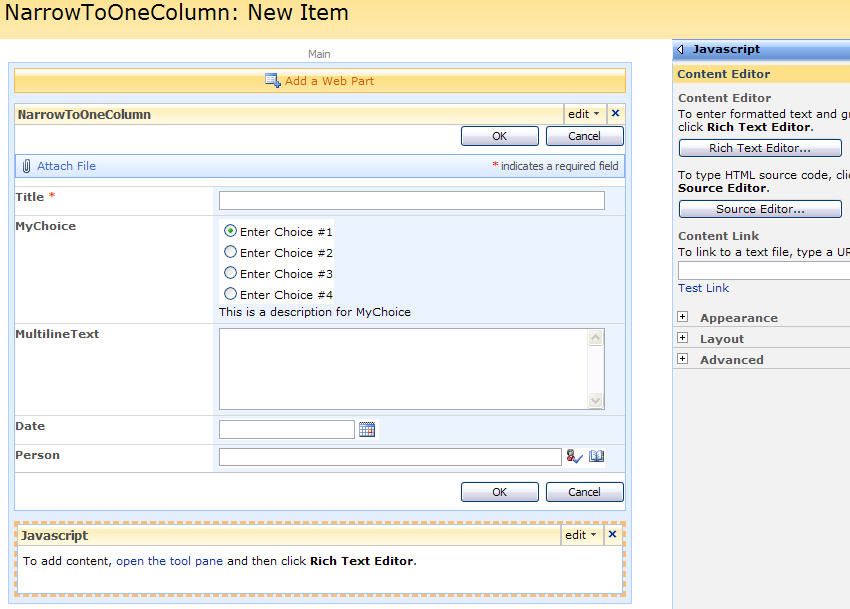
Add a CEWP below your NewForm list-form (and EditForm if you like) like this:
IMG

Add this code to the CEWP:

<script type="text/javascript" src="/test/English/Javascript/jquery-1.3.2.min.js"></script>
<script type="text/javascript">
$(document).ready (function() {	
	// This image sets the width of the form to min 590px - it must be removed
	$('#onetIDListForm img[width=590]').remove();	
});

$("td.ms-formlabel").each(function(){
	// Get the html of the formlabel
	var label = $(this).html();	
	// Insert the label over the formbody
	$(this).parents('tr:first').find('.ms-formbody').prepend(label);
	// Remove the original label
	$(this).remove();
	
});
</script>

Note: If you use this solution with other solutions that modifies the formbody – like the Wrap choice-field in multiple columns, you have to call this script last to have the “formlabel” added in the right position.

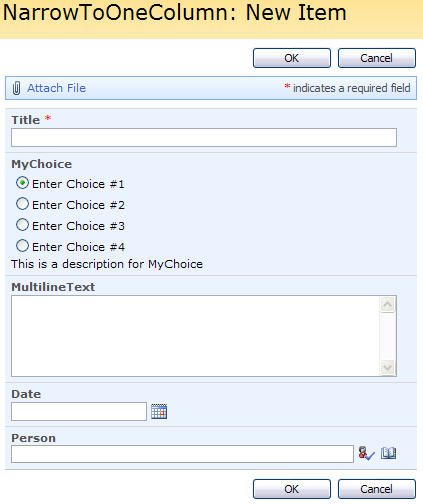
Your end result should look like this:
IMG

As always – ask if you do not understand how to use this script

Alexander

Add individual label for each choice in multichoice list

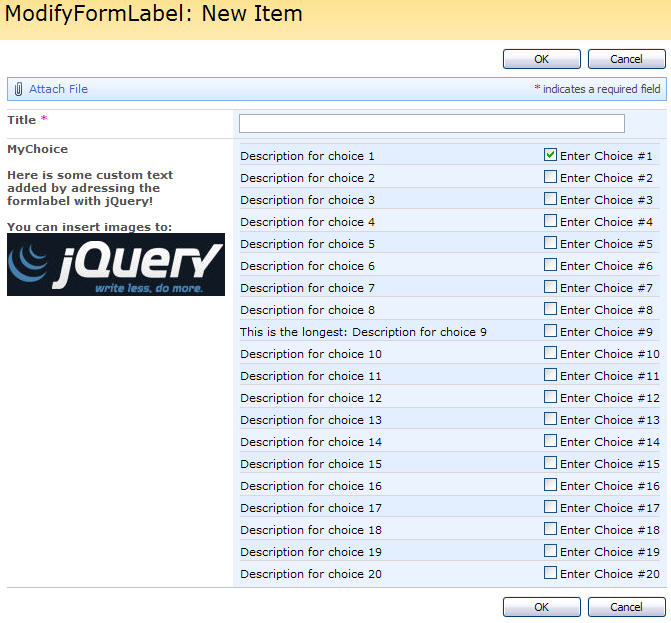
This post describes how to add individual labels for each choice in a multi choice list.
This is a follow-up on the post on how to modify formlabel in SharePoint form.

The end result looks like this:
IMG

Read the previous post to get the basics, then modify the code like this:

<script type="text/javascript" src="/test/English/Javascript/jquery-1.3.2.min.js"></script>
<script type="text/javascript">
fields = init_fields();

var myNewLabel = "<br><div>Here is some custom text added by adressing the formlabel with jQuery!</div>" +
				 "<br><div>You can insert images to:<br><img src='/test/English/Shared%20Documents/jQuery_img.jpg' border='0'></div>"

$(fields['MyChoice']).find(".ms-formlabel h3").after(myNewLabel);

// Array of all descriptions - must be the same number of elements as the number of choices in the choice-list
var arrMyChoice = ['Description for choice 1',
				'Description for choice 2',
				'Description for choice 3',
				'Description for choice 4',
				'Description for choice 5',
				'Description for choice 6',
				'Description for choice 7',
				'Description for choice 8',
				'This is the longest: Description for choice 9',
				'Description for choice 10',
				'Description for choice 11',
				'Description for choice 12',
				'Description for choice 13',
				'Description for choice 14',
				'Description for choice 15',
				'Description for choice 16',
				'Description for choice 17',
				'Description for choice 18',
				'Description for choice 19',
				'Description for choice 20'];

// Call the script that inserts the descriptions
descriptionBeforeChoice('MyChoice',arrMyChoice,300);

function descriptionBeforeChoice(FieldInternalName,arrName,widthOfCustomLabel){
	$(fields[FieldInternalName]).find(".ms-formbody").find(":checkbox").each(function(idx){
		// Add alternating style to make it easier to follow the lines in the form
		var trClass = '';
		if(idx%2==0){
			trClass = 'ms-alternatingstrong';
		}
		$(this).before("<span style='display:inline-block;width:" + widthOfCustomLabel + ";white-space:nowrap'>" + arrName[idx] + "</span>")
			.parent().css({'white-space':'nowrap'})
			.parents('tr:first').addClass(trClass);
	});
}

function init_fields(){
  var res = {};
  $("td.ms-formbody").each(function(){
	  if($(this).html().indexOf('FieldInternalName="')<0) return;	
	  var start = $(this).html().indexOf('FieldInternalName="')+19;
	  var stopp = $(this).html().indexOf('FieldType="')-7; 
	  var nm = $(this).html().substring(start,stopp);
	  res[nm] = this.parentNode;
  });
  return res;
}
</script>

Follow up: Get variables in a script from another list

Feel free to ask if anything is unclear!
Alexander

Modify formlabel in SharePoint form

I got a request for a method to edit the form label of a SharePoint form. Basically this i very easy.

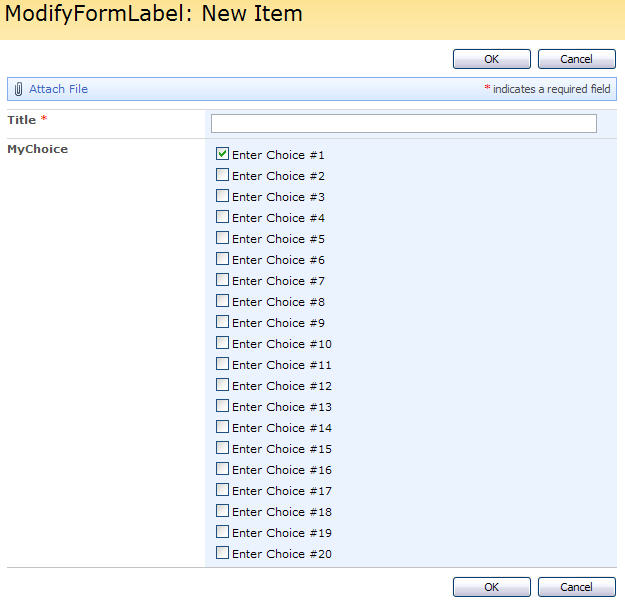
This is how it looks by default:
IMG

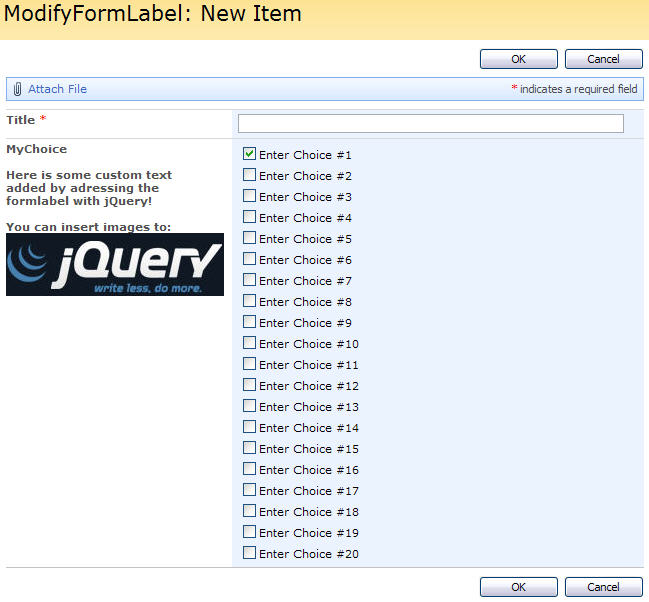
By adding a few lines of code it can look like this:
IMG

How is it done?


As always we start like this:
Create a document library to hold your scripts (or a folder on the root created in SharePoint Designer). In this example i have made a document library with a relative URL of “/test/English/Javascript” (a sub site named “test” with a sub site named “English” with a document library named “Javascript”):
IMG

The jQuery-library is found here. The pictures and the sourcecode refers to jquery-1.3.2.min. If you download another version, be sure to update the script reference in the sourcecode.

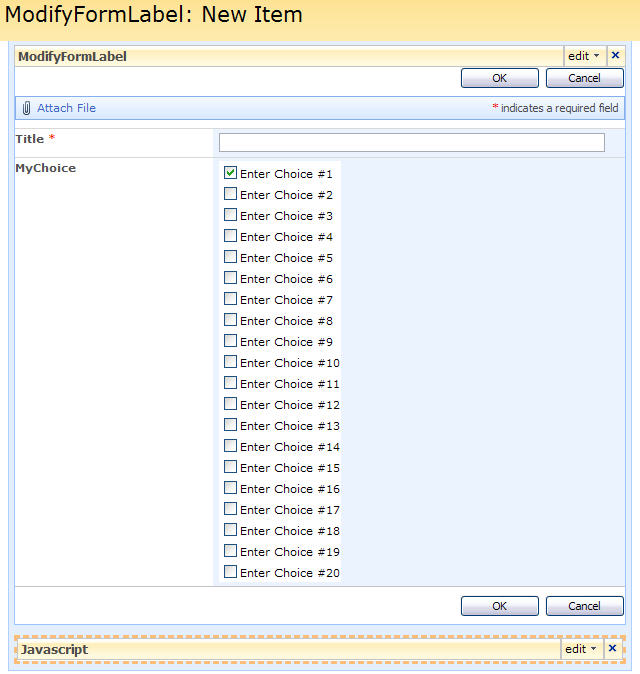
Add a CEWP below your NewForm list-form (and EditForm if you like) like this:
IMG

With this code:

<script type="text/javascript" src="/test/English/Javascript/jquery-1.3.2.min.js"></script>
<script type="text/javascript">
fields = init_fields();

var myNewLabel = "<br><div>Here is some custom text added by adressing the formlabel with jQuery!</div>" +
				 "<br><div>You can insert images to:<br><img src='/test/English/Shared%20Documents/jQuery_img.jpg' border='0'></div>"

$(fields['MyChoice']).find(".ms-formlabel h3").after(myNewLabel);

function init_fields(){
  var res = {};
  $("td.ms-formbody").each(function(){
	  if($(this).html().indexOf('FieldInternalName="')<0) return;	
	  var start = $(this).html().indexOf('FieldInternalName="')+19;
	  var stopp = $(this).html().indexOf('FieldType="')-7; 
	  var nm = $(this).html().substring(start,stopp);
	  res[nm] = this.parentNode;
  });
  return res;
}
</script>

The function init_fields() is a modified version of Erucy’s function for finding fields in a SharePoint form. My modified version uses FieldInternalName rather than DisplayName to locate the fields.

Thats it!
Alexander

If you want to add individual labels for each of the choices in the choice list- read this post to learn how.

Convert Singleline textfield to filtered lookup dropdown

08.04.2011 A small makeover to get rid of some extra script references and to add compatibility to all major browsers.


This one is related to my post on Cascading dropdowns, but is used to convert one column of type “Single line of text” or a column of type “Hyperlink or Picture” to a filtered dropdown.

You can populate this dropdown from any list in current site, sub site or parent site – as long as the user has read access to the list holding the information. The lookup can be against all elements – or filtered by any metadata in the source list item – like an “active/inactive” – Yes/No Checkbox-column.

In your list – add a column of type “Single line of text”, with a nice “FieldInternalName” (a name without spaces and special characters) – you can edit the column name as soon as the column is created to get a readable “DisplayName”. It is this newly created “Single line of text-column” that is to be converted to a dropdown. by this script. In this example I have used the “Title-column” as the field to convert.

As always we start like this:
Create a document library to hold your scripts (or a folder on the root created in SharePoint Designer). Make sure all users have read access to that folder.

Download the file “dropdownFromTextOrHyperlinkField.js” from here

Upload it to the selected folder.

Add a CEWP below your NewForm list-form (and EditForm if you like) like this:

IMG
With this code:

<script type="text/javascript" src="https://ajax.googleapis.com/ajax/libs/jquery/1.5.2/jquery.min.js"></script>
<script type="text/javascript" src="/test/English/Javascript/dropdownFromTextOrHyperlinkField.js"></script>
<script type="text/javascript">
fields = init_fields_v2();

singleFilteredDropdown('{1b128964-7075-491a-be7b-55c40d94714b}',L_Menu_BaseUrl,'Title','Active','Boolean','Eq','1',false,'DropdownNr1','<select>','Title',true,false,false);

</script>

Please note that the call to “init_fields_v2()” has changed from “init_fieldInternalName()” from earlier versions. You have to change the “src” to the file “dropdownFromTextOrHyperlinkField.js” to match your local path.

The list that is source for my lookup has a listGuid of {1b128964-7075-491a-be7b-55c40d94714b}, a Yes/No column named Active, and the Title column which holds the value to populate the dropdown.

IMG

The source list is located in the same site as the target list – hence the variable L_Menu_BaseUrl which SharePoint provides for us.

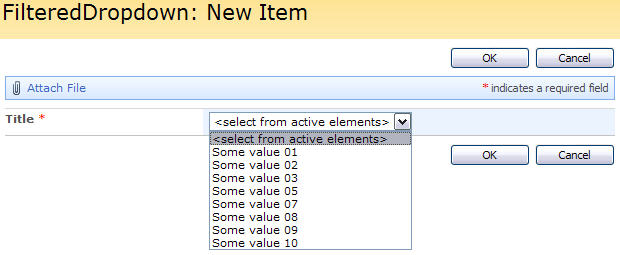
You should end up with a result like this:
IMG
Here some of the elements in the sourcelist is set to “inactive”:
IMG

To get a hyperlink back to the selected element – use a column of type “Hyperlink or Picture” – with hyperlink format, and change the parameter “showAsURL” to true.

Please ask if something is unclear.

Alexander

Headings in SharePoint Forms – jQuery

01.03.2010 Added another method of building headings here: Headings for SharePoint forms – another method

Modified 10.10.2009: Small update for compatibility with the script Narrowing list form to one column.

This script adds heading-support to a custom SharePoint List by using a “prefix” in the field name of a standard “Single line of text” field, and a script to search all column names and reformat it as a heading in NewForm, DispForm and EditForm.

Create the “headings” by adding a column of type “Single line of text” to your list – and prefix your heading with #H# in the column name like this #H#ThisIsMyHeading. You specify the font size in pixes like this #H#17#ThisIsMyHeading, and you can add a custom color to the heading by adding a hex-color code like this #H#17#FF0000#ThisIsMyHeading.

You can also add a background color to your heading as a parameter in your script call like this:

// Specify color like this
showHeadings(190,true,false,true,'#ebf3ff');
// Or inherit like this:
showHeadings(190,true,false,true,$('.ms-formbody').css('background-color'));

As always we start like this:
Create a document library to hold your scripts (or a folder on the root created in SharePoint Designer). In this example i have made a document library with a relative URL of “/test/English/Javascript” (a subsite named “test” with a subsite named “English” with a document library named “Javascript”):
IMG

The script “HeadingsInSharePointLists.js” has this sourcecode:

/* Headings from "Single line of text"
 * ---------------------------------------------
 * Created by Alexander Bautz
 * alexander.bautz@gmail.com
 * https://spjsblog.com
 * LastMod: 10.10.2009
 * ---------------------------------------------
   Example: Create a field of type "Single line of text" like this:
   #H#17#FF0000#This is a RED heading

  	 #H# - Defines heading
 	 17 - Font size
 	 #FF0000# - [optional] color

   If used without specifying the color it looks like this:
 	 #H#17#This is a heading 

Call like this in NewForm.aspx, DispForm.aspx or EditForm.aspx:
  <script type="text/javascript" src="/test/English/Javascript/jquery-1.3.2.min.js"></script>
  <script type="text/javascript" src="/test/English/Javascript/HeadingsInSharePointLists.js"></script>
  <script type="text/javascript">
    showHeadings(190,true,false,true,'#ebf3ff');
  </script>

  Parameters explained:
  divWidth: The width of the "label" colomn - where the fieldname is found. This script removes the nobr-tag from the label
            to prevent long field names to distort the column width.
  paddingTop: Adds a br-tag above the heading to make some air
  paddingBottom: Adds a br-tag below the heading to make some air
  stretch: Adds "colspan:2" to make the heading stretch to the full width of the list form
  bgColor: Background - [optional] background color of the td-tag. You can "copy" the color from
  		   another style to make the background adapt to changing site themes by using this as the
  		   parameter bgColor (no quotes - it's not a string):
  		   $('.ms-formbody').css('background-color')
  		   
  Note: To use with the script "Narrowing list form to one column", you must set the parameter "stretch" to false. 
  You must also call this script before the "Narrowing list form to one column-script".  		   
*/

function showHeadings(divWidth,paddingTop,paddingBottom,stretch,bgColor){
if(divWidth==undefined || divWidth=='')divWidth=190;
	$("td.ms-formlabel").each(function(){
		$(this).children().children('nobr').replaceWith('<div>' + $(this).children().children('nobr').html() + '</div>'); // Removes nobr-tag from label
		$(this).attr('width',divWidth); // Width of all "td.ms-formlabel"
		if($(this).text().match('#H#')){ // It's a heading
			var customDiv = $("<div></div>");
				if($(this).find('div').text()!=''){
					rawHeading = $(this).find('div').text()
				}else{
					rawHeading = $(this).text();
				}
			hSize = rawHeading.substring(3,5); // Find size
			customDiv.css({'fontSize':hSize}); // Set size
			if(rawHeading.substring(5,12).match(new RegExp(/^#?([a-f]|[A-F]|[0-9]){3}(([a-f]|[A-F]|[0-9]){3})?$/))){ // Find color
				customDiv.css({'color':rawHeading.substring(5,12)}); // Set color
			}
			if(stretch){ // Removes the "ms-formbody-td" and sets colspan=2 to stretch the heading
				$(this).next().hide();
				$(this).attr('width','');
				$(this).attr({colSpan:'2'});
			}
			if(typeof(bgColor)!="undefined" && bgColor != ''){
				$(this).css({'background-color':bgColor});
					if(!stretch){
						$(this).next().css({'background-color':bgColor});
					}
			}

			$(this).html(customDiv.text(rawHeading.substring(rawHeading.lastIndexOf('#')+1))); // Set new heading
			if(paddingTop)$(this).prepend('<br>');if(paddingBottom)$(this).append('<br>');	// Padding
			// Hide input
			if(!window.location.href.substring(0,window.location.href.indexOf('?')).match('DispForm.aspx')){
				$(this).next('td').children('span:eq(0)').hide();
				// Preserve borders if stretch = false
				newSpan = $("<span>&nbsp;</span>");
				$(this).next('td').append(newSpan);
			}
		}
	});
}

Save this as a text file and rename to “HeadingsInSharePointLists.js”, then upload to the library as shown above.

Then you add a CEWP below the list form in NewForm, DispForm and EditForm with this sourceCode:

<script type="text/javascript" src="/test/English/Javascript/jquery-1.3.2.min.js"></script>
<script type="text/javascript" src="/test/English/Javascript/HeadingsInSharePointLists.js"></script>
<script type="text/javascript">
// To inherit the bgColor of the ms-formBody use this
showHeadings(190,true,false,true,$('.ms-formbody').css('background-color'));
// To specify the bgColor do it like this in stead
// showHeadings(190,true,false,true,'#ebf3ff'); 
</script>

Parameters explained:

  • divWidth: The width of the “label” colomn – where the fieldname is found. This script removes the nobr-tag from the label to prevent long field names to distort the column width.
  • paddingTop: Adds a br-tag above the heading
  • paddingBottom: Adds a br-tag below the heading
  • stretch: Adds “colspan:2” to make the heading stretch to the full width of the list form
  • bgColor:  [optional] background color of the td-tag

You can “copy” the color from another style to make the background adapt to changing site themes by specifying the parameter bgColor like this:

showHeadings(190,true,false,true,$('.ms-formbody').css('background-color'));

The end result should look like this:
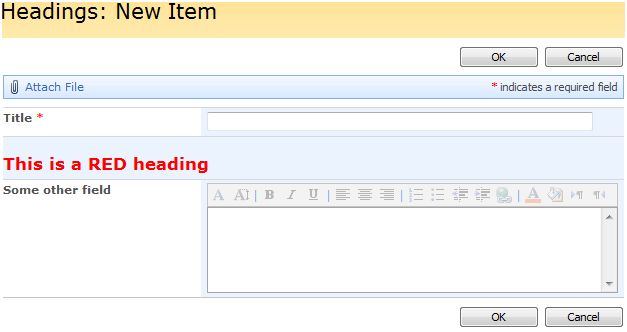
IMG

Regards
Alexander

A follow-up on this article describing how to add heading-support to a list view is found here.