Category Archives: Form modification

Showing or hiding form fields based on membership in a SharePoint group

This solution will let you control the visibility of individual fields in NewForm, DispForm and EditForm based on membership in a specific SharePoint group.

This is an updated version of this post.

I have updated it to support newer versions of jQuery, and to use spjs-utility.js.

Note:
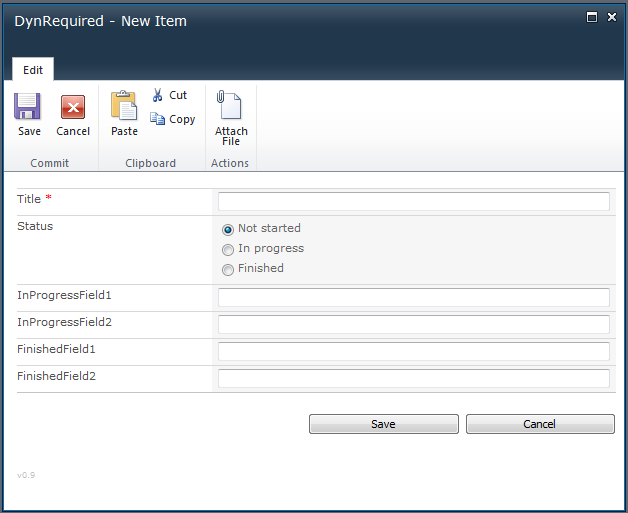
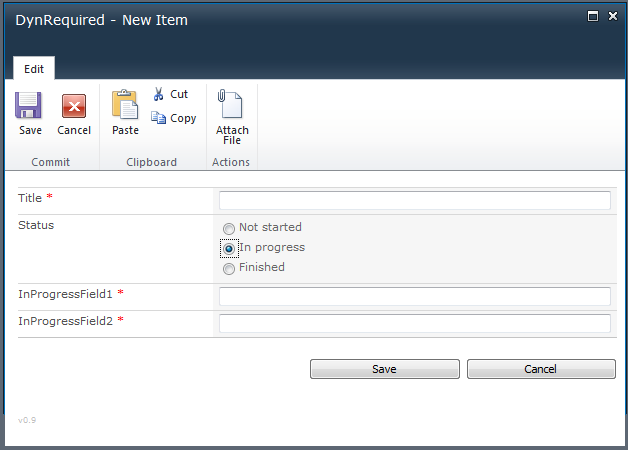
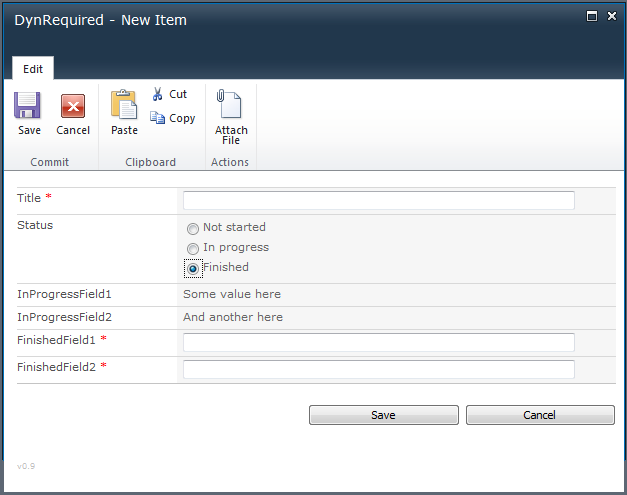
If you plan to hide empty fields in NewForm or EditForm, these fields cannot be required to contains information as the user would not be able to save the form – and as the field is invisible, the user will not see the empty field validation message.
How to set up this solution:
  • Download the latest version of spjs-utility.js, and save it locally. You can put it in a folder created using SharePoint designer, or in a shared document library where all users have read permission.
  • If you prefer to use a local version of jQuery, get it here and save it alongside the file above.
  • Add the below code to a CEWP or a HTML form web part, and update the script src to reflect your local copy of spjs-utility.js and jQuery.
<script type="text/javascript" src="https://ajax.googleapis.com/ajax/libs/jquery/1.7.2/jquery.min.js"></script>
<script type="text/javascript" src="https://files.spjsworks.com/files/spjs-utility/07.03.2012/spjs-utility.js"></script>
<script type="text/javascript">

var fields = init_fields_v2();
// The group ID
var groupId = 146; // This number must be changed to match your local group ID
// Show this array for members in the above group
var arrToShowForMembersInTheGroup = ['Title','ForOwnersOnly'];
// And this array for everybody else
var arrToShowForEverybodyElse = ['Title'];

var isInGroup = isCurrentUserInGroup(groupId,false);
if(isInGroup){
	hideAllButThese(arrToShowForMembersInTheGroup);
}else{
	hideAllButThese(arrToShowForEverybodyElse);
}

/************************************
     Do not edit below this line
************************************/
function isCurrentUserInGroup(groupId,returnGroupName){
	var ui, userLoginName, ug, result;
	ui = getUserInfo_v2(_spUserId); 
	userLoginName = ui['Name'];
	ug = getGroupCollectionFromUser(userLoginName);
	result = false;	
	$.each(ug,function(i,obj){
		if(obj.groupId===groupId){
			if(returnGroupName){
				result = obj.groupName;
			}else{
				result = true;
			}
			return false;			
		}
	});
	return result;
}

function getGroupCollectionFromUser(userLoginName,userListBaseUrl){
	if(userListBaseUrl===undefined){
		userListBaseUrl = L_Menu_BaseUrl;
	}
	var result = [];
	spjs_wrapSoapRequest(userListBaseUrl + '/_vti_bin/usergroup.asmx', 
		'http://schemas.microsoft.com/sharepoint/soap/directory/GetGroupCollectionFromUser',
		'<GetGroupCollectionFromUser xmlns="http://schemas.microsoft.com/sharepoint/soap/directory/"><userLoginName>' + userLoginName + '</userLoginName></GetGroupCollectionFromUser>',
		function(data){		
			$('Group', data).each(function(idx, itemData){
				result.push({"groupId":parseInt($(itemData).attr('ID'),10),"groupName":$(itemData).attr('Name')});
			});
		});
	return result;
}

function hideAllButThese(arrToShow){
	$.each(fields,function(fin){
		if($.inArray(fin,arrToShow)===-1){
			$(fields[fin]).hide();
		}else{
			$(fields[fin]).show();
		}
	});	
}
</script>
How to configure the solution

Find the group ID of the group you want to use by going to Site Settings > People and Groups, select your group and look at the URL:
http://www.contoso.com/_layouts/people.aspx?MembershipGroupId=6

Change the FieldInternalNames in the array “arrToShowForMembersInTheGroup” and “arrToShowForEverybodyElse” to match your setup.

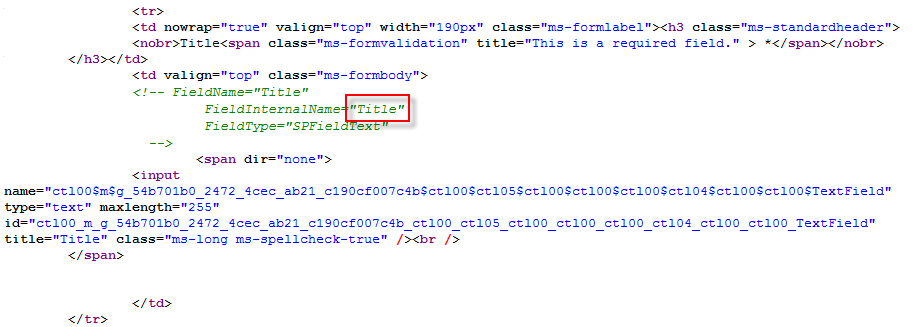
Look here to learn how to manually retrieve FieldInternalNames, or here to find a solution that shows you all in one go.

If you have trouble, post a comment below.

Alexander

SPJS Resource Management – No more double booking

I got this request from Cory

Alexander,

I was curious if you’d be interested in brain-storming a javascript idea for SharePoint calendars?
I’d be more than happy to buy you a couple beers to support it… 🙂

Here is what I was looking at doing.

1. Using Javascript, validate a new (or edited) calendar entry prior to save.
2. The save will check for overlapping dates and/or times.
3. The save could (if possible) validate pre-blocked times for either allowing entries or disallowing entries.

Real-world example.

We have an appointment calendar. I envision having within the same calendar (or for the sake of organization) in a seperate calendar,entries of what days and times are allowed to be “booked” and/or entries of days and times that are block from being “booked”

When a user attempts to create a new entry, the “booking” layer is evaluated to see if this new entry violates any of the currently exisiting rules. If it does, a notice is displayed.
Next, the new entry will be evaluated if it violates any currently exisiting entries. If it does, a notice will be displayed.

Do you think this might be possible via Javascript and/or SP Services?

Thanks!


The solution

I have made a solution that lets you set the time period of each week day that a resource (like a meeting room) can be booked. This is done by specifying a choice field (Meeting room) in the setup of this solution, and to add records in the settings list for each selection in the choice field (like Meeting room 1 or Meeting room 2).

This solution will ensure the room can be booked in the available time period only, and will also prevent users from double booking the resource by checking for overlapping time periods before saving the new or edited record.

The user will be presented with informative messages regarding time period or dates out of range, and/or double bookings so they can correct their input before attempting another save.

This solution is designed for both SharePoint 2007 and SharePoint 2010.

Here is a few screenshots before we walk trough the setup
IMG

In this example, Team 1 has booked room 1 for their morning meeting:
IMG

Then Team 2 tries to book the same room for a sales meeting:
IMG

The setup
  1. Download the latest version of “spjs_utility.js” from here
  2. Download the file “SPJS-ResourceManagement.js” and the CEWP code from here
  3. Upload “spjs_utility.js”, “SPJS-ResourceManagement.js”, jQuery and jQueryUI (if you prefer a local copy), to a shared document library, or a folder created in SharePoint Designer. Ensure all user have read access to the location where you put the files.
  4. Change the variables in the top of the CEWP code, and the script src to jQuery, jqueryUI, the jQueryUI css file, “spjs-utility.js” and “SPJS-ResourceManagement.js” to reflect your local copies.
  5. Upload the CEWP code as a txt file to the same location as the other files.
  6. Add a CEWP below the form web part in NewForm.aspx / EditForm.aspx and use the “content link option” to link to the CEWP code you uploaded in the previous step. You may also use the HTML form web part and put the CEWP code in the “source editor” directly.
  7. Enter edit mode by clicking the © below the form in NewForm.aspx.
  8. You may supply a password in the GUI to prevent user from editing the settings.

When you first enter the edit mode, you are prompted to create the configuration list:
IMG
Click “OK” to create it:
IMG
You will never have to hand edit the configuration list, but you find it under “All Site Content” of the site you specify as “SPJSRM_settingsListBaseUrl” in the CEWP code.

This is PARTS of the CEWP code
There are also a chunk of HTML code that must be included. You find the complete code in the download referred above.

<link type="text/css" rel="stylesheet" href="http://ajax.googleapis.com/ajax/libs/jqueryui/1.8.16/themes/sunny/jquery-ui.css">
<script type="text/javascript" src="https://ajax.googleapis.com/ajax/libs/jquery/1.6.4/jquery.min.js"></script>
<script type="text/javascript" src="https://ajax.googleapis.com/ajax/libs/jqueryui/1.8.16/jquery-ui.min.js"></script>
<script type="text/javascript" src="/test/Scripts/spjs_utility - blog/spjs-utility.js"></script>
<script type="text/javascript" src="/test/Scripts/SPJSResourceManagement/SPJS-ResourceManagement.js"></script>
<script type="text/javascript">
var SPJSRM_listName = "SPJSRM"; // Preferably use the List GUID
var SPJSRM_settingsListBaseUrl = L_Menu_BaseUrl; // The base url of the settings list
var SPJSRM_resourceFieldInternalName = "MeetingRoom"; // the FieldInternalName of the choice field that holds the name of the resources
var timeFormat = 24; // 12 for 12 Hour format or 24 for 24 Hour
// Validation messages
var alreadyBookedMsg = "This resource can be booked between {0} and {1}";
var overlapMsg = "The selected time period is not available. It has been booked by {0} between {1} and {2}.";
var endBeforeStartMsg = "End time cannot be less than or equal to start time.";
var startDateOutOfRange = "{0} is out of range.nnStarting date cannot be prior to {1}.";
var endDateOutOfRange = "{0} is out of range.nEnd date cannot be after {1}.";
</script>

These are the primary variables that needs attention

  • SPJSRM_listName: This is the list GUID or the DisplayName of the list you want this feature to apply to. In SharePoint 2010 you can use the variable “_spPageContextInfo.pageListId”, but for SharePoint 2007 you must find the GUID as described here
  • SPJSRM_settingsListBaseUrl: This is the base url of the settings list. Use “L_Menu_BaseUrl” to refer the current site, or supply another baseUrl to place the configuration list in another site – use “” to refer the root site.
  • SPJSRM_resourceFieldInternalName This is the FieldInternalName of the choice field that holds the name of the resources. Go here to learn how to find the FieldInternalName for a field
  • timeFormat: Use 12 for 12 Hour format or 24 for 24 Hour. Only cosmetics regarding the time as displayed in validation messages.


Buy me a beer!
If you like the solution – buy me a beer!

Form Field Tooltip for SharePoint 2007 and SharePoint 2010

27.01.2013 Updated to v1.5 and added MUI support.


30.04.2012 Updated the solution to Move the tooltip image to the formlabel field and ensured all fields are visible when entering “fftsetup=1”.


26.02.2012 Updated the solution to prevent cutting the top of large tooltip containers.


I have previously posted a solution for adding HTML tooltip for selected fields in a SharePoint form. Your find it here.

This is an updated version that is easier and cleaner – and it supports both SharePoint 2007 and SharePoint 2010.


Hover over the image to preview the tooltip
IMG

Add “fftsetup=1” to the URL to enter edit mode
For NewForm: /Lists/MyList/NewForm.aspx?fftsetup=1
For DispForm: /Lists/MyList/DispForm.aspx?ID=12&fftsetup=1
For EditForm: /Lists/MyList/EditForm.aspx?ID=12&fftsetup=1

You then enter edit mode
IMG

Wrap the tooltip text/HTML in a div with a width attribute like this:

<div style="width:200px">
   The tooltip text/HTML goes here
</div>

Or you can set a fixed width in the CEWP code under the style for “tooltipHolder” – see CEWP code example below.

How to set it up
  1. Download the latest version of “spjs_utility.js” from here
  2. Download the file “SPJS-FormFieldTooltip.js” and the CEWP code from here
  3. Upload “spjs_utility.js”, “SPJS-FormFieldTooltip.js” and jQuery (if you prefer a local copy), to a shared document library, or a folder created in SharePoint Designer. Ensure all user have read access to the location where you put the files.
  4. Change the three variables in the top of the CEWP code, and the script src to jQuery, “spjs-utility.js” and “SPJS-FormFieldTooltip.js” to reflect your local copies.
  5. Upload the CEWP code as a txt file to the same location as the other files.
  6. Add a CEWP below the form web part in NewForm.aspx / DispForm.aspx / EditForm.aspx and use the “content link option” to link to the CEWP code you uploaded in the previous step. You may also use the HTML form web part and put the CEWP code in the “source editor” directly.
  7. Enter edit mode by appending “fftsetup=1” in the URL as described above.

This is the CEWP code

<script type="text/javascript">	
	var settingsListBaseUrl = L_Menu_BaseUrl;
	var thisListID = "mylist";
	var hoverImgPath = "/_layouts/images/hhelp.gif";
</script>
<style type="text/css">
img.customTooltip{
	float:right;
	cursor:pointer;
}
td.toolTipEditor{
	vertical-align:top;
	padding:5px;
	background-color:#DFFFA5;
}
textarea.tooltipTextarea{
	height:150px;
	width:300px;
}
#tooltipHolder{
	background-color:#feeebd;
	padding:5px;
	border:1px silver solid;
	display:none;
	/*width:200px;*/
	-moz-border-radius: 10px;
    -webkit-border-radius: 10px;
    -khtml-border-radius: 10px;
    border-radius: 10px;
}
</style>
<div id="tooltipHolder"></div>
<script type="text/javascript" src="https://ajax.googleapis.com/ajax/libs/jquery/1.7.1/jquery.min.js"></script>
<script type="text/javascript" src="/spjs-utility/24.02.2012/spjs-utility.js"></script>
<script type="text/javascript" src="/test/Scripts/TooltipV2/SPJS-FormFieldTooltip.js"></script>

You must change these variables:

  • settingsListBaseUrl: This is the baseUrl to the site where the configuration list should be created. Use the variable L_Menu_BaseUrl to refer the current page.
  • thisListID: This is the unique id of the list you want the tooltip to appear in. If you plan to use the solution for multiple lists in one site, this value must be unique for each list as it’s this value that identifies which tooltip is for which list.
  • hoverImgPath: This is the path to the image the user hovers over to preview the tooltip.

When you first enter setup, you are presented with this prompt
IMG

Hit “OK” to create the list. You will get this “receipt”
IMG


You will never have to hand edit the configuration list, therefore I have not said a whole lot about it…


Buy me a beer!
If you like the solution – buy me a beer!

Alexander

Dynamic Forms for SharePoint

29.05.2012 I have published a production release here

You can no longer leave comments in this article. Please post any comments or questions in the one linked above.


29.01.2012 I have done some work during this weekend, and i see that i have underestimated the complexity dealing with other than “is equal to” in this solution. I will see what i can do about that, and will post a new version as soon as i can manage. In the meantime, stick with “is equal to”.

Please note that this solution is under development – and is still BETA. I’m almost certain I’ll have to change the configuration options – and this will break the existing “filters”. Please bear this in mind when testing this solution.

Alexander


22.01.2012
I have redone the script due to some bugs in the initial release. It should still be considered as a “beta”, but i hope as many as possible can test it and let me know the result.

I have not added any functionality over the initial release as i want to ensure the parts already in it works as expected before doing so. I have however noted these requests:

  1. DispForm support
  2. Set field value / clear field value

Alexander


I posted a teaser for my latest project in December. Now I thought it was time to post a working solution!

This solution will let you add dependent logic to your forms.
For example you could have a Yes/No check box determines whether some fields as required or not, or the status selector in a Tasks list can toggle which fields are visible or read only when you change from “In progress” to “Completed”.

Please note that the initial release is set to v0.9. I expect you to find some bugs! Please test it and comment below if you find something wrong, or you have a feature request.

All screenshots are from SharePoint 2010, but this solution is designed for both SharePoint 2007 and SharePoint 2010. I have tested it in IE7, IE9, FireFox 9.0.1 and Google Chrome 16.0.912.75.

How to set it up

Download the file “DynamicFormsForSharePoint.js” and “spjs-utility.js” from here. Please note that you will need the version dated 18.01.2012 or newer of “spjs-utility.js”. You find the files in folders with corresponding names. You also need jQuery – download i here. You may use the latest version, but i prefer v1.6.4 as it is faster in some areas. Please note that not all of my other solutions will work with jQuery v1.7x.

Put these files in a document library or a folder created with SharePoint Designer. Ensure all users have read access to this location.

This solution is set up by referring a script from NewForm and EditForm of the lists where you want the solution activated.

Add a CEWP to NewForm and EditForm like this

SharePoint 2007
Go to NewForm and EditForm and edit the URL by adding toolpaneview=2 behind the URL in this format:
…/NewForm.aspx?toolpaneview=2
…/EditForm.aspx?ID=12&toolpaneview=2

Press Enter and you should be able to add a CEWP to the page. Put the CEWP below the form web part.

SharePoint 2010
In the list view, click “List” on the List Tools menu. Then select “Form Web Parts” and pick NewForm and Editform from there and add a CEWP to the page. Put the CEWP below the form web part.

I recommend using the Content link option in the CEWP to refer the code like the example below. The CEWP code should be put in a text file (txt) or an aspx file like in the example below. This file should be put in the same location as you put the file “DynamicFormsForSharePoint.js”. You could also put the code directly in a HTML Form web part as this web part is handled in a slightly different manner in SharePoint 2010, and therefore does not mess with the script generated HTML.

CEWP setup in SharePoint 2010
IMG

The code the file CEWP.js.aspx

&lt;script type=&quot;text/javascript&quot; src=&quot;https://ajax.googleapis.com/ajax/libs/jquery/1.6.4/jquery.min.js&quot;&gt;&lt;/script&gt;
&lt;script type=&quot;text/javascript&quot; src=&quot;/test/Scripts/DynRequired/spjs-utility.js&quot;&gt;&lt;/script&gt;
&lt;script type=&quot;text/javascript&quot; src=&quot;/test/Scripts/DynRequired/DynamicFormsForSharePoint.js&quot;&gt;&lt;/script&gt;

You must change the script src to all files so that they refer your local files.

These three scripts are all that goes in the CEWP – all configuration is done in a graphical user interface.

Behind the scenes

When this solution is first setup in a site, the configuration list is created automatically. This list is not to be hand edited, and it can be hidden using SharePoint Designer if you like.

When you configure the solution for a specific NewForm or EditForm, the configuration is stored using the site-relative URL of the form as an identifier. When a user loads the form in a browser, this configuration is read from this location and the rules are applied “on the fly”.

How to configure the solution

Note:
When manipulating required fields, you must NOT set the fields as required under list settings in SharePoint. Let this script handle it.

When the solution is set up, the only thing giving it away is the little version number in the bottom left corner of the form:
IMG
You click this version number to enter the configuration. Note that this version number is visible only if the solution has not yet been set up, or the logged in user is the one that configured the solution for this particular form in the first place.

You can however enter the edit mode manually by appending to the URL like this:NewForm.aspx?setup=1 or EditForm.aspx?ID=10&setup=1

If you set up a password protection for the configuration, you are prompted for the password when entering the edit mode:
IMG
This dialog is bypassed if there are no password.

You then enter the configuration:
IMG

You can use these field types as “triggers”:
Yes/No, Drop-Down Menu, Radio Buttons, Checkboxes (allow multiple selections) and Single line of text.

You can use the following operators to match their value

  • is equal to
  • is not equal to
  • is greater than
  • is less than
  • is greater than or equal to
  • is less than or equal to
  • begins with
  • contains
Example

The Configuration
IMG

This configuration will result i these changes to the form
IMG

IMG

IMG


Let me know if you get this solution working. I’ll update the article with any missing parts tomorrow, so please let me know if you find any bugs in the solution, or missing steps in the article.

Alexander

Pull e-mail from people picker and write to a separate textfield – updated version

08.01.2012 I have published an updated version of this script here


I have previously posted a solution for pulling the e-mail address from a people picker and writing it to a separate field when saving the form. You find it here.

This one does the same, but i have updated the scripts and added an “onchange event” that triggers when you enter the name in the input field (and move focus away from the field), or uses the address book to pick a user.

This solution is designed for single selection people picker fields.

For Internet Explorer in SharePoint 2007, and for most browsers in SharePoint 2010, the email is pulled from the picker itself. For all other browsers than IE in SharePoint 2007, the email is retrieved by using a call to the built in “user list” in SharePoint using the function “getUserInfo_v2”. This function is part of “spjs-utility.js” and can be found below.

How to use

Insert a ContentEditorWebPart (CEWP) under the form in NewForm.aspx / EditForm.aspx by switching the page to edit mode. Read here on how to do it in SharePoint 2007. In SharePoint 2010 you can add the CEWP on the list ribbon menu “Form Web Parts”.

CEWP code for both SharePoint 2007 and 2010:

&lt;script type=&quot;text/javascript&quot; src=&quot;https://ajax.googleapis.com/ajax/libs/jquery/1.6.4/jquery.min.js&quot;&gt;&lt;/script&gt;
&lt;script type=&quot;text/javascript&quot; src=&quot;/test/EMSKJS/PeoplePickerEmail/spjs-utility.js&quot;&gt;&lt;/script&gt;
&lt;script type=&quot;text/javascript&quot;&gt;

fields = init_fields_v2();
pullEmailFromPickerOnChange({from:'MyPeoplePicker',to:'Title'});

/******************************************************
		Do not change anything below this line
*******************************************************/
function pullEmailFromPickerOnChange(obj){
	var toFind, data;
	$(document).ready(function(){
		toFind = &quot;div.ms-inputuserfield&quot;;
		if(!browseris.ie5up &amp;&amp; typeof(_fV4UI)==='undefined'){
			toFind = &quot;textarea&quot;;
		}
		$(fields[obj.from]).find(toFind).bind('blur',function(){
			data = pullEmailFromPicker(obj.from,obj.to);
			if(data.EMail!==undefined){
				$(fields[obj.to]).find('input').val(data.EMail);
			}
		});
		$(fields[obj.from]).find('img:last').bind('click',function(){
			setTimeout(function(){
				data = pullEmailFromPicker(obj.from,obj.to);
				if(data.EMail!==undefined){			
					$(fields[obj.to]).find('input').val(data.EMail);
				}
			},500);
		});
	});
}

function pullEmailFromPicker(finFrom,finTo){
	var result,	isResolved, data, matchArrRaw, matchArr;
	result = {};
	$(fields[finFrom]).find('.ms-formbody').find(&quot;div[id='divEntityData']&quot;).each(function(){
		isResolved = ($(this).attr('isresolved').toLowerCase()=='true')?true:false;
		if(isResolved){	
			data = $(this).find('div:first').attr('data');
			matchArr = [];
			matchArrRaw = data.split(/&lt;[^&gt;]*&gt;/);
			$.each(matchArrRaw,function(i,val){
				if(val!==''){
					matchArr.push(val);
				}
			});
			if(matchArr.length&gt;1){
				$.each(matchArr,function(i,val){
					if(i%2===0){
						switch(val){
							case'SPUserID':
								val = 'ID';
							break;
							case 'Email':
								val = 'EMail';
							break;
							case 'DisplayName':
								val = 'Title';
							break;
						}
						result[val] = matchArr[i+1];
					}
				});
			}else{ // Non IE in SP2007
				result = getUserInfo_v2($(this).attr('description'));				
			}
		}	
	});
	return result;
}
&lt;/script&gt;

Note to SharePoint 2010 users:
Add this code to a text file and put it in a document library, then use the content link option on the CEWP to link to this code. This is necessary to overcome a possible “bug” in the CEWP handling when editing a SP2010 page where the HTML is accumulated when editing the page.

This tip is also recommended for SharePoint 2007 users, but is not absolutely necessary.

Parameters

You call this function using an object literation like this
pullEmailFromPickerOnChange({from:’MyPeoplePicker’,to:’Title’});

The attribute “from” is the FieldInternalName of the people picker and “to” is the FieldInternalName of the field to write the email to.
Read here on how to find the FieldInternalName

Download

You find the file “spjs-utility.js” here, ensure you grab the version dated 18.09.2010 or newer.


Post any question below.

Alexander

Toggle appended comments in multi line fields

I got this request from Tim:

Tim Says:
Is there a way to hide the appended comments to a multipe line field with version control. Actually can it a a click hide/show, and can it display the last comment by default? click it the see all pervious comments.

Larry got a bit on the way, but the appended comments are a bit different in a plain text field and in a rich text field. This approach splits up the comments and wraps them in new div’s to handle the visibility.

The end result looks like this:
DispForm:
IMG
EditForm:
IMG

Put this code in a CEWP below the form in DispForm.aspx or EditForm.aspx

&lt;script type=&quot;text/javascript&quot; src=&quot;https://ajax.googleapis.com/ajax/libs/jquery/1.5.2/jquery.min.js&quot;&gt;&lt;/script&gt;
&lt;script type=&quot;text/javascript&quot;&gt;
fields = init_fields_v2();

toggleAppendOnMultiline('MyRichText');
toggleAppendOnMultiline('MyPlainMultiLine');

function toggleAppendOnMultiline(fin){
var currField = $(fields[fin]);
var rich = (currField.find('.ms-formbody div:last').parent().find('div').length&gt;1)?true:false;
	if(rich){	
		var allArr = currField.find('.ms-formbody div:last').parent().find('div').remove();
	}else{
		var all = currField.find('.ms-formbody div:last').remove();
		var allArr = all.html().split(/&lt;br&gt;/i);
	}
	var buffer = [&quot;&lt;table style='width:410px'&gt;&lt;tr&gt;&lt;td valign='top' style='font-size:0.7em;width:99%'&gt;&quot;];
	$.each(allArr,function(i,part){
		var disp = &quot;block&quot;
		if(i&gt;0){
			disp = &quot;none&quot;;
		}
		buffer.push(&quot;&lt;div class='&quot;+fin+&quot;_dummyHide' style='display:&quot;+disp+&quot;'&gt;&quot;);
		if(rich){
			buffer.push($(part).html());
		}else{
			buffer.push(part)
		}
		buffer.push(&quot;&lt;/div&gt;&quot;)
	});
	buffer.push(&quot;&lt;/td&gt;&quot;);
	if(allArr.length&gt;1){
		buffer.push(&quot;&lt;td title='Toggle visibility' onclick='toggleShowAll(this,&quot;&quot;+fin+&quot;_dummyHide&quot;)' valign='top' style='cursor:pointer;'&gt;&quot;);
		buffer.push(&quot;&lt;div style='white-space:nowrap;border:1px silver solid;padding:2px;background-color:#ffffff'&gt;&quot;);	
		buffer.push(&quot;&lt;img style='vertical-align:middle' src='&quot;+L_Menu_BaseUrl+&quot;/_layouts/images/tpmax1.gif' border='0'&gt;&quot;);
		buffer.push(&quot;&lt;img style='vertical-align:middle' src='&quot;+L_Menu_BaseUrl+&quot;/_layouts/images/tpmax1.gif' border='0'&gt;&quot;);
		buffer.push(&quot;&lt;/div&gt;&quot;);
		buffer.push(&quot;&lt;/td&gt;&quot;);
	}
	buffer.push(&quot;&lt;/tr&gt;&lt;/table&gt;&quot;);	
	currField.find('.ms-formbody').append(buffer.join(''));
}

function toggleShowAll(elm,id){
var img = $(elm).find('img');
	if(img.attr('on')!=='1'){
		img.attr('src',L_Menu_BaseUrl+&quot;/_layouts/images/tpmin1.gif&quot;);
		img.attr('on','1');
	}else{
		img.attr('src',L_Menu_BaseUrl+&quot;/_layouts/images/tpmax1.gif&quot;);
		img.attr('on','0');
	}
	$(&quot;div.&quot;+id+&quot;:first&quot;).nextAll().toggle();
}

function init_fields_v2(){
	var res = {};
	$(&quot;td.ms-formbody&quot;).each(function(){
	var myMatch = $(this).html().match(/FieldName=&quot;(.+)&quot;s+FieldInternalName=&quot;(.+)&quot;s+FieldType=&quot;(.+)&quot;s+/);	
		if(myMatch!=null){
			// Display name
			var disp = myMatch[1];
			// FieldInternalName
			var fin = myMatch[2];
			// FieldType
			var type = myMatch[3];
			if(type=='SPFieldNote'){
				if($(this).find('script').length&gt;0){
					type=type+&quot;_HTML&quot;;
				}
			}
			if(type=='SPFieldLookup'){
				if($(this).find('input').length&gt;0){
					type=type+&quot;_Input&quot;;
				}
			}
			// Build object
			res[fin] = this.parentNode;
			res[fin].FieldDispName = disp;
			res[fin].FieldType = type;
		}		
	});
	return res;
}
&lt;/script&gt; 

Please note line 5 and 6 – i have addressed my two fields by FieldInternalName there. In the images, the comments in the field “MyRichText” has been toggled visible.

Alexander

Accordion for SharePoint forms v2.0

19.03.2011 v2.1 adds the ability to call a function after the section has expanded. You can specify a shared function that will be called on every section, and/or a function that is called on one specific section.

The CEWP code must be updated from v2.0 to include the new parameters.


This solution is used to break up a SharePoint form into sections – like in an accordion.
IMG

Features

  • Full SP2007 and SP2010 support for both lists and document libraries
  • Works for all standard field types (Custom field types are not guaranteed to work)
  • A field can be used in multiple section
  • You can have a section displaying all fields
  • You can have a section catching all orphans (fields that are not displayed in any other section). Useful if one adds columns to a list without updating the script call.
  • Highlights section if a field fails validation upon save
  • Use a URL query string parameter to expand a specific section

Browser compatibility tested in:

  • IE6 (Works in SP2007 only due to SP2010 incompatibility with IE6)
  • IE7
  • IE8
  • Firefox 3.6.13
  • Google Chrome 8.0.552.237
  • Safari 5.0.2

How to use this solution

Download the code for the file “AccordionForSharePointForms.js” from this location

Upload the file to your script repository. This can be a shared document library in the site where you will be using the solution (ensure ALL users have read access).

For each of the forms (NewForm.aspx, DispForm.aspx and EditForm.aspx) add a Content Editor Web Part (CEWP) below the form.

For SharePoint 2007

To put the page in edit mode, modify the URL like this:
/Lists/Accordion/NewForm.aspx?toolpaneview=2
/Lists/Accordion/DispForm.aspx?ID=1&toolpaneview=2
/Lists/Accordion/EditForm.aspx?ID=1&toolpaneview=2

For SharePoint 2010

IMG

Add this code block to the CEWP:

&lt;script type=&quot;text/javascript&quot; src=&quot;https://ajax.googleapis.com/ajax/libs/jquery/1.5.1/jquery.min.js&quot;&gt;&lt;/script&gt;
&lt;script type=&quot;text/javascript&quot; src=&quot;/test/English/Javascript/Accordion/v2.0/AccordionForSharePointForms.js&quot;&gt;&lt;/script&gt;
&lt;script type=&quot;text/javascript&quot;&gt;

var accConstructor = {sections:[{name:'First section',fields:['InMultipleSections','Column1','Column2'],mouseOver:'This is the first section',sectionStyle:'',clickFunction:''},
							{name:'Second section',fields:['InMultipleSections','Column3','Column4','Lookup1','MyMultiLookup'],mouseOver:'This is the second section',sectionStyle:'',clickFunction:'secondSectionClick(this)'},
							{name:'Third section',fields:['InMultipleSections','Title'],mouseOver:'This is the third section',sectionStyle:'',clickFunction:''},
							{name:'Forth section',fields:['Column5','Column6','MyPeoplePicker'],mouseOver:'This is the forth section',sectionStyle:'',clickFunction:''},
							{name:'Attachments',fields:['attachments'],mouseOver:'',sectionStyle:'',clickFunction:''}],
					  settings:{viewAllFields:{show:true,position:'bottom',name:'All fields',mouseOver:'This section shows all fields',sectionStyle:'',clickFunction:''},
					  orphanFields:{show:true,name:'Orphans',mouseOver:'All orphan fields',sectionStyle:'',clickFunction:''},
					  bgColor:'#8EB4E8',
					  hoverColor:'#FFF68F',
					  selectedColor:'#C6E2FF',
					  formBgColor:'#C6E2FF'},
					  clickFunctionShared:'clickFunctionShared(this)'};

function clickFunctionShared(elm){
	var acc = $(elm);
	// This code is run on click on any section
}

function secondSectionClick(elm){
	var acc = $(elm);
	var arrOfFields = acc.attr('fields').split(',');
	alert(&quot;The fields included in the second section is these:n&quot;+arrOfFields);
}
				  
init_buildAccordionForm(accConstructor,'1');
&lt;/script&gt;

This is explained in detail below.
You must change the “src” to “AccordionForSharePointForms.js” to match your local file. If you like to use a local instance of jQuery, change that as well.

You must also change this example to match your columns FieldInternalName.

The call to the function “init_buildAccordionForm” takes two parameters:
accConstructor: The object constructed in “var accConstructor”.
selectedAcc: Integer that specifies which section to preselect.

Variable “accConstructor” explained:

IMG

Attachments

I have added the attachment row as a “field” you can insert in a selected section. It is named “attachments”. Look at the example CEWP code and the image.

How to find the FieldInternalName

Go to your list. Open one existing list element in DispForm.aspx. Right click and select “View source”. Search for “FieldInternalName”. All fields should be found in this format:
IMG

Link directly to a section:

Specify the section to preselect in the URL like this:
http://*************/Lists/Accordion/NewForm.aspx?sAcc=3

Note:

This is true only for unmodified forms. If you have modified the form in SharePoint designer, you will have to look at the function “init_fields_v2()” in the code to adapt it to your custom form. You will find a bit more information here.

Overriding native SharePoint functions

To overcome some issues with rich text fields I had to override one function: RTE_OnFocus.
I have added one line to the bottom of the function:
g_elemRTELastTextAreaConverted=document.getElementById(strBaseElementID);

To catch “empty field validation” on date and time columns “pre save”, I had to override the function “PreSaveItem”. I have added one line to the top of the function:
preSaveHighlightAccOnValidation();

This will not interfere with the use of the function “PreSaveAction” often used to “do stuff” before save.

Finale notes

The solution is licensed under the MIT X11 license. You find the license agreement by clicking the little (c) to the left of the lower button row.

I have set the initial release to v2.0 as I have previously posted a similar solution.

Ask if anything is unclear
Alexander