All posts by Alexander Bautz

DFFS: New triggers and major improvements in handling linked rules

This post describes changes made in Dynamic Forms For SharePoint (DFFS): https://spjsblog.com/dffs/

I have updated DFFS and introduced some new triggers and improved the functionality related to linked rules.

You can now use a custom function as a rule trigger, and you can also set up rules that can only be triggered by other rules (trough “Run these functions / trigger these rules”), or by a custom function.

Trigger rules manually

You can manually trigger all rules from a custom function like this:

spjs.dffs.triggerRule(["IndexOrFriendlyNameOfRule"]);

Supply the rule identifiers as a comma separated array. Please note that the rule will be executed as if the trigger returned true.

The enhanced “And these rules or functions = true” functionality

On load
Rules with lower index than the current rule, and custom fuctions will be evaluated. Reorder rules if necessary.

On change
The “last run status” of the rules will be checked, and custom functions will be reevaluated.

Checking a custom function
To check the result of a custom function, use the name of the function without parentheses. You can combine a custom function with indexes or friendly name of other rules.

Checking multiple rules
Separate indexes or friendly name with comma to use [and]. Separate indexes or friendly name with pipe to use [or].

Example
Rule1,Rule2,Rule3|Rule4

In this example, Rule1 and Rule2 must be true, and Rule3 or Rule4 must also be true for the overall result to return true.

See change log for details: https://spjsblog.com/dffs/dffs-change-log/

Comments or feedback

Use the forum for discussions related to DFFS: https://spjsblog.com/forums/forum/dynamic-forms-for-sharepoint/

Alexander

Approve or reject list items

I have previously posted a JavaScript solution for approving multiple documents or list items. This is an updated version that adds two buttons in the ribbon: one for “Approve” and one for “Reject”. Refer the original solution for details, but please note that the variables for controlling the text values have changed.

Use this code to load the solution in a list view
<script type="text/javascript" src="https://ajax.googleapis.com/ajax/libs/jquery/1.11.3/jquery.min.js"></script>
<script type="text/javascript" src="/Scripts/ApproveOrRejectSelected.js"></script>
Change the default text values

If you are happy with the default, English text, you can skip this next step.

To override the default text, add this to the CEWP below the script reference to “ApproveOrRejectSelected.js”,and change the text as you like:

<script type="text/javascript">
spjs.contentApproval.text = {
	"approveBtn":"Approve selected",
	"rejectBtn":"Reject selected",
	"groupLabel":"Approve or Reject",
	"working":"Processing items...",
	"done":"{0} items processed"
};
</script>

You can wrap it like this to switch based on the logged in users language (in MUI environments):

switch(_spPageContextInfo.currentLanguage){
	case 1044:
		// Add Norwegian values
		spjs.contentApproval.text = {
			"approveBtn":"Approve selected",
			"rejectBtn":"Reject selected",
			"groupLabel":"Approve or Reject",
			"working":"Processing items...",
			"done":"{0} items processed"
		};
	break;
	case 1031:
		// Add German values
		spjs.contentApproval.text = {
			"approveBtn":"Approve selected",
			"rejectBtn":"Reject selected",
			"groupLabel":"Approve or Reject",
			"working":"Processing items...",
			"done":"{0} items processed"
		};
	break;
}
Download ApproveOrRejectSelected.js

Get the file here.

Alexander

DFFS: Multiple variations on one form

If you have a very complicated form with a lot of rules and complexity, you might want to split this up in different configurations. Here is an example of how you can do this.

How to enable this form switch

This example will create separate configurations for the form based on a “status” column named “CaseStatus”. To start using this switch, all you have to do is to add these lines of code to the CEWP – above the script tag that refers DFFS_Frontend_min.js.

<script type="text/javascript">
// Override pageId to load different DFFS configurations for different statuses in the "CaseStatus" field.
var dffs_formTypeSwitch = "CaseStatus";
</script>

Please note that you must update DFFS_frontend to v4.272 or later to support this option.

How does it work?

What this code does is to get the current value from the “CaseStatus” field, and appending it to the pageId it uses to query the DFFS configuration list for the correct configuration to load.

How to configure the different forms

To be able to configure the forms for the different “Statuses” you can either enter DFFS backend from a form loaded with the correct status, or edit the URL in DFFS backend directly to change for example “formType=Not started” to “formType=In progress” in the URL example below:

https://contoso.com/DFFS/WebPartPages/DFFS_Backend.aspx?targetList={46e7516d-a6f3-400e-992f-e08338da2ccc}&targetListBaseUrl=/DFFS&formId=/lists/dffs dev/editform.aspx?formType=Not started&formType=3&Source=/DFFS/Lists/DFFSDEV/EditForm.aspx?ID=4

I hope this makes sense. If it does not, please post any questions or comments in the forum.

Alexander

DFFS: Check out list items

Change log
December 14, 2015
Added a fix for an unintentional check-in when adding attachments on SP2007 with Internet Explorer 8/9. See code section below.

May 06, 2015
Changed the function “goToDispForm” to include “dffs_beforeunload = false;” to prevent check-in when a user was redirected to DispForm.

May 05, 2015
Updated code example to handle check in if the user cancels out of the EditForm without saving changes (and thus not being asked to check in the list item. Please adapt the code to suite your needs.

This post will describe a possible solution to handle check out of list items when editing. This will prevent others from making changes to the list item while another person has the same item already open in EditForm.

This solution is intended used in EditForm, and requires you to add one new field to the list: A yes/no column named (for example) “CheckedOut”.

Currently this requires four rules added to DFFS, but I might consider building in support for this so that this would just require a “tick in a box” to enable.

These are the rules required in DFFS


IMG


IMG


IMG

Please note that you must have DFFS frontend v4.267 or later to be able to “alert” the name of the Editor like in this example.


IMG

Please note a typo in “promptCheckin” – use lover case “i” to correspond with the function in the Custom JS below.

The code from the CSS and JS tab in DFFS backend
var dffs_beforeunload = true;

function goToDispForm(){
	dffs_beforeunload = false;
	$("#part1").hide();
	location.href = location.href.replace(/editform.aspx/i,"DispForm.aspx");
}

function mustCheckOut(){
	dffs_beforeunload = false;	
	if(confirm("You must check out this item to proceed.\n\nCheck out this item now?")){
		var res = spjs_updateItem({"listName":_spPageContextInfo.pageListId,"id":GetUrlKeyValue("ID"),"data":{"CheckedOut":"1"}});
		if(res.success){
			location.href = location.href;
		}else{
			alert(res.errorText);
		}
	}else{
		goToDispForm();
	}
}

function promptCheckin(){
	dffs_beforeunload = false;	
	if(getFieldValue("CheckedOut") === true){
		if(confirm("Do you want to check in this item to allow otheres to contribute?")){
			setFieldValue("CheckedOut",false);
		}
	}
}

$(window).bind("beforeunload",function(event) {
	if(dffs_beforeunload){
		var res = spjs_updateItem({"listName":_spPageContextInfo.pageListId,"id":GetUrlKeyValue("ID"),"data":{"CheckedOut":"0"}});
		if(res.success){
			alert("The list item was checked in.");
		}else{
			alert(res.errorText);
		}
	}
});

// Fix for add attachment in IE 8 / 9 on SharePoint 2007
$("a[href^='javascript:UploadAttachment()']").hover( 
	function(){
		dffs_beforeunload = false;
	},
	function(){
		dffs_beforeunload = true;
	}	
);

Please use the forum for any discussions

Alexander

Cascading dropdowns now supports multi choice

I have updated the cascading dropdown solution to support multi choice in all positions. Refer this article for setup instructions and background information.

To use multichoice on the select, you must use a multiline plain text field as “placeholder”, and address the field like the field “ThisListField2” in the “spjs.casc.init” function:

spjs.casc.init({
	lookupList:"NameOfYourList",
	lookupListBaseUrl:"BaseUrlOfYourList",
	lookupListFields:["LookupListField1","LookupListField2"],
	thisListFields:["ThisListField1","ThisListField2:multi"],
Edit form

IMG

Display form

IMG

List view

IMG

If you plan to use this with DFFS you must update to DFFS backend v4.259 to support the “:multi” suffix in the cascading dropdown configuration.

Post any questions in the forum

If you do not already have a forum user, look at the sticky post Register for a user account.

Alexander

SPJS Simple tooltip

By request I have “ripped” the DFFS tooltip from DFFS. This code can use to create a custom tooltip with the same style and function as in DFFS. This means that you can have a hover-over tooltip that sticks if you click the hover-image.

Take a look at it, and familiarize with the code before asking questions.

The tooltip text or HTML is added to the variable “SPJS_SimpleTooltipContents”, and the “key” is used in the image “onmouseover” to pull in the correct tooltip.

The code
<style type="text/css">
div.SPJS_SimpleTooltipPlaceholder img{
	cursor:pointer;
}
#SPJS_SimpleTooltipPlaceholder{
	/*width:350px;*/
	white-space:normal;
	background-color:#E7ECEF;
	border:1px #9F9E9C solid;
	display:none;
	font-size:11px;
	font-weight:normal;
	max-width:500px;
	z-index:1001;
}
div.SPJS_SimpleTooltipHolderHead{
	height: 16px;
	padding:1px;
	border-bottom:1px silver solid;
	background-color:#0072C6;
}	
div.SPJS_SimpleTooltipHolderClose{
	float:right;
	width: 16px;
	height: 16px;
	cursor:pointer;
	background-repeat: no-repeat;
	background-image: url(data:image/png;base64,iVBORw0KGgoAAAANSUhEUgAAABAAAAAQCAYAAAAf8/9hAAAAAXNSR0IArs4c6QAAAARnQU1BAACxjwv8YQUAAAAJcEhZcwAADsMAAA7DAcdvqGQAAAAYdEVYdFNvZnR3YXJlAHBhaW50Lm5ldCA0LjAuM4zml1AAAAB5SURBVDhPzZJBDoAgEAN5CG/jF74fGewigSUcOOgkTaTtrhoN/yHnHIuSFGU3djkFAuMqaiWu5RlJ0QvmkzXqEqkfBneBV+TsefMrAIEKK9bDBgUVR/bDQEnlkaO7G+slBCr0cPa8eUkxjz/j8Y9EiSVoesRd/hUh3IlkrlzxjRMpAAAAAElFTkSuQmCC);
}
</style>

<script type="text/javascript">
var SPJS_SimpleTooltipContents = {
	"helpText1":"<div style='width:200px;'>This is a custom tooltip for field 1<div style='color:red'>You can use HTML</div></div>",
	"helpText2":"<div style='width:200px;'>This is a custom tooltip for field 2<div style='color:red'>You can use HTML</div></div>"
};

var SPJS_SimpleTooltip = {
	"data":{
		"isSP13":typeof _spPageContextInfo !== "undefined" && _spPageContextInfo.webUIVersion === 15 ? true : false
	},
	"show":function(elm,key){
		var p = $(elm).position(), l = {};
		if($("#SPJS_SimpleTooltipPlaceholder").length === 0){
			$("body").append("<div id='SPJS_SimpleTooltipPlaceholder'></div>");
		}
		$(elm).after($("#SPJS_SimpleTooltipPlaceholder"));
		$("#SPJS_SimpleTooltipPlaceholder").html("<div style='padding:3px;'>"+(SPJS_SimpleTooltipContents[key] !== undefined ? SPJS_SimpleTooltipContents[key] : "The tooltip for key \""+key+"\" was not found.")+"</div>").attr("pin","0").css({"position":"absolute","left":p.left+15});
		// Check left pos
		l.l = p.left+30;
		l.tw = $("#SPJS_SimpleTooltipPlaceholder").width();
		l.ww = $(window).width();
		if(l.l + l.tw > l.ww){
			$("#SPJS_SimpleTooltipPlaceholder").css("left",(p.left - (l.l + l.tw - l.ww)));
		}
		$("#SPJS_SimpleTooltipPlaceholder").stop(true,true).fadeIn(200);
	},
	"click":function(elm){
		if($("#SPJS_SimpleTooltipPlaceholder").find("div.SPJS_SimpleTooltipHolderClose").length === 0){
			$("#SPJS_SimpleTooltipPlaceholder").attr("pin","1").prepend("<div class='SPJS_SimpleTooltipHolderHead'><div class='SPJS_SimpleTooltipHolderClose' onclick='SPJS_SimpleTooltip.hide(true);'></div></div>");
		}
	},
	"hide":function(c){
		if($("#SPJS_SimpleTooltipPlaceholder").attr("pin") !== "1" || c){
			$("#SPJS_SimpleTooltipPlaceholder").attr("pin","0").stop(true,true).fadeOut(100);
		}
	}
};

</script>
This HTML code shows you how to use the tooltip
<!-- Example HTML -->
<table cellpadding="0" cellspacing="0">
	<tr>
		<td valign="top">Field 1: </td>
		<td valign="top"><input style="width:300px;" type="text">
			<img onmouseover="SPJS_SimpleTooltip.show(this,'helpText1')" onmouseout="SPJS_SimpleTooltip.hide()" onclick="SPJS_SimpleTooltip.click(this)" src="/_layouts/images/hhelp.gif" border="0">
		</td>
	</tr>
		<tr>
		<td valign="top">Field 2: </td>
		<td valign="top"><input style="width:300px;" type="text">
			<img onmouseover="SPJS_SimpleTooltip.show(this,'helpText2')" onmouseout="SPJS_SimpleTooltip.hide()" onclick="SPJS_SimpleTooltip.click(this)" src="/_layouts/images/hhelp.gif" border="0">
		</td>
	</tr>
</table>
<!-- Example HTML -->

PS: It’s the <img> tags that calls the tooltip, the other HTML is for demonstration only.

I hope you can make use of this code.

Alexander

SPJS Poll for SharePoint v2.0

I have brushed up the 5 year old solution Poll for SharePoint, to change the deprecated “Google Image Charts to use Google Charts (AKA Google Visualization). The Image Charts are officially deprecated, but will probably continue working for some time, but to ensure you have a working solution, you should upgrade to this new version.

Please note that there are some changes to the Content Editor Web Part code, so existing users must not only update the script file, but also look over the CEWP code and make some small changes.

This code lets you generate polls without the need for server side installed WebParts.
Change log
March 15, 2015
v2.0 released. This one has no new functionality, but the code has been brushed up, and now the charts are generated using “Google Charts” rather than “Image Charts”.
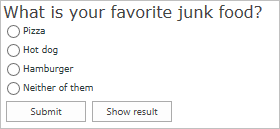
Poll

IMG

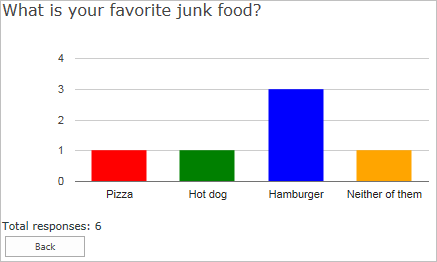
Result with column chart

IMG

How to set it up
Create a custom list with the following fields
  • Answer: Single line of text
  • Question: Single line of text

Name it anything you like, but keep the display name fairly simple (no special characters) as you will use the display name in the CEWP code.

CEWP code

The CEWP code below refers jQuery from Google. If you have a local copy of jQuery you can change the script src. You find the code for the file “SPJS-Poll.js” at the bottom of the page.

NOTE: You must change the script src for the file “SPJS-Poll.js” and “spjs-utility.js” to point your instance of the files – the CEWP code will not work unless you do this.
Place this code where you want the poll to appear:
<div id="SPJS_Poll"></div>
<link type="text/css" href="/Scripts/Poll/spjs_poll.css" rel="stylesheet">
<script type="text/javascript" src="https://www.google.com/jsapi"></script>
<script type="text/javascript" src="https://code.jquery.com/jquery-1.11.2.min.js"></script>
<script type="text/javascript" src="/Scripts/spjs-utility/spjs-utility.js"></script>
<script type="text/javascript" src="/Scripts/Poll/SPJS-Poll.js"></script>
<script type="text/javascript">

// Preload the chart solution
google.load("visualization", "1", {"packages":["corechart","table"]});

// If you want to override these texts, uncomment the object and localize as you like.
/* 
	spjs.poll.text = {
		"submitLinkText":"Submit",
		"backLinkText":"Back",
		"showResultBtnText":"Show result",
		"pollNotActiveText":"The poll is not active prior to {0}",
		"pollEndedText":"The poll ended on {0}",
		"alreadyRespondedText":"You answered: ",
		"totalResponsesLabel":"Total responses: ",
		"chartLegendLabels":["Answer","Count"]

	};
*/

spjs.poll.init({pollAnswerListName:'Poll',
				listBaseUrl:L_Menu_BaseUrl,				
				id:"Poll_3", // Allowed characters id a-z, 0-9 - and _
				start:"01/02/2015", // format: mm/dd/yyyy
				end:"03/15/2015", // format: mm/dd/yyyy
				singleResponse:false,
				q:"What is your favorite junk food?",
				qStyle:"font-size:1.5em;color:#444;",
				aStyle:"font-size:xx-small",
				a:["Pizza","Hot dog","Hamburger","Neither of them"], // Leave empty for free input				
				color:["red","green","blue","orange"],
				forceLowerCaseAnswer:false, // Group result by lowercase				
				chart:"col", // table, bar, col or pie
				height:200,
				width:500});

</script>

Object attributes explained

  • pollAnswerListName: DisplayName or GUID of the list that stores the answers
  • listBaseUrl: The baseUrl of the site. This is like “/sites/hr” when the list is located in the site “hr” under “/sites”. Use L_Menu_BaseUrl (or omit the property) for current site.
  • id: The unique id of the poll. All poll answers are stored in a list and this id is used to separate each poll
  • start: Start date in the format mm/dd/yyyy
  • end: End date in the format mm/dd/yyyy
  • singleResponse: true for one reply per user, false for unlimited number of replies
  • q: Poll question. To have a linefeed in the question, use <br>
  • qStyle: CSS syntax style
  • aStyle: CSS syntax style
  • a: Answers in an array format. To use free input and not predefined answers, leave the array empty.
  • color: Colors for the chart in an array format. This must have the same length as the previous parameter – one color for each answer
  • forceLowerCaseAnswer: Primarily for use with free input to avoid getting two “series” when the only difference are uppercase characters.
  • chart: “bar” for bar chart, “col” for column chart, “pie” for pie chart or “table” for a plain table.
  • height: Height in pixels
  • width: Width in pixels
Regarding free input

If you leave the attribute “a” as an empty array, the user can supply free text as “answer”. When using free input, the result are automatically presented as a table.

Download code

The code for the file SPJS-Poll.js. You find spjs-utility.js here.

Questions or feedback

Post any questions in the forum

Alexander