All posts by Alexander Bautz

Hit counter for SharePoint

28.05.2011 I have redone this solution to use a star-rating in stead of the simple “like” button. You find the new version here


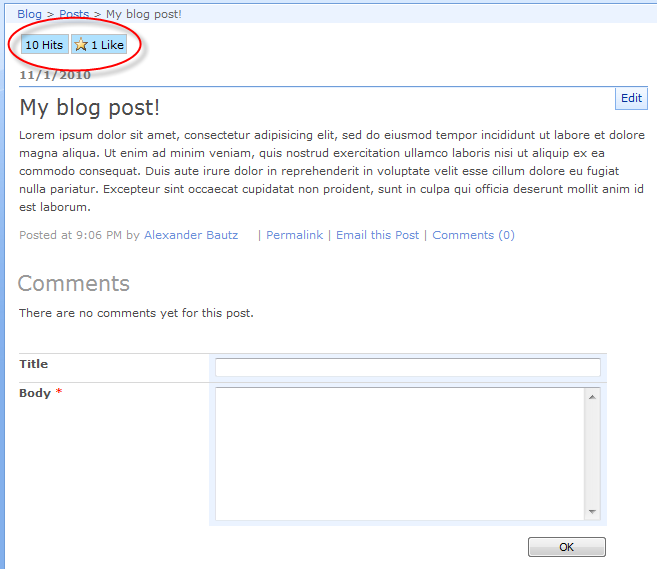
01.11.2010 Redone the scripts and added support for rating individual items in a list – for example in “Dispform” in a blog:
IMG

The solution counts “Hits” and “Likes”.


Create a document library to hold your scripts

Or a folder on the root created in SharePoint Designer). In this example i have made a document library with a relative URL of “/test/English/Blog/Scripts” (a sub site named “test” with a sub site named “English” with a subsite named “Blog” and a document library named “Scripts”).

When you refer the scripts in the CEWP, ensure that you point to the correct location of your scripts.

The jQuery-library is found here. The CEWP code refers to jquery-1.4.2.min. If you download another version, be sure to update the script reference in the CEWP.

The sessvars.js is created by Thomas Frank and can be found here

The sourcecode for the file “HitCounterForSharePoint.js” is found here

Create a list with the name “HitCounter”, and add these fields:

  • URL: Multiline plain text
  • User: Person or Group
  • ReferringURL: Multiline plain text
  • Like: Single line of text

You have to give all users write access to the list “HitCounter”.

Add a CEWP where you want this counter to appear, and add this code:

<script type="text/javascript" src="/test/English/Blog/Scripts/jquery-1.4.2.min.js"></script>
<script type="text/javascript" src="/test/English/Blog/Scripts/sessvars.js"></script>
<script type="text/javascript" src="/test/English/Blog/Scripts/HitCounterForSharePoint.js"></script>
<script type="text/javascript">
	hitCounter(true,true);
</script>

Parameters:

  • oncePerSession: True to allow one “hit-count” per unique item per browser session.
  • isDispForm: If true, includes the ID of the item to allow individual counting of each item in a list.

Ask if something is unclear!

Regards
Alexander

Manipulating the Custom Send To Destination in document library with javascript

You all know that you can send a copy of a document from one document library to another by using the dropdown on the “Name” column and selecting “Send to > Other location”.

Some of you also know that you can add a predefined “send to location” under Document library settings > Advanced settings.

The irritating fact is that you can only add one custom location here.


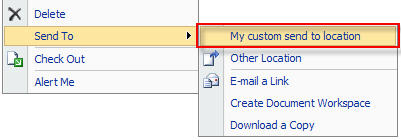
Here is a method for setting this custom send to location by javascript – and being able to manipulate it for each view – or by a dropdown select.

To set the location for a view – put this code in a CEWP below the list view:

<script type="text/javascript" src="../../Javascript/jquery-1.3.2.min.js"></script>
<script type="text/javascript">
// Name displayed on the link
ctx.SendToLocationName = "My custom send to location";
// The full url to the document library to send to - i used ctx.HttpRoot as it reflects the current root
ctx.SendToLocationUrl = ctx.HttpRoot + "/TestLibrary";
</script>

IMG

To have a dropdown select, use this code:

<script type="text/javascript" src="../../Javascript/jquery-1.3.2.min.js"></script>
<script type="text/javascript">
// Define array of locations
var mySendToArr = ['<select location>|',
		 'Archive|http://www.mysendtolocation.com/Archive',
		 'Publish|http://www.mysendtolocation.com/Publish',
		 'AnotherPlace|http://www.mysendtolocation.com/AnotherPlace'];
			  	   
// Build the dropdown			  	   
var mySelect = $("<select id='myCustomSendToSelector'></select>");
$.each(mySendToArr,function(idx,item){
	var split = item.split('|');
	var opt = $("<option></option>");	
	opt.text(split[0]);
	opt.val(split[1]);
	mySelect.append(opt);
});

// Place the dropdown
$("#onetidPageTitle").append("<div style='font-size:10px;float:right;margin-top:-15px' id='insertMySendToSelectHere'>Send to location: </div>");
$("#insertMySendToSelectHere").append(mySelect);

// Add onchange
$("#myCustomSendToSelector").change(function(){
	var SendToLocationName = $(this).find('option:selected').text();
	var SendToLocationUrl = $(this).find('option:selected').val();
	if(SendToLocationUrl!=''){
		ctx.SendToLocationName = SendToLocationName;
		ctx.SendToLocationUrl = SendToLocationUrl;
	}else{
		ctx.SendToLocationName = "";
		ctx.SendToLocationUrl = "";
	}
});
</script>

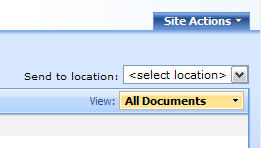
This script adds a dropdown above the view selector like this:
IMG

Ask if anything is unclear!

Regards
Alexander

Prefill fields in NewForm from url query string

This one if based on a request from Charlie Epes:

Hi Alexander:
I need my users to click an “Add New” icon next to an item in a List View and have a NewForm pop-up with the same [Company Name] field already populated. Possible?

This request hat two sides, one for adding the clickable link in the list view, and one to populate the field in the NewForm.

Larry pointed to the Text to HTML script from Christophe for the first part.

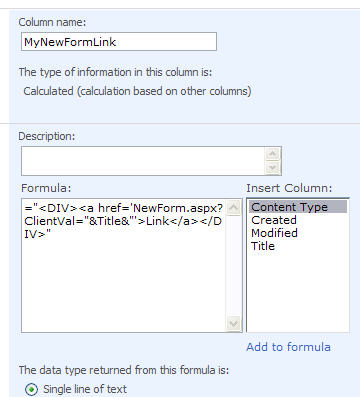
You basically create a calculated field like this:
IMG

This formula gets the value from the “Title” field and wraps it as a link. Then you use the Text to HTML script to convert it into HTML.

The second part is about getting the value from the URL query string and into the Title field in the NewForm.

Place this code in a CEWP (read here how to do that) below the NewForm.aspx.

&lt;script type=&quot;text/javascript&quot; src=&quot;../../Javascript/jquery-1.3.2.min.js&quot;&gt;&lt;/script&gt;
&lt;script type=&quot;text/javascript&quot;&gt;
fields = init_fields();
// Get all querystring parameters
var queryStr= getQueryParameters();

// Is the parameter &quot;ClientVal&quot; defined?
if(queryStr['ClientVal']!=undefined){
	var properVal = decodeURI(queryStr['ClientVal']);
	$(fields['Title']).find('input').val(properVal);
}

// Function to separate each url search string parameters
function getQueryParameters(){
qObj = {};
var urlSearch = window.location.search;
	if(urlSearch.length&gt;0){
		var qpart = urlSearch.substring(1).split('&amp;');
		$.each(qpart,function(i,item){
			var splitAgain = item.split('=');
			qObj[splitAgain[0]] = splitAgain[1];
		});
	}
return qObj;
}

function init_fields(){
var res = {};
$(&quot;td.ms-formbody&quot;).each(function(){
if($(this).html().indexOf('FieldInternalName=&quot;')&lt;0) return; 
var start = $(this).html().indexOf('FieldInternalName=&quot;')+19;
var stopp = $(this).html().indexOf('FieldType=&quot;')-7; 
var nm = $(this).html().substring(start,stopp);
res[nm] = this.parentNode;
});
return res;
}
&lt;/script&gt;

This code looks at the URL query string and finds the “ClientVal”. If it is defined, it prefills the “Title” field with the value from the query string.

Customized form?
How to use these scripts in a customized form

Ask if something is unclear!

Regards
Alexander

Filter list view based on membership in SharePoint group

This script filters a list view based on membership in SharePoint groups. The filtering has nothing to do with item level security, it is merely a method for filtering by comparing a users group membership against a text field containing a group name. This column “VisibleTo” must contain the actual group names from the “People and Groups” list in SharePoint.

This method gives you the ability to filter the list view based on multiple criteria. If the user is member of multiple groups, the list will display all items relevant to any of the groups. You may also specify that elements where the column “VisibleTo” is empty will be displayed for all visitors. The “VisibleTo” column can be a multiple choice checkbox type column.

As always we start like this:
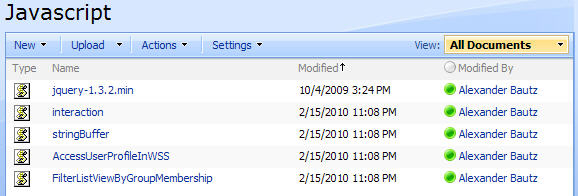
Create a document library to hold your scripts (or a folder on the root created in SharePoint Designer). In this example i have made a document library with a relative URL of “/test/English/Javascript” (a sub site named “test” with a sub site named “English” with a document library named “Javascript”):
IMG

The jQuery-library is found here. The pictures and the sourcecode refers to jquery-1.3.2.min. If you download another version, be sure to update the script reference in the sourcecode.

The scripts “interaction.js” and “stringBuffer.js” is created by Erucy and published on CodePlex.

The script “AccessUserProfileInWSS.js” is found here.

Note:

  • If used in grouped views, you must have the groups initially expanded, otherwise the elements are not rendered and cannot be filtered.
  • Only one level of grouping is currently supported.
  • Boxed view are not supported.
  • The filter does not apply in a datasheet view.

Add a CEWP below the list view webpart, and add this code:

&lt;script type=&quot;text/javascript&quot; src=&quot;../../Javascript/jquery-1.3.2.min.js&quot;&gt;&lt;/script&gt;
&lt;script type=&quot;text/javascript&quot; src=&quot;../../Javascript/interaction.js&quot;&gt;&lt;/script&gt;
&lt;script type=&quot;text/javascript&quot; src=&quot;../../Javascript/stringBuffer.js&quot;&gt;&lt;/script&gt;
&lt;script type=&quot;text/javascript&quot; src=&quot;../../Javascript/AccessUserProfileInWSS.js&quot;&gt;&lt;/script&gt;
&lt;script type=&quot;text/javascript&quot; src=&quot;../../Javascript/FilterListViewByGroupMembership.js&quot;&gt;&lt;/script&gt;
&lt;script type=&quot;text/javascript&quot;&gt;

// Find the user login name
var ui = getUserInfo(); 
var userLoginName = ui['Name'];
// Get the group collection for the current user
var ug = getGroupCollectionObjFromUser(userLoginName);
// Set the filter - if you want the results to include elements in a specific group by default, specify it in the array below
filterVal = [];
// Define the group - find the group ID in &quot;People and Groups&quot;
var groupIdTeam1 = 145;
var groupIdTeam2 = 146;
// Build the filter - add more if's to complete your filter
// Is the user member of the group with id 145?
if(ug[groupIdTeam1]!=undefined){
	filterVal.push(ug[groupIdTeam1]);
}
// Is the user member of the group with id 146?
if(ug[groupIdTeam2]!=undefined){
	filterVal.push(ug[groupIdTeam2]);
}

// Call the function
filterListViewByGroupMembership('VisibleTo',filterVal,true,true,true);
&lt;/script&gt;

The sourcecode for the file “FilterListViewByGroupMembership.js”:

/* Filter list view by membership in SharePoint group - hide the column header and the filter column if specified
 * -----------------------------
 * Created by Alexander Bautz
 * LastMod 15.02.2010
 * -----------------------------
 * Include reference to:
	jquery - http://jquery.com
	interaction.js - http://spjslib.codeplex.com/
	stringBuffer.js - http://spjslib.codeplex.com/
	AccessUserProfileInWSS.js
	FilterListViewByGroupMembership.js
 * -----------------------------
   If used in grouped views, you must have the groups initially expanded, otherwise the elements are not rendered and cannot be filtered.
   Note: only one group level is currently supported.
*/

function filterListViewByGroupMembership(FieldInternalName,filterValueArr,includeEmpty,hideFilterCol,collapseGroupedViews){
filterOK = true;
	// Build object of all headings
	if(typeof(filterColIndex)=='undefined'){
		if(typeof(FieldInternalName)=='string'){
			intName = FieldInternalName;
			hideTD = hideFilterCol;
			fvArr = filterValueArr;
			inclEmpty = includeEmpty;
		}
		filterColIndex = '';
		$(&quot;.ms-viewheadertr th&quot;).each(function(){
			if($(this).find('table:first').attr('name')==intName){
				filterColIndex = $(this).attr('cellIndex');	
				displayName = $(this).find('table:first').attr('displayname');
				// If the parameter &quot;hideFilterCol&quot; is true, remove the column
				if(hideTD){
					$(this).remove()
				}
			}
		});
		
		if(filterColIndex==''){
			filterOK = false;
			var str = &quot;&lt;font color='red'&gt;The column with FieldInternalName  &quot;&quot; + intName + &quot;&quot;, must be in the view for the filter to work.&lt;/font&gt;&quot;;
			$(&quot;td.ms-toolbar[width='99%']&quot;).append(&quot;&lt;div id='hoverDelayInfo' class='ms-listheaderlabel' style='text-align:center;margin-top:-15px'&gt;&quot; + str + &quot;&lt;/div&gt;&quot;);
		}
	}
	
	// Apply filter
	if(filterOK){
		// Build view header text
		if(inclEmpty &amp;&amp; fvArr.length==0){
			fvArr.push('');
			var fv = displayName + &quot; = empty&quot;;
		}else if(inclEmpty &amp;&amp; fvArr.length&gt;0){
			fvArr.push('');
			var fv =  displayName + &quot; = &quot; + fvArr.join(' or ') + &quot; or empty&quot;;
		}else if(!inclEmpty &amp;&amp; fvArr.length==0){
			var fv = &quot;No filtervalues found - all items hidden&quot;;
		}else if(!inclEmpty &amp;&amp; fvArr.length&gt;0){
			var fv =  displayName + &quot; = &quot; + fvArr.join(' or ');
		}		
		// Insert view header text
		if($(&quot;#filterInfo&quot;).length==0){
			$(&quot;td.ms-toolbar[width='99%']&quot;)
				.append(&quot;&lt;div id='filterInfo' class='ms-listheaderlabel' style='text-align:center;margin-top:-15px'&gt;&quot; +
						&quot;&lt;span style='cursor:default'&gt;&lt;img src='/_layouts/images/filter.gif'&gt;&amp;nbsp;&quot; + fv + &quot;.&lt;/span&gt;&lt;/div&gt;&quot;);
		}

		// Find all rows and apply filter
		$(&quot;table.ms-listviewtable tbody:not([id^='aggr']) tr:has(td.ms-vb2) &gt;td[cellIndex=&quot; + filterColIndex + &quot;]&quot;).each(function(){	
			var thisTd = $(this);
			// Build array from all values in &quot;Visible to&quot; - column
			var arrCurrTDtext = thisTd.text().split(';');
			var keeper = false;
			// Find all keepers
			$.each(arrCurrTDtext,function(i,val){
				var thisVal = $.trim(val);
				if($.inArray(thisVal,fvArr)&gt;-1){
					keeper = true;
				}
			});	
			// Remove the ones that do not match
			if(!keeper){
				thisTd.parents('tr:first').remove();				
			}			
			// If the parameter &quot;hideFilterCol&quot; is true, remove the column			
			if(hideTD){
				$(this).remove()
			}
		});
		
		// Test whether the view is grouped twice and give alert
		if($(&quot;td.ms-gb2&quot;).length&gt;0)alert(&quot;Sorry, but this script does not handle views grouped twice.&quot;);
		// Loop trough every tbody to remove empty and to update item count
		$(&quot;tbody[isloaded='true'][beenthere!='true']&quot;).each(function(){
			$(this).attr('beenthere',true)
			var gId = $(this).attr('id');
			var gIdPart = gId.substring(4,gId.length-1);
				// Number of elements remaining
				var trLength = $(this).find(&quot;td.ms-vh-group&quot;).length;				
				if(trLength==0){	
					// Remove the group heading and remaining elements for the group			
					$(&quot;#titl&quot;+gIdPart).remove();
					$(&quot;#foot&quot;+gIdPart+&quot;_&quot;).remove();
					$(this).remove();
				}else{
					// Write the new count to the group heading
					$(&quot;#titl&quot;+gIdPart).find('td.ms-gb span:last').html(&quot;&amp;lrm;(&quot; + trLength + &quot;)&quot;);
				}
		});
		
		// Collapse all groups - they must be expanded by default for the filter to apply
		if(collapseGroupedViews){
			$(&quot;td.ms-gb&quot;).each(function(){
				$(this).find('a:first').click();
			});
		}
		
		// Fix highlighting of every other row
		var classToFind = '';
		if($(&quot;table.ms-listviewtable&quot;).find('tr.ms-alternating').length&gt;0){
			var classToFind = 'ms-alternating';
		}else if($(&quot;table.ms-listviewtable&quot;).find('tr.ms-alternatingstrong').length&gt;0){
			var classToFind = 'ms-alternatingstrong';
		}
		if(classToFind!=''){
			$(&quot;table.ms-listviewtable tr:has(td.ms-vb2)&quot;).each(function(i,row){
				if(i%2==0){
					$(this).addClass(classToFind);
				}else{
					$(this).removeClass(classToFind);
				}
				
			});
		}
		
	}
}

/*
 * Function to get the groupCollectionfrocurrent user.
 * Requires the scripts interaction.js and stringBuffer.js to be loaded
*/
function getGroupCollectionObjFromUser(userLoginName){
	var result = {};
	innerPost(wsBaseUrl + 'usergroup.asmx', 
		'http://schemas.microsoft.com/sharepoint/soap/directory/GetGroupCollectionFromUser',
		'&lt;GetGroupCollectionFromUser xmlns=&quot;http://schemas.microsoft.com/sharepoint/soap/directory/&quot;&gt;&lt;userLoginName&gt;' + userLoginName + '&lt;/userLoginName&gt;&lt;/GetGroupCollectionFromUser&gt;',
		function(data){		
			$('Group', data).each(function(idx, itemData){
				result[$(itemData).attr('ID')] = $(itemData).attr('Name');
			});
		});
	return result;
}

// Attaches a call to the function to the &quot;expand grouped elements function&quot; for it to function in grouped listview's
function ExpGroupRenderData(htmlToRender, groupName, isLoaded){
	var tbody=document.getElementById(&quot;tbod&quot;+groupName+&quot;_&quot;);
	var wrapDiv=document.createElement(&quot;DIV&quot;);
	wrapDiv.innerHTML=&quot;&lt;TABLE&gt;&lt;TBODY id=&quot;tbod&quot;+groupName+&quot;_&quot; isLoaded=&quot;&quot;+isLoaded+&quot;&quot;&gt;&quot;+htmlToRender+&quot;&lt;/TBODY&gt;&lt;/TABLE&gt;&quot;;
	tbody.parentNode.replaceChild(wrapDiv.firstChild.firstChild,tbody);
javascriptFilterView();
}

Save as “FilterListViewByGroupMembership.js”, mind the file extension, and upload to the scriptlibrary as shown above.

Let me know if something is unclear.

Regards
Alexander

Expand empty subgroups and remove group header in grouped list view

I got this request from Kale:

Do you have an ideas on how to remove “empty/blank” items when using the “group by” feature? See the example below. In other words, for category ‘Test 1′ you have to expand the blank item just to see the documents since they don’t have any subcategories assigned to them.

Example:
* Category: Test 1
* Subcategory 1:
– Document 1
– Document 2
* Category: Test 2
* Subcategory: SharePoint
– Document 3
– Document 4
* Subcategory: CRM
– Document 5
– Document 6

This is how I want it to work:
* Category: Test 1
– Document 1
– Document 2
* Category: Test 2
* Subcategory: SharePoint
– Document 3
– Document 4
etc.

Thanks!
Kale

This script checks if the “groupBy” is empty, and if so, expands the content of the group and hides the group header.

Add this script in a CEWP below the list view – alter the location of jQuery to reflect your location:

<script type="text/javascript" src="../../Javascript/jquery-1.3.2.min.js"></script>
<script type="text/javascript">
$(document).ready(function(){
	// Add onclick to the first grouping
	$(".ms-listviewtable td.ms-gb").click(function(){
		expandEmptyCategory();
	});	
	// Call function on load
	isTbodyLoaded();	
});

var isloadedCheck = 0;
// Looping function to call "expandEmptyCategory" when subgroups are loading - looping every 200ms for a maximum of 4 seconds
function isTbodyLoaded(){
	setTimeout(function(){
		tbodyIsLoadedLength = $(".ms-listviewtable tbody[isLoaded='true']").length;
		if(tbodyIsLoadedLength>0){
			expandEmptyCategory();
		}else{
			isloadedCheck += 1;
			if(isloadedCheck<=20){
				isTbodyLoaded();
			}
		}
	},200);
}

function expandEmptyCategory(){
var NameGrouping2 = $(".ms-listviewtable td.ms-gb2:first a:eq(1)").text();
	$(".ms-listviewtable td.ms-gb2").each(function(){	
		var grNameRaw = $(this).text().replace(NameGrouping2+' :','');
		grName = grNameRaw.substring(0,grNameRaw.indexOf('(')-1).replace(/s|xA0/g,'');
		if(grName.length==0){
		var parentTbody = $(this).parents('tbody:first');
			if(parentTbody.css('display')!='none'){
			var tIdRaw = parentTbody.attr('id');
			var tId = tIdRaw.substring(4);
			var tb = $("#tbod"+tId+"_");
				if(tb.attr('isLoaded')){
					if(tb.css('display')=='none'){
						$(this).find('a:first').click();
						$(this).parents('tbody:first').hide();
					}else{
						$(this).parents('tbody:first').hide();
					}
				}
			}		
		}	
	});
}
</script>

This solution is not fully tested so please post any bugs you might find.

SharePoint 2013

Here is a version that works with SP 2013. Due to the asynch loading of the view, this one uses a setInterval, and an initial delay to try to let the view finish loading before kicking in. Try it and see how it behaves, but keep in mind this is most likely not a 100% solution.

Place code in a HTML form web part, or linked using the content link option of a CEWP below the list view.

<script type="text/javascript" src="https://spjsblog.sharepoint.com/DFFS/SPJS/jquery-1.11.1.min.js"></script>
<script type="text/javascript">
$(document).ready(function(){
	setTimeout(function(){
		$("td.ms-gb").each(function(){
			$(this).parents("tbody:first").on("click",function(){
				$(this).next().find(".spjs_expanded").removeClass("spjs_expanded");
			});
		});
		setInterval(function(){
			$("td.ms-gb2:visible:not(.spjs_expanded)").each(function(i,td){
				var a = $(td).find("a:first").parent().text().split(":")[1].split("(")[0], b, c, d;
				if($.trim(a) === ""){
					b = $(td).parents("tbody:first").attr("id");
					if(typeof b === "string"){
						b = b.substring(4);
						c = $("#tbod"+b+"_").attr("isloaded") === "true";
						d = $("#tbod"+b+"_").is(":visible");
						if(!c || !d){
							$(this).find("a:first").trigger("click");
						}
						$(this).addClass("spjs_expanded");
						$(this).parents("tbody:first").hide();
					}
				}
			});		
		},500);
	},1000);
});
</script>

Alexander

SharePoint form: present fields side-by-side

I got this request from Khan:

Alexander,
… Another question I have is how I can display two fields (and their labels) in the same row? I know I am asking too much. But I really hope you can give me some advice o this. Thanks man.

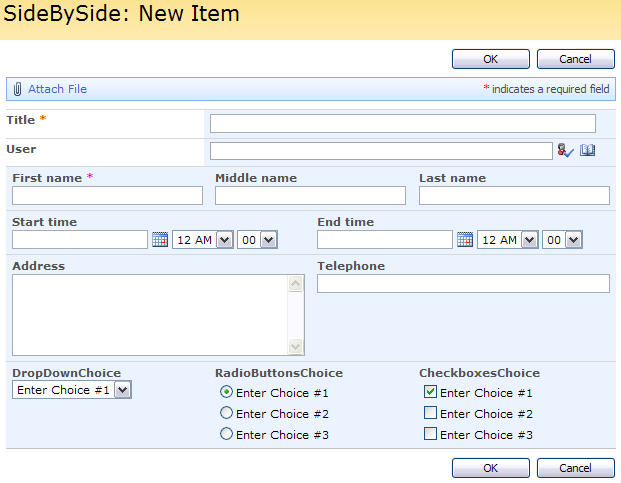
Here is an image of a few random fields put side-by-side:
IMG

As always we start like this:
Create a document library to hold your scripts (or a folder on the root created in SharePoint Designer). In this example i have made a document library with a relative URL of “/test/English/Javascript” (a sub site named “test” with a sub site named “English” with a document library named “Javascript”):
IMG

The jQuery-library is found here. The pictures and the sourcecode refers to jquery-1.3.2.min. If you download another version, be sure to update the script reference in the sourcecode.

Add a CEWP below your NewForm/DispForm/EditForm with this code:

&lt;script type=&quot;text/javascript&quot; src=&quot;/test/English/Javascript/jquery-1.3.2.min.js&quot;&gt;&lt;/script&gt;
&lt;script type=&quot;text/javascript&quot; src=&quot;/test/English/Javascript/FieldsSideBySide.js&quot;&gt;&lt;/script&gt;
&lt;script type=&quot;text/javascript&quot;&gt;
  // Append fields to the field &quot;User&quot;
  arrToPutSideBySide = ['StartTime','EndTime'];
  customSideBySide(arrToPutSideBySide,'User');
  // Appends another set of fields to the field &quot;User&quot;
  arrToPutSideBySide = ['FirstName','MiddleName','LastName'];
  customSideBySide(arrToPutSideBySide,'User');

  // To append the fields to the top use this code:
  //arrToPutSideBySide = ['FirstName','MiddleName','LastName'];
  //customSideBySide(arrToPutSideBySide,'',true);
&lt;/script&gt;

This code is not the full code from the screenshot above. Each horizontal “section” is made with a separate call to the function “customSideBySide()”.

Parameters explained:

  • arr: Array or fields to put in one line.
  • insertAfterField: If you want to append the fields below another field, insert the FieldInternalName here. Set this parameter to “” if you want to use the next parameter.
  • appendToTop: To insert the fields in the top of the form, set it to true. To insert at the bottom of the form, set it to false.

The sourcecode for the file “FieldsSideBySide.js” looks like this:

/* Sharepoint form: Present fields side-by-side
 * ---------------------------------------------
 * Created by Alexander Bautz
 * alexander.bautz@gmail.com
 * https://spjsblog.com
 * v1.0
 * LastMod: 26.01.2010
 * ---------------------------------------------
 * Must include reference to:
 *  jQuery - http://jquery.com
 * ---------------------------------------------
*/

function customSideBySide(arr,insertAfterField,appendToTop){
if(typeof(fields)=='undefined')fields = init_fields();
// Does the field specified as &quot;insertAfterField&quot; exist?
if(insertAfterField!='' &amp;&amp; typeof(fields[insertAfterField])=='undefined'){
	alert(&quot;The FieldInternalName &quot;&quot; + insertAfterField + &quot;&quot;, which is specified as &quot;insertAfterField&quot; does not exist.&quot;);
	return false;
}
	var str = '';
	$.each(arrToPutSideBySide,function(i,fin){
		// Check if FieldInternalName is correct
		if(typeof(fields[fin])=='undefined'){
			alert(&quot;The FieldInternalName &quot;&quot; + fin + &quot;&quot; does not exist.&quot;);
			return false;
		}
		// Adapt width of single line and multi lines of text
		if($(fields[fin]).html().indexOf('FieldType=&quot;SPFieldText&quot;')&gt;0){
			$(fields[fin]).find('input').css({'width':'100%'});
		}else if($(fields[fin]).html().indexOf('FieldType=&quot;SPFieldNote&quot;')&gt;0){
			$(fields[fin]).find('textarea').css({'width':'100%'});
		}
		var tdWidth = Math.round(100/arr.length);
		str += &quot;&lt;td class='ms-formbody' style='width:&quot;+tdWidth+&quot;%'&gt;&quot; + $(fields[fin]).find('.ms-formlabel').html() + $(fields[fin]).find('.ms-formbody').html() + &quot;&lt;/td&gt;&quot;;
		// Remove original field
		$(fields[fin]).remove();			
	});
	str = &quot;&lt;tr&gt;&lt;td colspan='2'&gt;&lt;table cellpadding='0' cellspacing='0' style='width:100%'&gt;&lt;tr&gt;&quot; + str + &quot;&lt;/tr&gt;&lt;/table&gt;&lt;/td&gt;&lt;/tr&gt;&quot;;	
	if(insertAfterField!=''){
		$(fields[insertAfterField]).after(str);
	}else{
		if(appendToTop){
			$(&quot;table.ms-formtable tbody:first&quot;).prepend(str);
		}else{
			$(&quot;table.ms-formtable tbody:first&quot;).append(str);
		}
	}
}

function init_fields(){
  var res = {};
  $(&quot;td.ms-formbody&quot;).each(function(){
	  if($(this).html().indexOf('FieldInternalName=&quot;')&lt;0) return;	
	  var start = $(this).html().indexOf('FieldInternalName=&quot;')+19;
	  var stopp = $(this).html().indexOf('FieldType=&quot;')-7; 
	  var nm = $(this).html().substring(start,stopp);
	  res[nm] = this.parentNode;
  });
  return res;
}

Save as “FieldsSideBySide.js” – mind the file extension, and upload to the script library as shown above.

Ask if something is unclear.

Regards
Alexander

How to use these scripts in a customized form

03.08.2010 Updated the article with another example on how to build the fields-object in a customized form.


This article describes how to use most of the solutions found in this blog with a customized form. The scripts which this article addresses, is the ones involving the function “init_fields()_v2”.

This was originally an answer to a comment in one of the articles.


I get this question a lot:
How can i use these scripts in a customized form?

The answer is simple, but i will explain it so that you understand why it’s not working.

This script relays in the function init_fields() to identify and “objectify” the form by it’s <TR> tags (table rows). What the function does is to find all the FieldInternalNames in the code by this “information-tag”:

&lt;!-- FieldName=&quot;This is the DisplayName&quot;
FieldInternalName=&quot;ThisIsTheFieldInternalName&quot;
FieldType=&quot;SPFieldText&quot;
--&gt;

It then make an object which, when called with the FieldInternalName of a field, returns an object containing that table row (both formlabel and formtable).

When initiated like this:

fields = init_fields_v2();

You address a <TR> like this:

$(fields[FieldInternalName])

Where “FieldInternalName” is the FieldInternalName of your field. Read here how to identify the FieldInternalName.

This is the original function for use in standard SharePoint forms:

function init_fields_v2(){
	var res = {};
	$(&quot;td.ms-formbody&quot;).each(function(){
	var myMatch = $(this).html().match(/FieldName=&quot;(.+)&quot;s+FieldInternalName=&quot;(.+)&quot;s+FieldType=&quot;(.+)&quot;s+/);	
		if(myMatch!=null){
			// Display name
			var disp = myMatch[1];
			// FieldInternalName
			var fin = myMatch[2];
			// FieldType
			var type = myMatch[3];
			if(type=='SPFieldNote'){
				if($(this).find('script').length&gt;0){
					type=type+&quot;_HTML&quot;;
				}
			}
			if(type=='SPFieldLookup'){
				if($(this).find('input').length&gt;0){
					type=type+&quot;_Input&quot;;
				}
			}
			// Build object
			res[fin] = this.parentNode;
			res[fin].FieldDispName = disp;
			res[fin].FieldType = type;
		}		
	});
	return res;
}

Customized form

When you modify the list form in SharePoint Designer, you loose the FieldInternalName and therefore the function init_fields_v2() does not return anything.

To address the fields on a custom form you have to find another way of addressing these fields and to “objectify” them in the same way as the script init_fields_v2(). Basically you could insert some kind of “identifier-attribute” on the <TR> tags, or you can go with the displayName – only remember that if you change the displayName – you have to update your script…

To use the a custom made ID attribute, replace the init_fields_v2() function with this one:

function init_fields_v2(){
  var res = {};
  $(&quot;td.ms-formlabel&quot;).each(function(){
  	var thisID = $(this).attr('id');
	  res[thisID] = $(this).parents('tr:first');
  });
  return res;
}

This approach requires that you add a unique ID attribute to the <TD> holding the formlabel. Here is an example of code from a customized form:

&lt;table border=&quot;0&quot; cellspacing=&quot;0&quot; width=&quot;100%&quot;&gt;
	&lt;tr&gt;
		&lt;td width=&quot;190px&quot; valign=&quot;top&quot; class=&quot;ms-formlabel&quot; id=&quot;TitleColumnCustomID&quot;&gt;
			&lt;H3 class=&quot;ms-standardheader&quot;&gt;
				&lt;nobr&gt;Title&lt;span class=&quot;ms-formvalidation&quot;&gt; *&lt;/span&gt;
				&lt;/nobr&gt;
			&lt;/H3&gt;
		&lt;/td&gt;
		&lt;td width=&quot;400px&quot; valign=&quot;top&quot; class=&quot;ms-formbody&quot;&gt;
			&lt;SharePoint:FormField runat=&quot;server&quot; id=&quot;ff1{$Pos}&quot; ControlMode=&quot;New&quot; FieldName=&quot;Title&quot; __designer:bind=&quot;{ddwrt:DataBind('i',concat('ff1',$Pos),'Value','ValueChanged','ID',ddwrt:EscapeDelims(string(@ID)),'@Title')}&quot;/&gt;
			&lt;SharePoint:FieldDescription runat=&quot;server&quot; id=&quot;ff1description{$Pos}&quot; FieldName=&quot;Title&quot; ControlMode=&quot;New&quot;/&gt;
		&lt;/td&gt;
	&lt;/tr&gt;
	&lt;tr&gt;
		&lt;td width=&quot;190px&quot; valign=&quot;top&quot; class=&quot;ms-formlabel&quot; id=&quot;ChoiceColumnCustomID&quot;&gt;
			&lt;H3 class=&quot;ms-standardheader&quot;&gt;
				&lt;nobr&gt;MyChoiceColumn&lt;/nobr&gt;
			&lt;/H3&gt;
		&lt;/td&gt;
		&lt;td width=&quot;400px&quot; valign=&quot;top&quot; class=&quot;ms-formbody&quot;&gt;
			&lt;SharePoint:FormField runat=&quot;server&quot; id=&quot;ff2{$Pos}&quot; ControlMode=&quot;New&quot; FieldName=&quot;MyChoiceColumn&quot; __designer:bind=&quot;{ddwrt:DataBind('i',concat('ff2',$Pos),'Value','ValueChanged','ID',ddwrt:EscapeDelims(string(@ID)),'@MyChoiceColumn')}&quot;/&gt;
			&lt;SharePoint:FieldDescription runat=&quot;server&quot; id=&quot;ff2description{$Pos}&quot; FieldName=&quot;MyChoiceColumn&quot; ControlMode=&quot;New&quot;/&gt;
		&lt;/td&gt;
	&lt;/tr&gt;
&lt;/table&gt;

Note the id attributes “TitleColumnCustomID” and “ChoiceColumnCustomID” in line 03 and 15.

To “get” the Title field you address it like this:

fields = init_fields_v2();
var myTitleField = $(fields['TitleColumnCustomID']);
alert(myTitleField.html());

Ask if anything is unclear.

Regards
Alexander

SharePoint form: scroll to field as with an anchor tag

I got this request from Cookie:

Is there a way to create an anchor within a NewForm or EditForm? I have a long intake, or it could be long. When I assign the the item to an owner and provide them a link to the form, it would be easier to have an addition to the link with the anchor that links to a specific field in the form. Maybe a script that uses the fieldinternalname and converts that to the anchor name for simplicity.

Place this code in a CEWP below the form in NewForm, EditForm or DispForm:

&lt;script type=&quot;text/javascript&quot; src=&quot;../../Javascript/jquery-1.3.2.min.js&quot;&gt;&lt;/script&gt;
&lt;script type=&quot;text/javascript&quot;&gt;
/*
  This script is used to be able to scroll to a field based upon a url query string parameter like this:
  .../EditForm.aspx?ID=1&amp;focus=FieldInternalNameOfFieldToFocusOn
*/

fields = init_fields();

// If the query string parameter &quot;focus&quot; is set, and a field with that FieldInternalName is found, scroll to that field
$(document).ready(function(){
	var q = getQueryParameters();
	if(q['focus']!=undefined){
		var fin = q['focus'];
		if(fields[fin]!=undefined){
			var offset = $(fields[fin]).offset();
			scrollTo(0,offset.top);
		}
	}
});

// Function to separate each url search string parameters
function getQueryParameters(){
qObj = {};
var urlSearch = window.location.search;
	if(urlSearch.length&gt;0){
		var qpart = urlSearch.substring(1).split('&amp;');
		$.each(qpart,function(i,item){
			var splitAgain = item.split('=');
			qObj[splitAgain[0]] = splitAgain[1];
		});
	}
return qObj;
}

// Function to make an object of all tr-tags in the form
function init_fields(){
var res = {};
$(&quot;td.ms-formbody&quot;).each(function(){
if($(this).html().indexOf('FieldInternalName=&quot;')&lt;0) return; 
var start = $(this).html().indexOf('FieldInternalName=&quot;')+19;
var stopp = $(this).html().indexOf('FieldType=&quot;')-7; 
var nm = $(this).html().substring(start,stopp);
res[nm] = this.parentNode;
});
return res;
}
&lt;/script&gt;

Make your links up like this:
…/EditForm.aspx?ID=1&focus=FieldInternalNameOfFieldToFocusOn

Look here on how to find the FieldInternalName of your field.

Regards
Alexander