Background
This presentation seeks to show how easily you can setup a leave or vacation request system in DFFS. This presentation assumes that you already have SharePoint and DFFS already installed in your environment.
The development is based on an On premises SharePoint 2016 setup however the same concept applies to SharePoint 2019 or O365
Environment
- SharePoint 2016
- DFFS
- SharePoint Designer 2013
Note: The way I have developed this system is not the only way of achieving this task. DFFS is so flexible That it allows you to do this in many ways. I just chose one the ways.
Scope and Features.
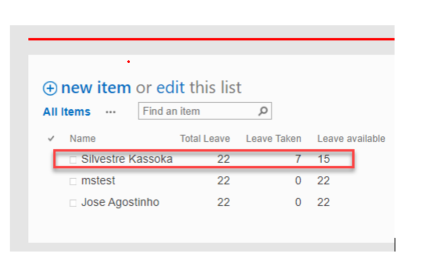
This system will manage the leave requests and leave days of employees of any organization. The leave days will be stored in another list where user can track the number of leave/vacation days taken and leave/vacation days to be taken.
When the requests are made the leave days will go through approval processes based on the employee´s position. For example, in some organization a Manager´s leave request will only be approved by the Managing Director i.e. one level approval process.
However, in most cases the approval process is far more complex than that they are case where you have factory employees who report to different Supervisors who in turn report to the different Managers. In such a case the approval process has to go through all these different approval processes. This system will address that as well.
System Features.
- Submission of Leave Requests.
- Submission of Justification Requests for absence (attachment of doctor’s report).
The system will also have safety nets in that a requests can only be submitted if the request days do not exceed available days.
Now enough with the theory, let get into it!
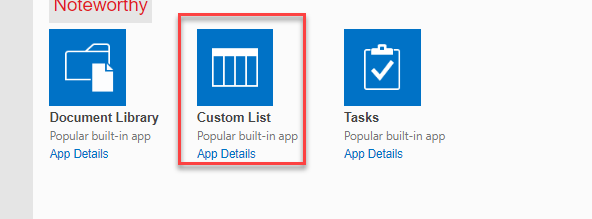
- We need to create two custom lists named Leave Requests and Employees requests.
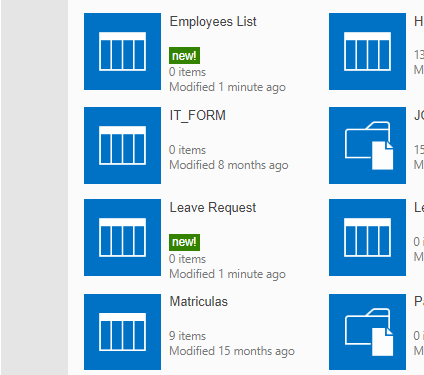
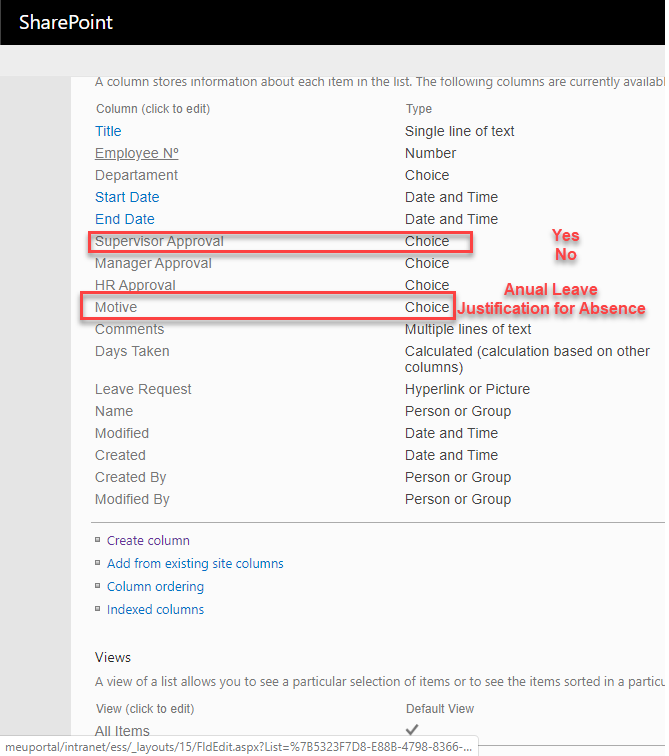
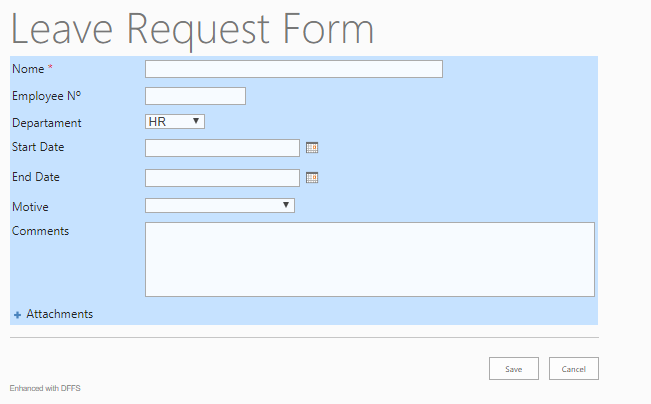
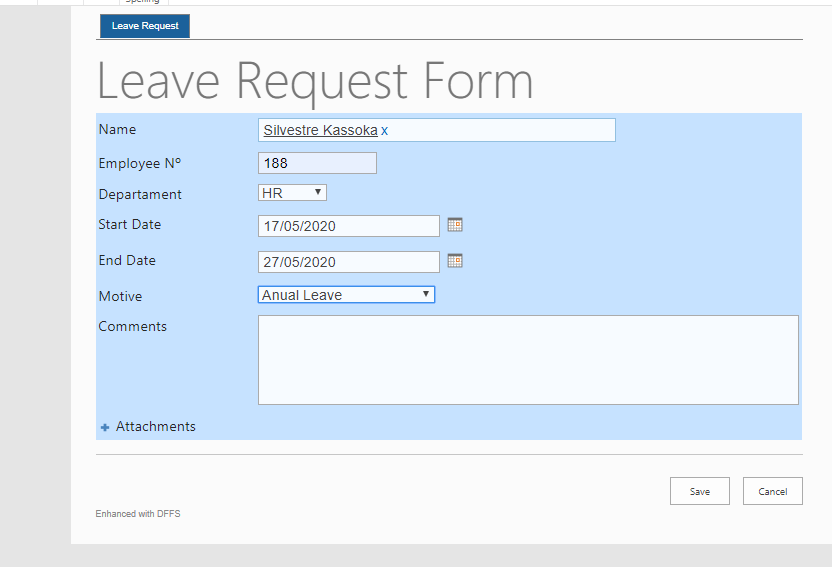
After creating the custom lists please go ahead and create the columns necessary. For the leave request I have created the columns as shown below.
For choice fields I have shown the option configured in the print screen below.
Please note that the Days taken column is a calculated column. You have to be careful when calculating Start Days and End Days not to include weekends so for that we use the formula
Below. In The Column validation of the calculated Column.
=IF(AND((WEEKDAY([[End Date]];2))<(WEEKDAY([Start Date];2));((WEEKDAY([Start Date];2))-(WEEKDAY([End Date];2)))>1);(((DATEDIF([Start Date];[End Date];”D”)+1))-(FLOOR((DATEDIF([Start Date];[End Date];”D”)+1)/7;1)*2)-2);(((DATEDIF([Start Date];[End Date];”D”)+1))-(FLOOR((DATEDIF([Start Date];[End Date];”D”)+1)/7;1)*2)))
After creating the two custom list, we need to install DFFS on these list in order to create and customize our forms. Please follow the step below to customize to install DFFS.
First identity in Site Contents a folder written SPJS and open it.

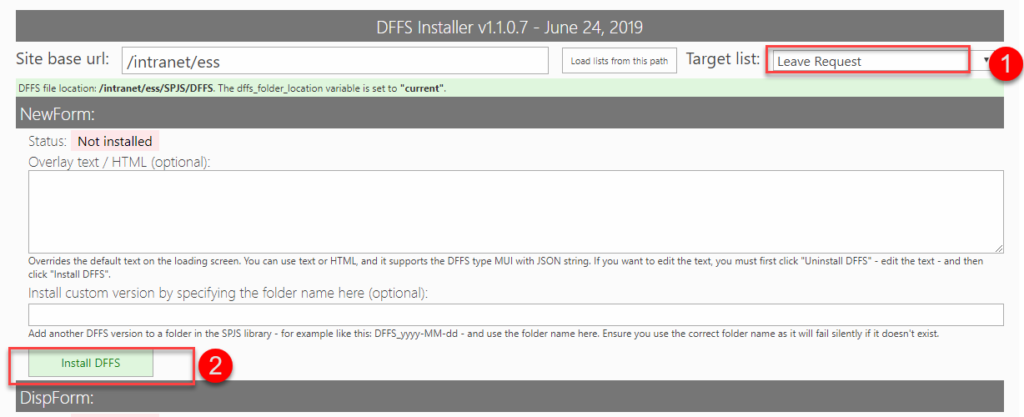
After opening the DFFS folder on the target list please select the name of the list in which you want to customize your forms. In my case it is the Leave Request list.
After selecting the list proceed to install DFFS by clicking theinstall DFFS buttonfor all the formtypes i.e. New Form, Display form and Edit form.
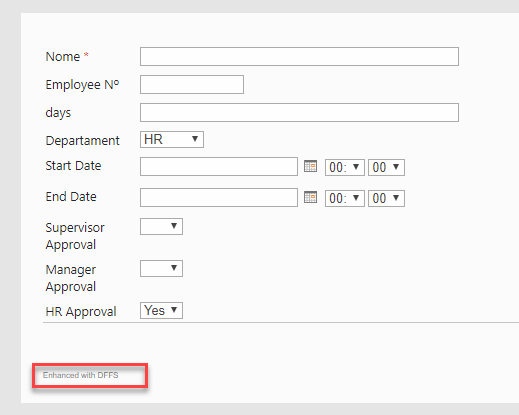
When we reopen our form when can now see that its Enhanced with DFFS meaning the install was successful. And now we can start customizing our form.I will not go deep in customization as this is already covered in the DFFS Manual however I will add a little colour to make this form look pleasant.
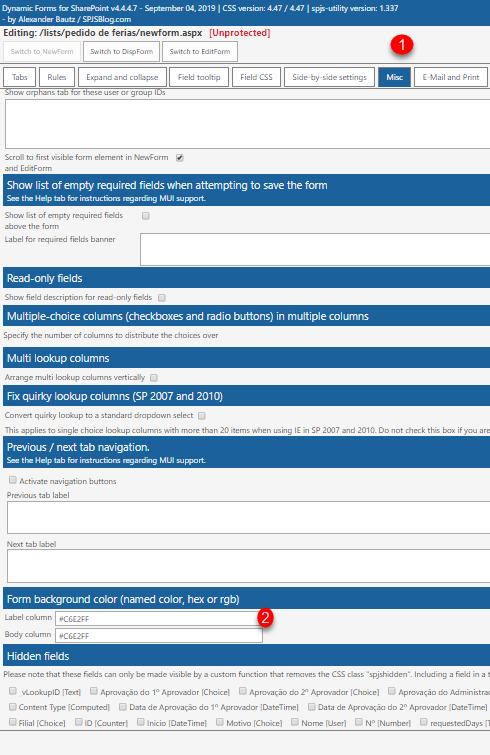
To do a bit of customization we are going to do the below configs to help the form look a bit more pleasant. Customization is a whole big topic on its own and like I mentioned earlier we will not be getting in more detail.
Add the columns to the form as shown below
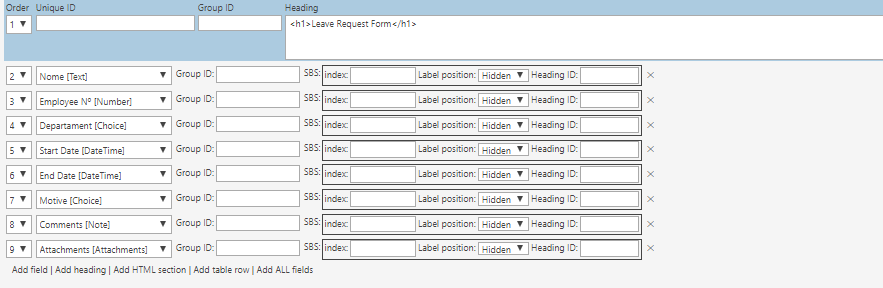
.
After few configurations shown above our form is already looking this. We need to include the attachments on the form to help when submitting the Doctors reports when justifying for absence due to medical reasons.
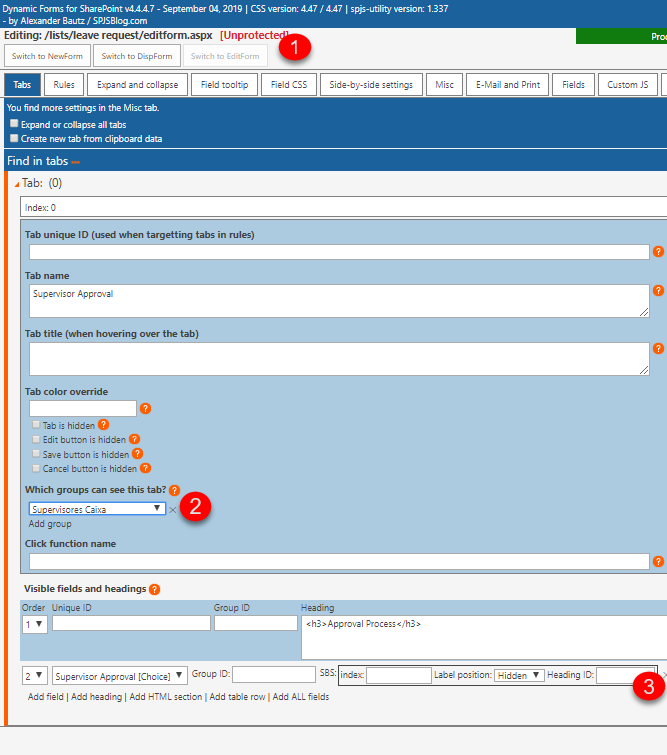
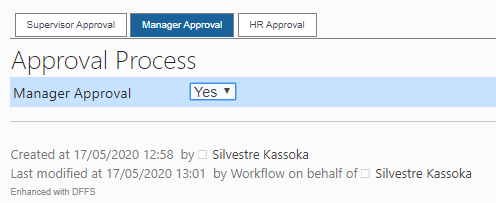
As our requests will pass through different approval stages will need to create the approvals Tabs in the Edit form. In our case the approvals will be done by Supervisors, Managers and HR Department. As a rule of thumb you need to create SharePoint Groups for each TAB for example.The edit tabs will have the approvals columns which are Supervisor Approval,
Manager Approval and HR Approval.Normally, this will have a date field to show the date when the approval was made.In our example we did not include a date for simplicity sake.
When creating the Edit Tabs, we need to specify which groups will be able to visualize that TAB in the example below the group Supervisors Caixa will visualize the Approval TAB for the Supervisors.
This is a good security measure to make sure the Approvals are done by the intended people.
Please note that we are not going to be installing DFFS on the Employees custom list because this basically used to track Employees Leave Days. What will happen is that someone from the HR Department with edit permissions will update the leave days of the employees normally at the beginning of the year.
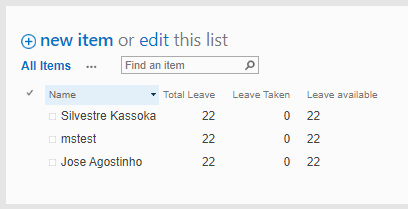
Please note the leave available column is a calculated column which use the formula below
To calculate the number of days.
=IF (AND ([Total Leave] <[Leave Taken];NOT(ISBLANK([Total Leave]));NOT(ISBLANK([Leave Taken])));””;IF(AND([Total Leave]>=[Leave Taken];NOT(ISBLANK([Total Leave]));NOT(ISBLANK([Leave Taken])));[Total Leave]-[Leave Taken];””))
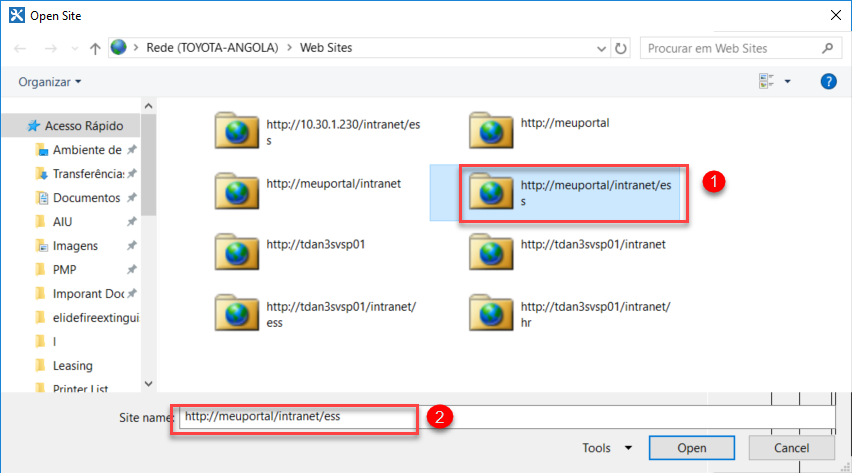
Now that the basic customizations are done we will jump to SharePoint Designer(SPD) to continue with our configs.
When opening SPD we need to specify the site that hosts our custom list.
In SDP open your Leave Request list as shown below.
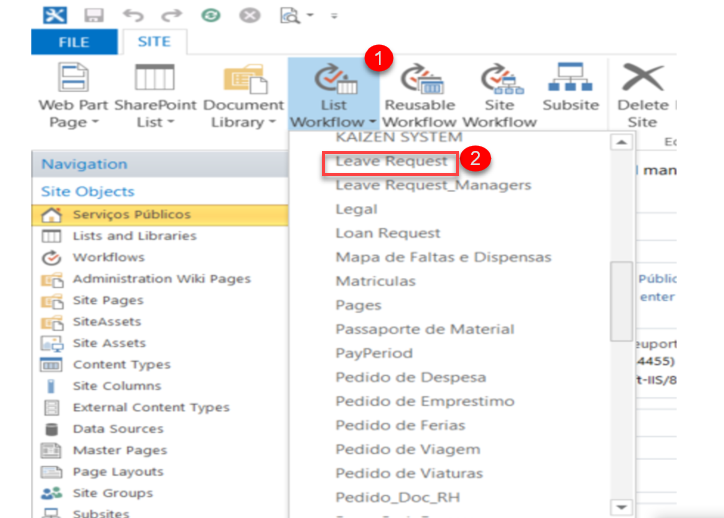
Give your workflow a name and make sure it is a 2013 Workflow as highlighted below. Please note will not go into details on how to make workflows in SPD.That’s a whole big subject which has books written on it. I will just show the Configuration that will make your leave request work.However, from the configuration we are going to be making here there is a lot to be learnt.
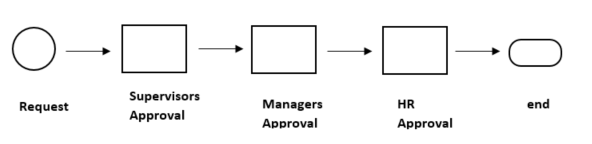
Again, the way I will configure my workflow is not the only way please feel to configure in a way that best suits your environment.Our requests will follow the fluxogram shown below.
We can add a stage by clicking the Stage Option on the ribbon tab of the SDP as shown below.

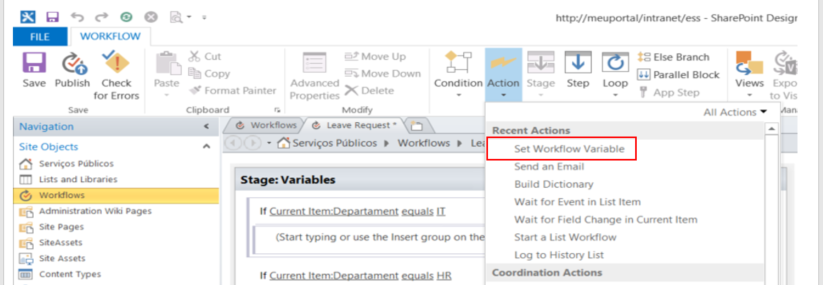
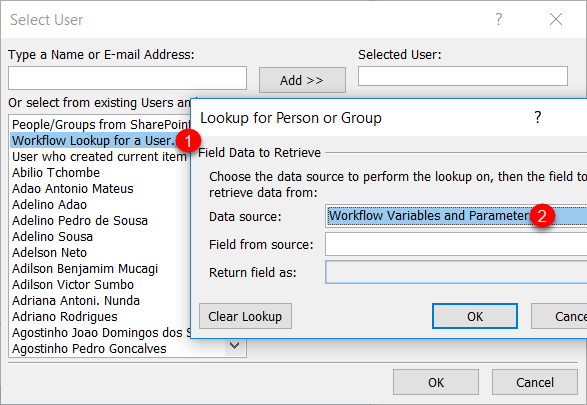
To simplify things, for each approval stage we will create a Stage in SPD except for Supervisor Approval because this will be part of the variables stage. First we will create A stage to store all of our variables.This stage will be called variables.
To set a variable click in the Set workflow variable on the actions ribbon as shown below.
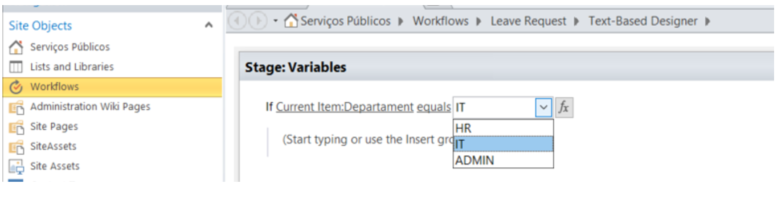
To set values we click on condition right on the ribbon and select the option If value equals value. To make logic in SPD we need to associate conditions and actions.
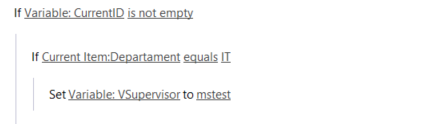
IF Department equals IT, Department and IT being lookup values from our Custom list through SPD.
To kick start the workflow we need to make sure that the ID field should have a value.
After clicking the option double click, it and give name to the variable in our case It going to VSupervisor and we are setting that to user mstest. Basically what we are saying it is.
If a request is made and the Department is IT, make the Supervisor to be mstest. In other words, we are telling the workflow to route all IT request to the IT Supervisor who is mstest.
Will the follow the same procedure to setup for Variable for Managers as well.This request has to be sent by email so we are going to prepare that as well. Normally for HR you can just forward the e-mail to a Group.These are usually the HR employees who deal with vacations
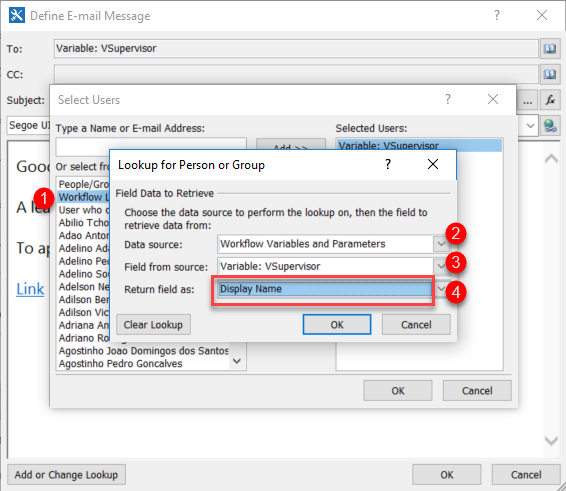
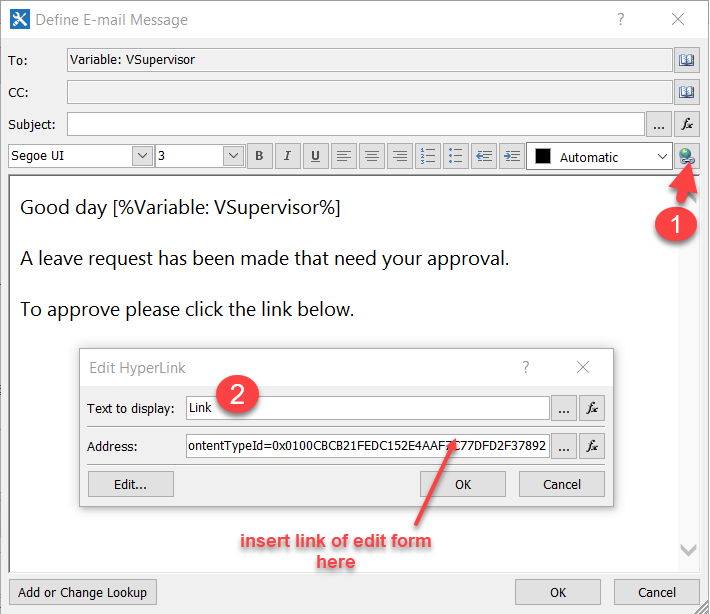
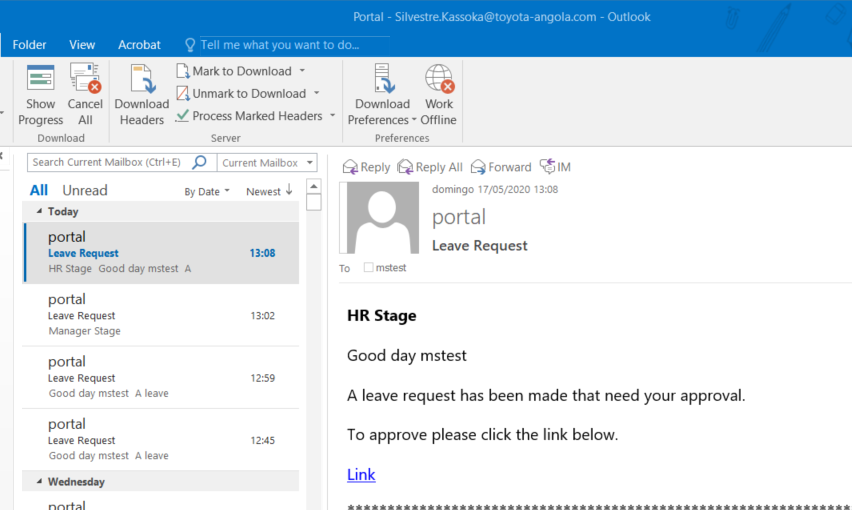
After setting your variables then configure the send e-mail option and to do that follow the steps.
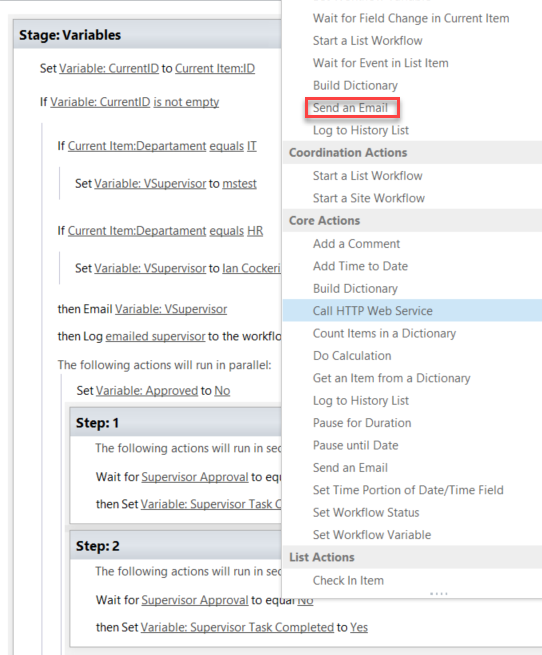
After adding the e-mail option double click it and configure as follows.
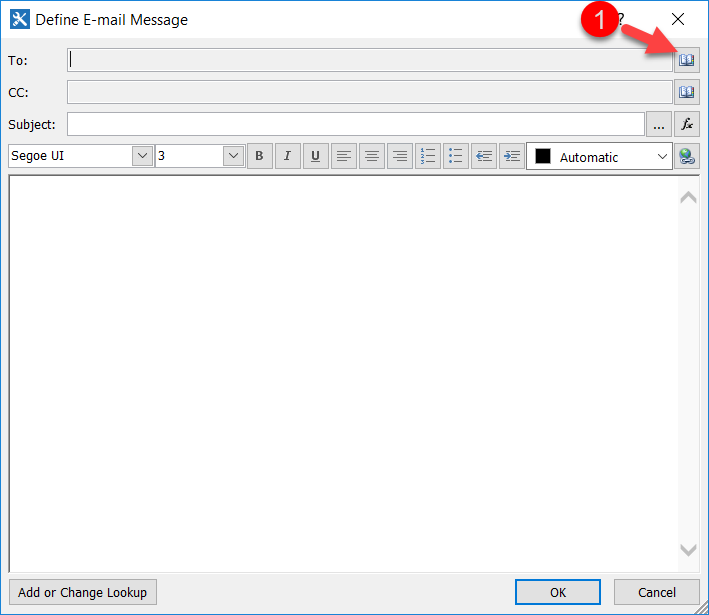
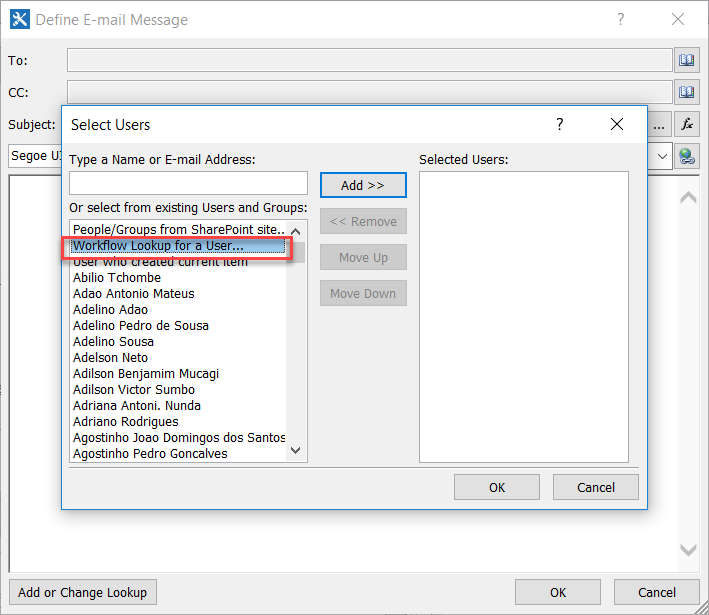
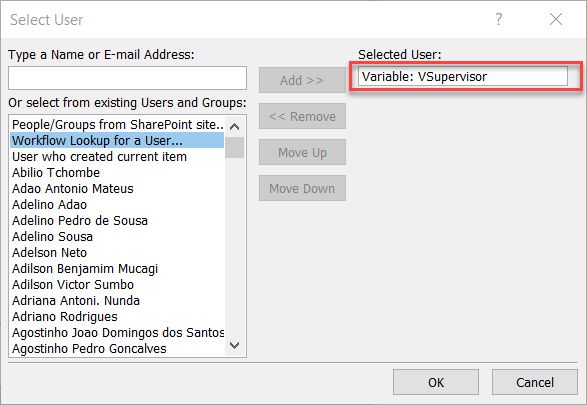
Select the VSupervisor variable as shown below.
- As we configured the email we will need an edit form link. This the link which will be used for the approval.
- There are so many ways of getting this but I prefer to simply create a dummy request edit it and get the link from thereI my case I created the dummy request below

I will now edit it by clicking the 3 dots to obtain the edit link. Please make sure to copy the whole link we will need it later.
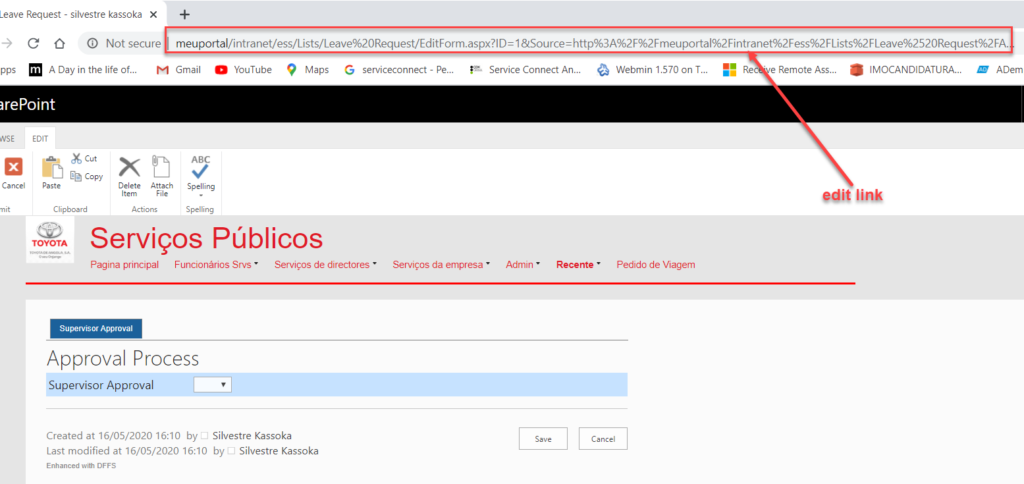
After getting the edit link paste it in the body of your e-mail.
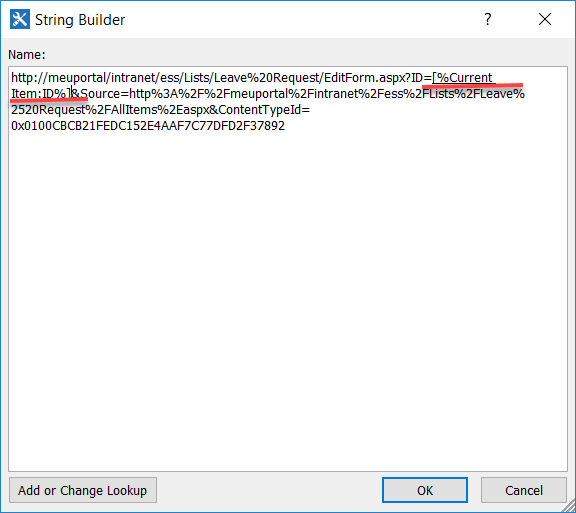
Now we need to edit the edit link sorry for the pun so that it will be different on every request
If we do not edit it all the requests will come with one ID. To do so click on the 3 dots next to
Fx. Delete the ID number, in these case its 1, meaning request is number 1 on the list.
After deleting, the ID value lookup the ID field from the list. To do that click the add or change lookup value.
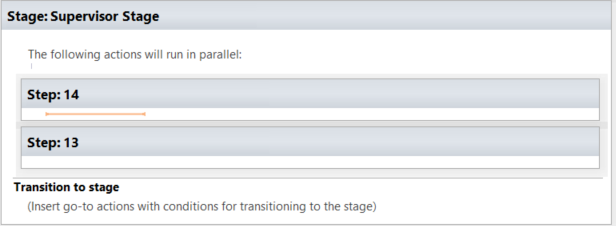
After the email is wait is sent to the Supervisor we need to put the wait function on this stage to do that the parallel block option in the ribbon. The whole idea here is we want the workflow to stop until the Supervisor approves the task. If we do not do that the workflow we just go through all the stages even if the conditions are not met. Basically the logic here will tell the workflow to stop until the Supervisor approves or rejects the request. This setup will be done also for the Manager and HR Stages.

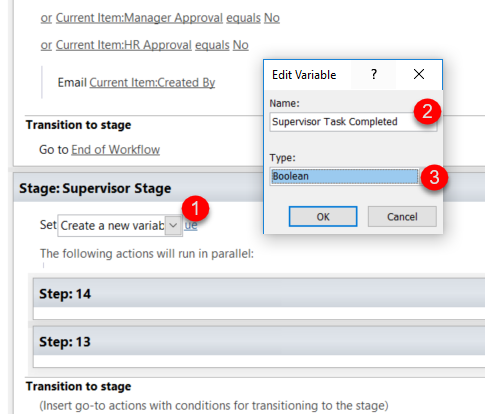
After selecting the run in parallel block and 2 steps in that block by clicking the Step option in the ribbon.
In the first step we are going to configure the wait for approval option. First we need to create a variable for starting and ending our parallel block, it has to be a Boolean variable. In our case we will call it Supervisor Task Completed.

Right mouse click the parallel block and go to Advanced properties and then select the previouslycreated variable Supervisor Task Completed As shown by the prints below.
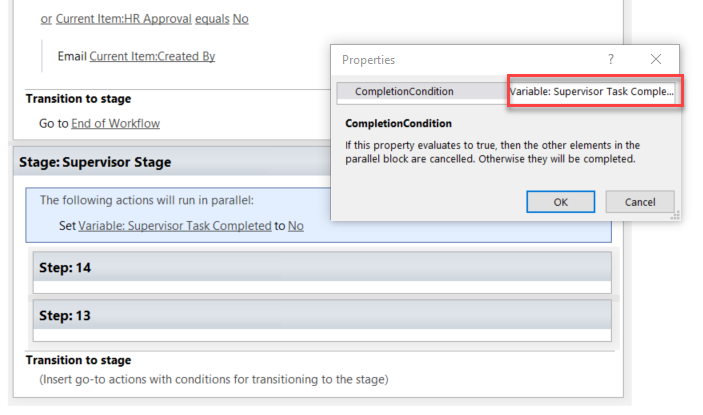
After completing your waiting steps configuration, it should look like below.
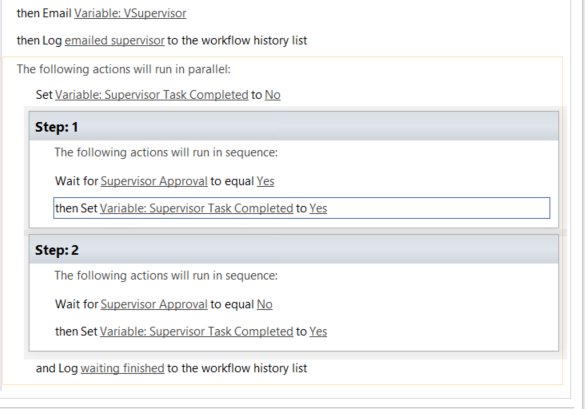
As I have already highlighted the waiting configuration should be done of for all the stages.
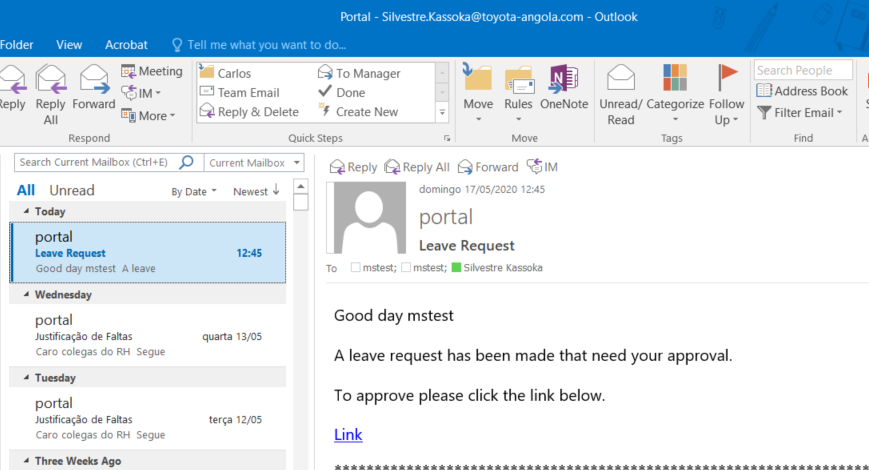
Our Basic Email Setup is done for the Supervisor.
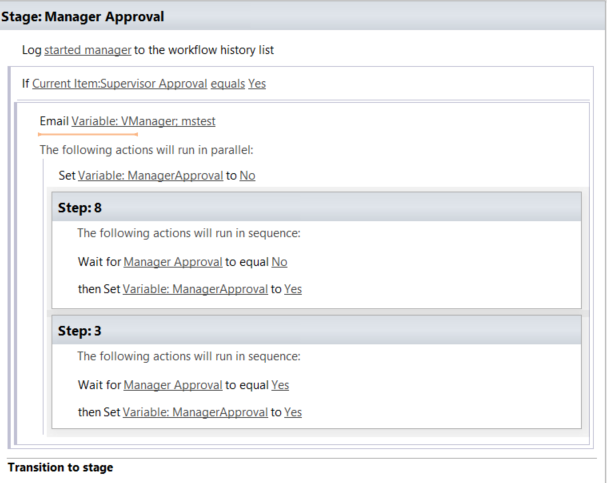
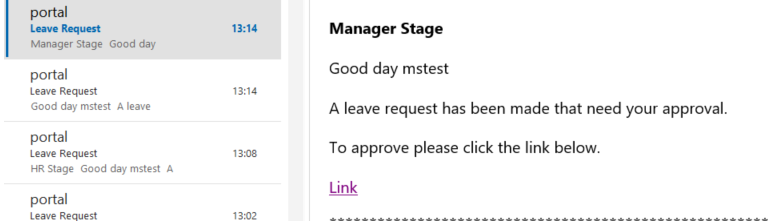
For the Manager´s approval the setup is similar. The only difference is that the Manager should only receive the Leave Request if the Supervisor approves else an email of rejection is sent to
to the requester. Your Manager Stage Setup should look like below.
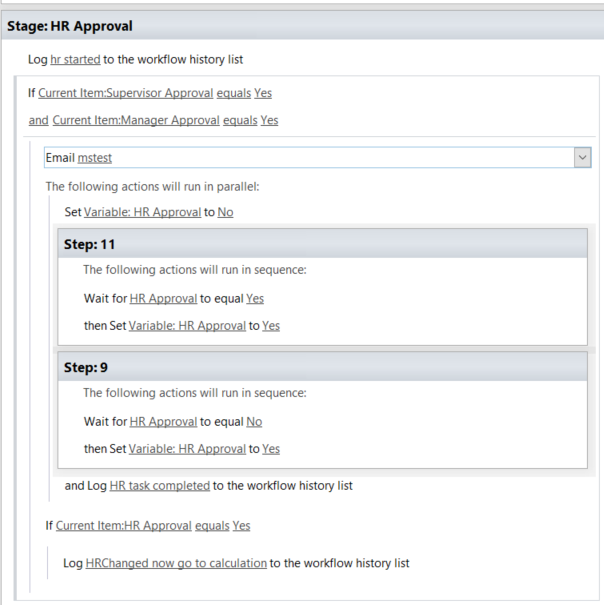
And to reach HR the request will need the approval of the Supervisor and the Manager.
So the Setup should be like the on below.
After HR has approved a request the system should look into the Employees List and deduct the number of approved days from that Employees´ leave available days.
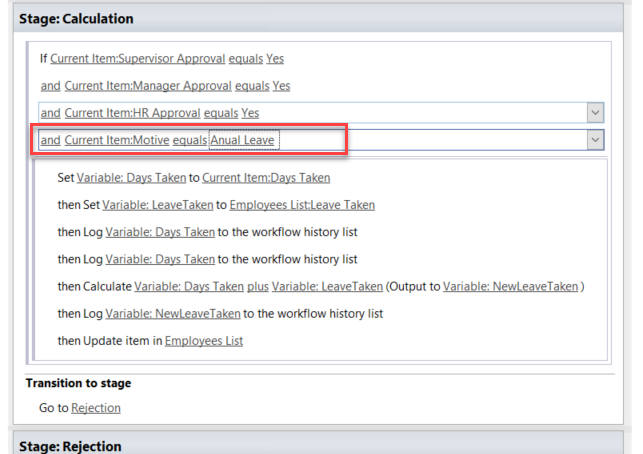
To do that I have included another stage for Calculation which will call Calculation Stage.
Basically we need to create Variables again for this, we need the store the Values from our employees list such as the Leave Taken & Leave available. So Basically our formula will be
Leave taken + Days Requested =New Leave Taken then we update the in the Employees list and there since we the Leave available is a calculated field it will also be updated.
The result to the formula should not be negative because its means the Employee has requested leave days than has available. In a such we can put a condition that if that happens then the requested should be rejected.
Now that we have the idea he goes the configuration in SharePoint designer.
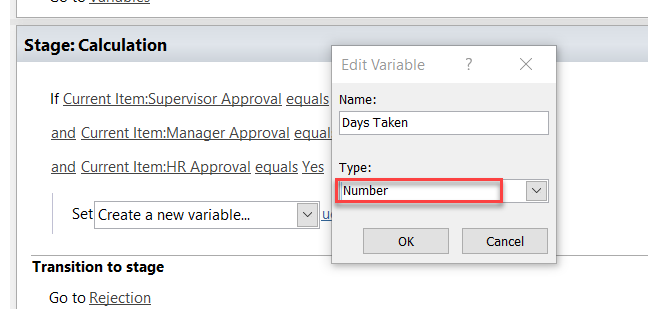
First let´s create a variable for our day taken. Please note when creating the variables at this Stage the type should be numbers since we are dealing with numbers.
It is important to note that the calculation should on be made if the reason for request is Annual leave to guarantee that we will put a condition that specifies it.
Please note when looking up the value for the Leave Taken valuable we need to change the Data source to the employees list.
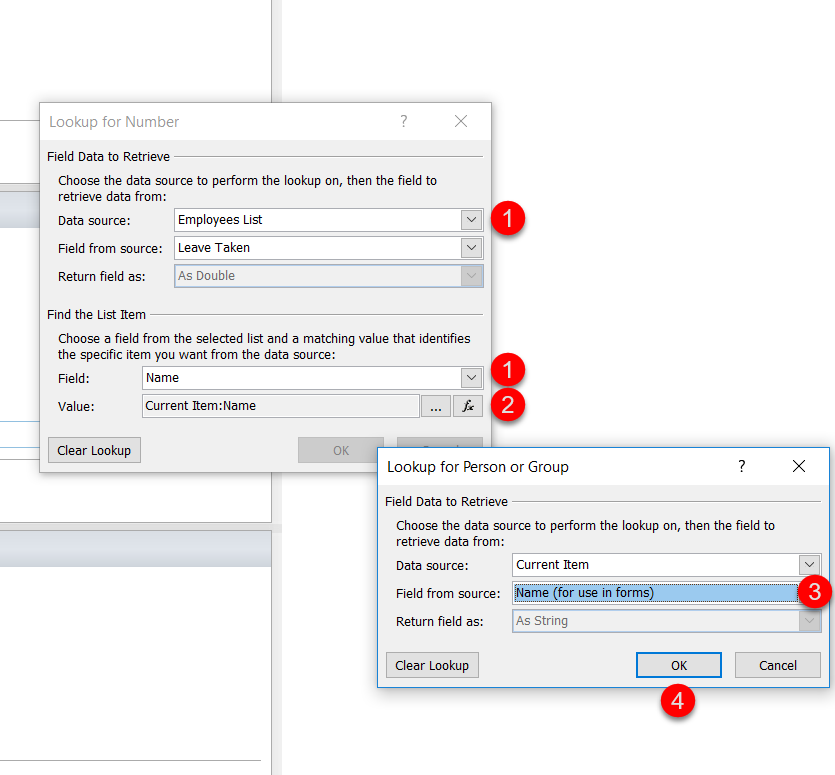
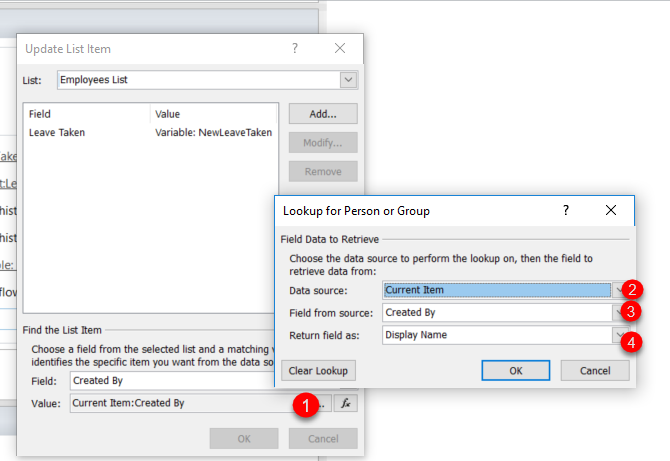
To retrieve the Value, on the Field from Source field we should select the column Leave Taken because that’s where our field. The on the find list item we need matching values in both lists. In this we are matching by name.
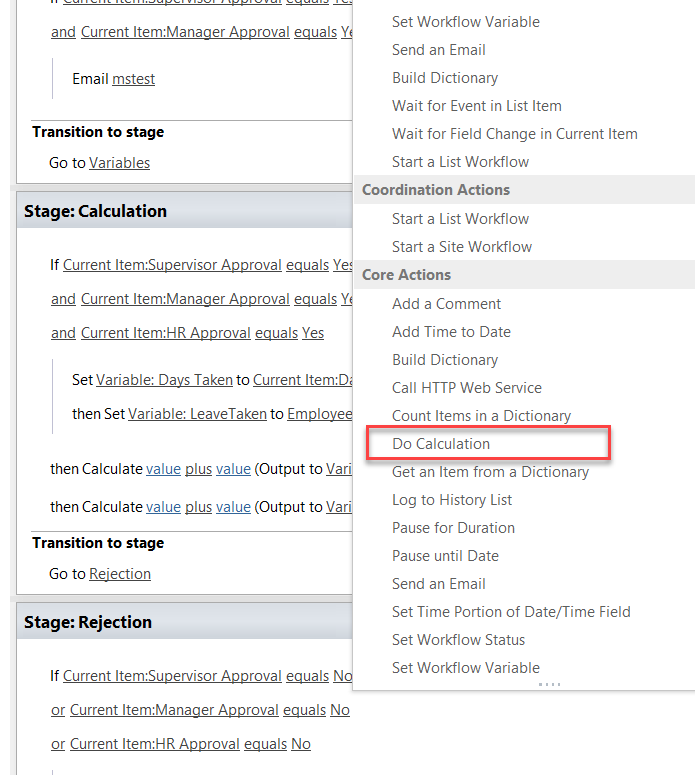
After we retrieve these values the we need to do the calculation. In SharePoint Designer there is
an action called do calculation
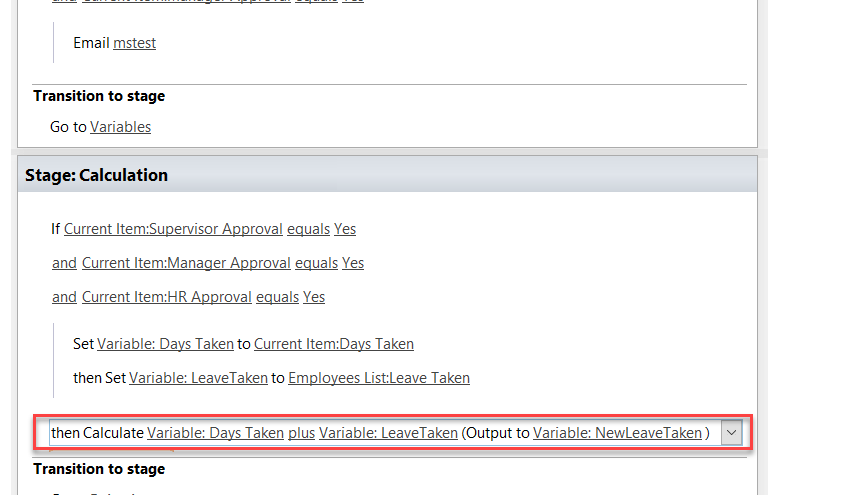
When looking up for the fields we need for the calculation all we need to retrieve our previous
Set variables. Your formula should look like the print below.
After we have out NewLeaveTaken we need to updated the Employees list
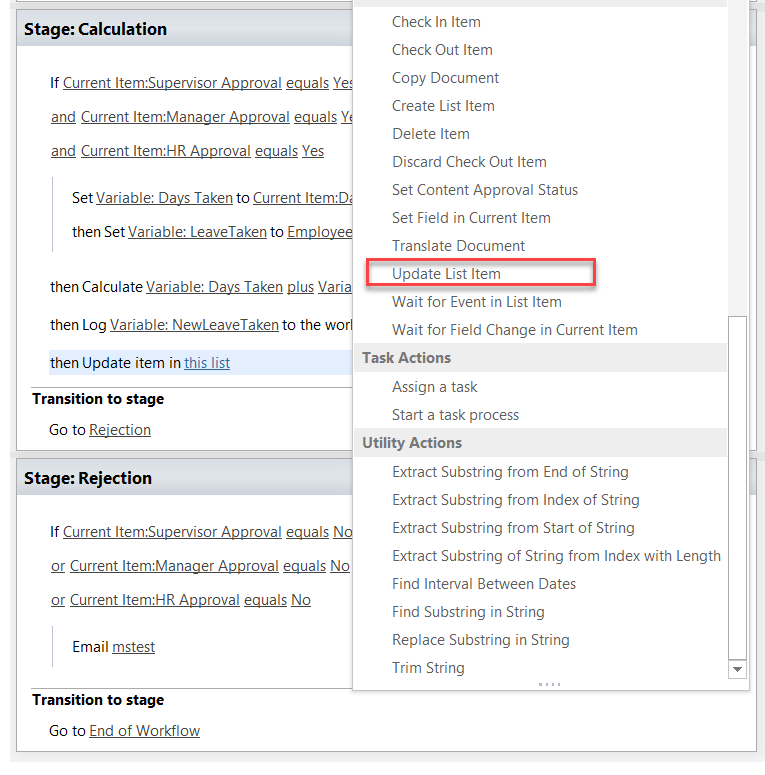
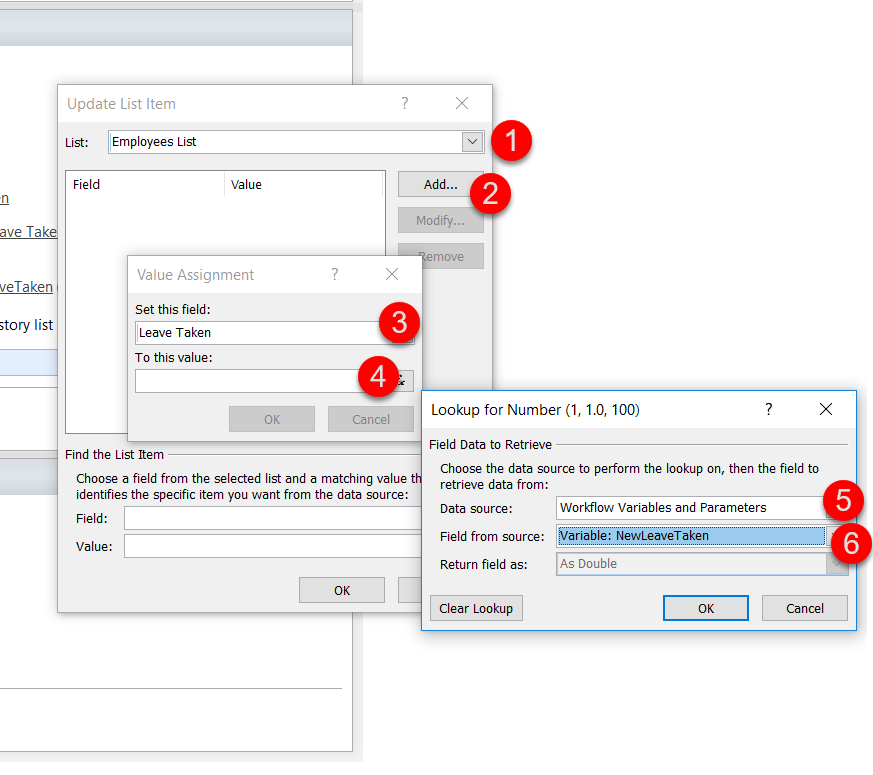
Your setup should look like the print below.
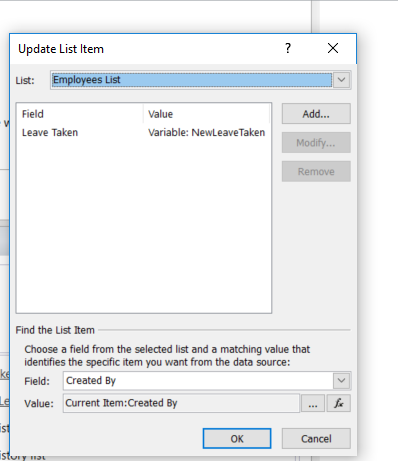
After everything is done your Calculation Stage should like below.Please note the condition on annual leave.This to guarantee that the calculation can only be done when its a leave request.
Almost done, we just need to setup the rejection stage. Basically if the request is rejected on any of the stages then the request is rejected. And this is where the workflow ends.

Lastly we need to setup the Workflow to run automatically and to do that we click on Workflow settings


Now let’s test.
As you see the e-mail has been received by the supervisor.
After the Supervisor Approves yes the Request move to the Manager.
After the Managers Approval the Request goes to HR.
After the HR approves the request you the employees’ days are then updated in the Employees List automatically.
To make a justification request the user simply has to select the motive justification for absence in the motive column otherwise all the approvals stages are the same. The only difference is that when you make a justification for absence fase and after all the approvals you leave days’ balance will not be updated.
So this is basically a setup for a leave request System using DFFS enjoy.
Hi There,
A nice and simple example.
I just have a small concern. How can I make sure not any supervisor can approve the request? From the above security measures, all supervisors can approve all requests regardless of the department. (They need only change the ID in the url)
I suggest setting the supervisor by workflow and matching him upon loading the edit form to make the tab visible or not.
Hi Tony
You are right , if the user is really that nifty to decipher the contents of url which is quite long by the way they probably can.
In my case however i really lock it down on the notifications and create different views which i show through target audiences . However i will very interested in your solution on addressing this.
Thanks for sharing Silvestre,
At each stage of this approval, the first person from each SP group (who all gets an email to approve) will click link in email, open form and approve. Then workflow moves to next round of approvals (new email to new group and new link)
I would therefore use a rule in each email alert that uses a targeted URL ( a rule) as Alex describes here..
https://spjsblog.com/forums/topic/content-types-and-dffs-newform-aspx-opening-different-starting-tabs-rules/
Which only shows the approval tab for that group/approval round.
You would still want to stop more than one person going in and editing the form from any one group/round of approvals.
Add another rule (when the form loads – not when a field changes) and if the manager approval field for that tab/round of approval is already set to YES, then set the manager approval value to read only and add a message that this item is already approved.
Approval in the form is great and the built in emails can be used in the form itself (rather than SPD workflows). Although you can also use Power Automate and leverage the MS Approval flow so users approve within the email itself, which then updates the form!