Home › Forums › Classic DFFS › DFFS Form examples
Tagged: DFFS Examples
- This topic has 21 replies, 8 voices, and was last updated 7 years, 2 months ago by
Alexander Bautz.
-
AuthorPosts
-
-
May 19, 2015 at 23:22 #7664
This topic is for user-posted DFFS forms. Please take a few screenshots, and write a few lines to describe what’s special with your form.
Alexander
-
May 21, 2015 at 18:58 #7684
Just a simple form to start things off. Apologies for the blurred data and the large image size – seemed best to show it all together rather than chopping it up into sections – zoom in to see the detail. I’ve annotated alongside the form to describe which elements of DFFS I’ve used.
I created this for capturing quarterly reports from about 30 separate contributors. Nothing very fancy here really, but I do have four separate child lists linked up to this parent one via the vLookup plugin. Two for display of read only data, and two where data is being submitted as part of the report – multiple rows as required.
The only other thing I think I’ve used is html formatting on a couple of fields.
Attachments:
-
May 22, 2015 at 07:14 #7686
Hi Adam,
Thank you for taking the time to post this example.Alexander
-
May 27, 2015 at 15:39 #7703
This is my application for headcount request approvals and tracking.
The form changes based on which level of approval is required so that the approval field for the stage is at the top of the form and is the only editable field. All other fields are read-only in any approval stage.
Custom headings with HTML (and wingdings) show the current stage.
Other headings separate the detail by priority.
A separate tab allows for a detailed job description.First screenshot shows the Manager approval stage. Second screenshot shows the CIO-1 approval stage.
Attachments:
-
May 28, 2015 at 07:16 #7707
Thanks for posting this Rich, the heading looked nice – can you post a screenshot / code snippet of the configuration for the heading with the 1-9 steps?
Best regards,
Alexander -
May 28, 2015 at 12:46 #7708
Here is a sample of HTML used for the “Manager Approval Required” stage. For each stage, I change the color of the Wingding and change the Wingding to the solid background. I have one of these headings for each stage, and I show the current stage and hide the others based on the status.
<table cellSpacing="8" cellPadding="0" align="left"><tr><td title="Awaiting Manager Approval" align=center><font size=5 color=#cd3529><b>❶</b></font></td><td align=center><font size=3 color="silver">➔</font></td><td title="Awaiting CIO-2 Approval" align=center><font size=5 color=#808080>②</font></td><td align=center><font size=3 color="silver">➔</font></td><td title="Awaiting CFO & BM Approval" align=center><font size=5 color=#808080>③</font></td><td align=center><font size=3 color="silver">➔</font></td><td title="Awaiting CIO-1 Approval" align=center><font size=5 color=#808080>④</font></td><td align=center><font size=3 color="silver">➔</font></td><td title="Awaiting CIO Approval" align=center><font size=5 color=#808080>⑤</font></td><td align=center><font size=3 color="silver">➔</font></td><td title="Approved" align=center><font size=5 color=#808080>⑥</font></td><td align=center><font size=3 color="silver">➔</font></td><td title="Interviewing" align=center><font size=5 color=#808080>⑦</font></td><td align=center><font size=3 color="silver">➔</font></td><td title="Offer Out" align=center><font size=5 color=#808080>⑧</font></td><td align=center><font size=3 color="silver">➔</font></td><td title="Filled" align=center><font size=5 color=#808080>⑨</font></td></tr><tr><td align=left colspan=17><font size=2 color=#cd3529>Manager Approval Required </td></tr></table>
-
May 28, 2015 at 12:53 #7709
The Wingdings are showing as the actual characters in my code sample above.
Here is a sample of the codes used for each character:
arrow #10132
Numbers with solid background
1 – #10102
2 – #10103
3 – #10104Numbers with hollow background
1 – #9312
2 – #9313
3 – #9314 -
May 29, 2015 at 15:02 #7712
Thanks!
Alexander
-
May 29, 2015 at 19:08 #7713
Here is a handy bit of HTML I use in a heading (see attachment) shown or hhidden based on a rule for an important message.
<table bgcolor="#fff9de" cellpadding="3px" width=100% style="border-collapse: collapse;"><tr><td style="border-top: 1px solid #ffdf88; border-bottom: 1px solid #ffdf88; border-left: 1px solid #ffdf88; border-right: 0px solid #ffdf88;"><img src="_layouts/images/warning32by32.gif" /></td><td style="font-size: 12px; border-top: 1px solid #ffdf88; border-bottom: 1px solid #ffdf88; border-left: 0px solid #ffdf88; border-right: 1px solid #ffdf88;"> This is an important message that can be hidden or displayed based on rules for headings.</td></tr></table>
-
This reply was modified 10 years ago by
Rich Rockwell.
-
This reply was modified 10 years ago by
Rich Rockwell.
-
This reply was modified 10 years ago by
Alexander Bautz. Reason: Fixed HTML format on the image tag
Attachments:
-
This reply was modified 10 years ago by
-
May 29, 2015 at 19:54 #7721
Hi Rich,
I fixed the image format (and removed your other comment) – thanks again for taking the time to post these examples!Best regards,
Alexander -
July 8, 2015 at 20:22 #7858
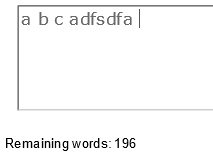
Word counter in multiline Enhanced Rich Text field
A couple weeks ago we received a request to automatically aggregate weekly report documents into one report through SharePoint. Essentially, replace a manual process of copying and pasting Word documents into an automated SharePoint solution. Part of this request was to limit the overall length of the document so that each report is about two 8½ x 11 pages in length. Internet Explorer and SharePoint being intrinsically NOT a word processor, we decided to use a word count as a visual indicator of length. With Alexander’s Dynamic Forms for SharePoint and a little code this didn’t appear too difficult until we realized our multiline Enhanced Rich Text fields couldn’t use solutions developed for multiline plain text fields (SeeAlexander’s solution here).
Not finding a readily available solution with my limited coding skills, I reached out to a work colleague who came up with a workable solution. Below is my attempt at explaining how to replicate this solution on your DFFS forms.
This solution also needed to work in IE 8 per our intranet browser settings. We created a simpler solution that was working in IE 11 and Chrome, but failed in IE 8. This solution is working in a SharePoint 2013 site displaying in SharePoint 2010 during our migration. Confirmation of this working in a 2013 site would be appreciated.
Step 1. Find Field ID
You will first need to find the field ID of your enhanced rich text field. Use the Developer Toolbar to find the field ID for each enhanced rich text field. It should look something like this: ctl00_m_g_164b102d_447f_4802_9953_f6aacc6e614c_ctl00_ctl05_ctl02_ctl00_ctl00_ctl04_ctl00_ctl00_TextField_inplacerteStep 2. The Code:
Custom JS
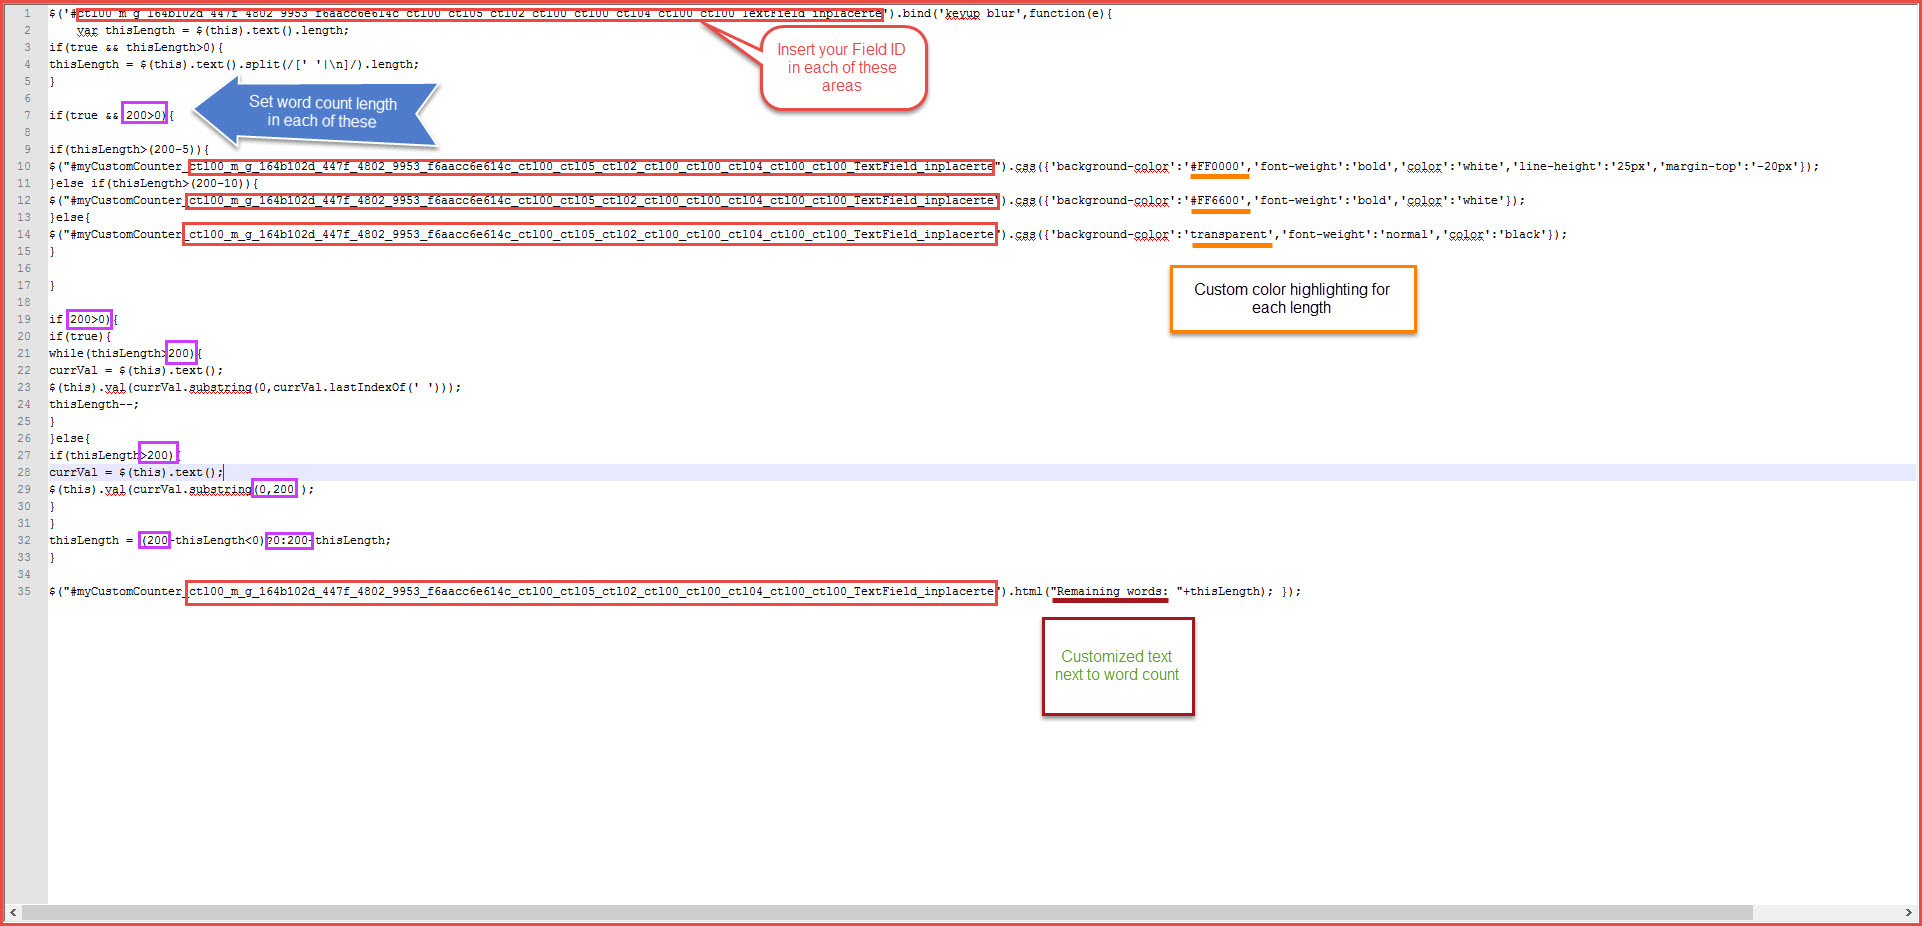
In the Custom JS section of the DFFS form, enter the following code for each enhanced rich text field (See attachment for markup and comments):
$('#ctl00_m_g_164b102d_447f_4802_9953_f6aacc6e614c_ctl00_ctl05_ctl02_ctl00_ctl00_ctl04_ctl00_ctl00_TextField_inplacerte').bind('keyup blur',function(e){
	var thisLength = $(this).text().length;
if(true && thisLength>0){
thisLength = $(this).text().split(/[' '|\n]/).length;
}

if(true && 200>0){

if(thisLength>(200-5)){
$("#myCustomCounter_ctl00_m_g_164b102d_447f_4802_9953_f6aacc6e614c_ctl00_ctl05_ctl02_ctl00_ctl00_ctl04_ctl00_ctl00_TextField_inplacerte").css({'background-color':'#FF0000','font-weight':'bold','color':'white','line-height':'25px','margin-top':'-20px'});
}else if(thisLength>(200-10)){
$("#myCustomCounter_ctl00_m_g_164b102d_447f_4802_9953_f6aacc6e614c_ctl00_ctl05_ctl02_ctl00_ctl00_ctl04_ctl00_ctl00_TextField_inplacerte").css({'background-color':'#FF6600','font-weight':'bold','color':'white'});
}else{
$("#myCustomCounter_ctl00_m_g_164b102d_447f_4802_9953_f6aacc6e614c_ctl00_ctl05_ctl02_ctl00_ctl00_ctl04_ctl00_ctl00_TextField_inplacerte").css({'background-color':'transparent','font-weight':'normal','color':'black'});
}

}

if(200>0){
if(true){
while(thisLength>200){
currVal = $(this).text();
$(this).val(currVal.substring(0,currVal.lastIndexOf(' ')));
thisLength--;
}
}else{
if(thisLength>200){
currVal = $(this).text();
$(this).val(currVal.substring(0,200));
}
}
thisLength = (200-thisLength<0)?0:200-thisLength;
}

$("#myCustomCounter_ctl00_m_g_164b102d_447f_4802_9953_f6aacc6e614c_ctl00_ctl05_ctl02_ctl00_ctl00_ctl04_ctl00_ctl00_TextField_inplacerte").html("Remaining words: "+thisLength); });
Why a 200 word count? Our form has 5 multiline fields which roughly translates to 170 words per field to reach our 2 page “limit” goal. We decided not to use a hard limit on the word count, meaning the user can enter more than 200 words and we’re counting on the visual indicators to help guide their behavior. Additional levels and colorization can be added to code as necessary.
Standard

Warning

Limit

See attachments for stylization examples.
Step 3. Create Word Count Headers in Tabs
Now that the code is added we need to create a div in the form to show the Word Count. For each Enhanced Rich Text Field, insert a header below the field. For example:<div id="myCustomCounter_ctl00_m_g_164b102d_447f_4802_9953_f6aacc6e614c_ctl00_ctl05_ctl02_ctl00_ctl00_ctl04_ctl00_ctl00_TextField_inplacerte"></div>
The string “ctl00_m_g_164b102d_447f_4802_9953_f6aacc6e614c_ctl00_ctl05_ctl02_ctl00_ctl00_ctl04_ctl00_ctl00_TextField_inplacerte” is the field ID we captured in Step 1. You will need to customize each header with its related field ID. You may also notice we’ve added a class name to each header. We are not using the class names at this time.

Done!
Save your changes and test your solution by typing into your multiline text field(s). If the word counter is not appearing, you may have not entered the Field ID correctly. Check all areas the field ID is referenced (5x in the JS code and once in each header).
-
October 19, 2016 at 18:10 #13727
Hi!
Just wanted to share what i have made With DFFS.
There’s really nothing fancy With the Forms.
I have just used some CSS to change colors on the background, tabs etc.
I have alsp added some fontello icons just for the UI to be user friendly.The Whole meaning of this form is to keep it simple for the eyes, and easy to use for the users.
Don’t mind that the Language on the forms is Norwegian 🙂
-
This reply was modified 8 years, 7 months ago by
Remi Steen.
Attachments:
-
June 5, 2017 at 19:55 #16757
The form looks very nice Remi. Would it possible to see your css field?
-
This reply was modified 8 years, 7 months ago by
-
October 21, 2016 at 21:58 #13758
Thanks for sharing Remi.
The form looks nice – could you possibly share the “Custom CSS” you used?
Best regards,
Alexander -
September 8, 2017 at 01:03 #18070
Hi Alexander, is it possible to share the Side-by-side settings of this form?

-
September 12, 2017 at 21:16 #18156
Sorry, but I don’t have this form any more, but you should find a similar looking form here: https://spjsblog.com/dffs/dffs-styling/
Does this answer your question?
Alexander
-
February 13, 2018 at 15:03 #19795
Hi All,
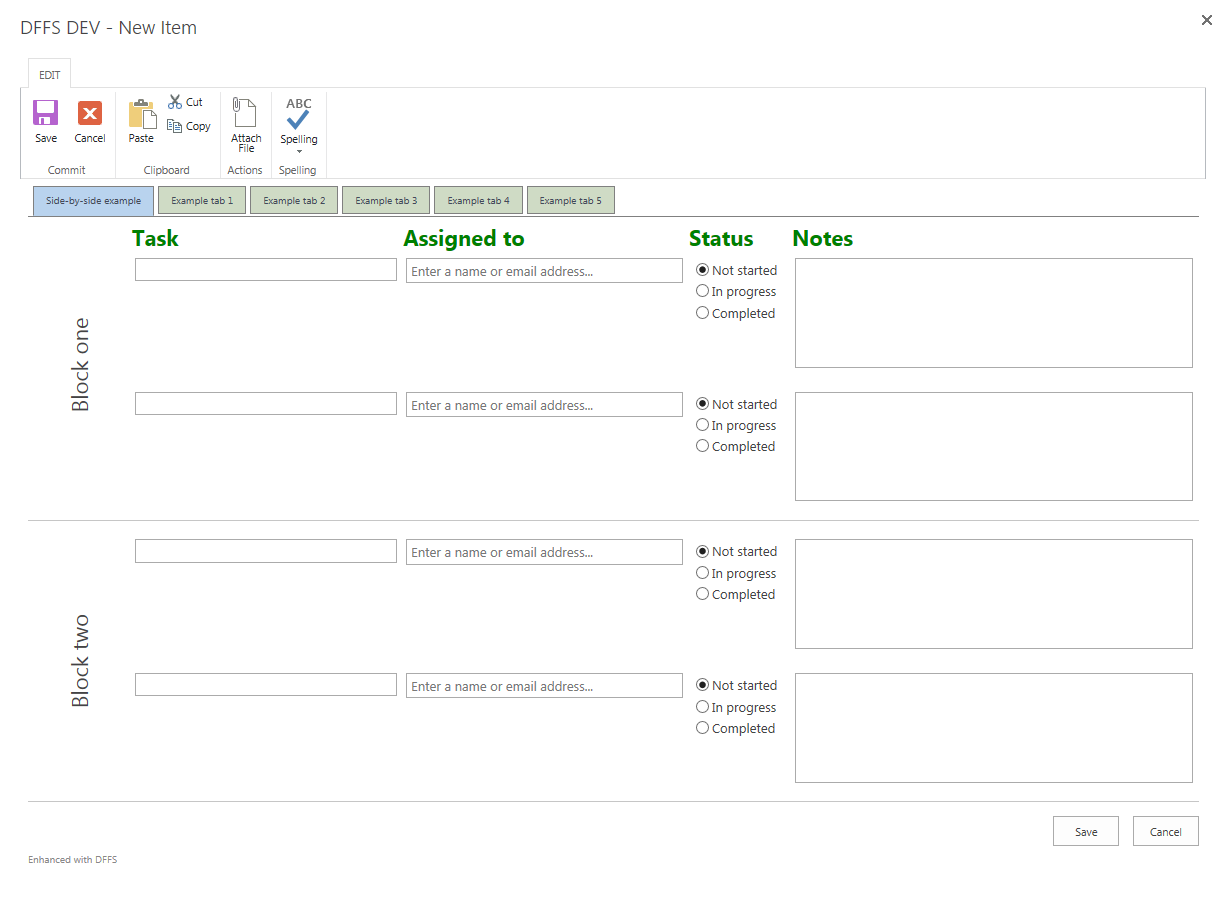
I’m after a bit of advice to help me get started with some java scripting. I’m trying to make one of my forms really user friendly and have managed to get it much better by using the side-by-side setting (see attached screenshot). I would also like to use some of the java scripting to colour code some of the fields based on their value or when they are blank/contain N/A.
I’ve had a go at adapting some of the script found on the forum but I keep getting an 80020101 error message, i’m not sure if i’m missing a step, any help to get me started would be greatly appreciated.
thanks
Emma-
This reply was modified 7 years, 3 months ago by
Emma N. Reason: image change
Attachments:
-
This reply was modified 7 years, 3 months ago by
-
February 13, 2018 at 20:40 #19805
Hi,
What kind of script are you trying to use when you get this error? – and is it when you try to save the form you get it?Alexander
-
February 14, 2018 at 10:06 #19830
Hi Alexander,
thanks for getting in touch…This is the code I’ve tried using in the custom JS section to colour the AprilStatus field dependent upon the choice selected. Ideally I want to be able to extend this to other fields and in particular grey out the N/A fields.
(function colorMyField(){
var val = getFieldValue(“AprilStatus”), color = “#ffffff”;
if(Val==”Due”){
color = “#00ff00”;
}
$(spjs.dffs.fields[“AprilStatus”]).css(“background-color”,color);
})();$(spjs.dffs.fields[“AprilStatus”]).find(“input”).change(function(){
colorMyField();
}); -
February 14, 2018 at 21:49 #19842
Here is a code snippet that colors the dropdown in the “Status” field. See if you can use it as a starting point.
jQuery("#dffs_Status select").on("change",function(){
    var bgColor = "white", txtColor = "black";
    switch(jQuery(this).val()){
        case "Not started":
            bgColor = "red";
            txtColor = "white";
        break;
        case "In progress":
            bgColor = "green";
            txtColor = "white";
        break;
        case "Completed":
            bgColor = "gray";
            txtColor = "black";
        break;
    }
    jQuery(this).css({"background-color":bgColor,"color":txtColor});
}).trigger("change");
Alexander
-
March 2, 2018 at 15:20 #20025
Hi All,
After another bit of help… I’ve trying to get my edit form set up so that my headings align with the side by side rows I’ve applied. The fields in my list are mainly choice options that all seem to have an auto width and don’t align with the headings I’ve set up.
Attachments:
-
March 4, 2018 at 15:54 #20035
Hi,
You can try this snippet in the Custom CSS:.sbs_OuterTable { width: auto; } .sbs_tdIndex_1, .sbs_tdIndex_2, .sbs_tdIndex_3{ min-width:200px !important; width:200px !important; }It will set each “column” to 200px. Adjust this number to match the layout you like.
It might also require that you set the width of the dropdowns – try using this snippet:
.sbs_InnerTR select{
    width:190px;
}
Hope this lines it up correctly for you.
Alexander
-
-
AuthorPosts
- You must be logged in to reply to this topic.


