- What is vLookup for SharePoint
- Licensing
- Setup
- Configuration
- Save configuration
- Child list NewForm (or EditForm for Document libraries)
- How to find the FieldInternalNames
- Multilingual user interface (MUI)
- Events
- Accessing the vLookup data object
- Adding children from NewForm
- vLookup receiver for NewForm
- Troubleshooting
You find the updated files here
Last updated: February 12, 2018.
This solution lets you create relationships between two or more lists or document libraries, based a lookup column connection or a keyword in a field in the child item that matches a value in the parent item.
You can list the connected children in the parent element, something that is not possible out of the box in SharePoint.
This solution also lets you create new children directly from the parent element, and it will auto-populate the “connection” to the parent element, as well as prefilling other fields based on values from the parent element.
Licensing
I have previously had a license check in the vLookup solution (it shared license key with DFFS), but I have now removed this as it from v2.0 is purely a DFFS plugin.
Setup
Prerequisites
To use this solution you must first set up Dynamic Forms for SharePoint. Follow these instructions
To start using vLookup you must follow the instructions to set it up, and then you must add at least one column with a FieldInternalName starting with vLookup. The internal name is the name given to the field the first time you create it. This means you can create a field named “vLookupTasks” and then change the display name to “Tasks”.
Frontend setup
If you use the JSLink version of DFFS (SP2013 only), you simply check the box besides the vLookup plugin in the JSLink setup page to activate it.
If you use the Content Editor Web Part version of DFFS, you must ensure the vLookup plugin is added to the file “DFFS_frontend_CEWP.html”. You find this file in the CEWP folder in “/SPJS/DFFS/CEWP”.
You might have to correct the links to the script files in the file “DFFS_frontend_CEWP.html”.
Backend setup
If you use the JSLink version of DFFS (SP2013 only), and have completed the frontend step above, you can skip this step.
If you use the Content Editor Web Part version of DFFS, you must ensure the vLookup plugin is added to the file “DFFS_backend_CEWP.html”. You find this file in the CEWP folder in “/SPJS/DFFS/CEWP”.
You might have to correct the links to the script files in the file “DFFS_backend_CEWP.html”.
List view setup
Please note that you must have the “Tabular view” selected for vLookup to work in a list view. You find this setting in the “edit view” page.
To use vLookup in a list view, add a CEWP to the list view, and refer the file “vLookup_ListView.html” from “/SPJS/DFFS/CEWP” using the “Content link” option.
You might have to correct the links to the script files in the file “vLookup_ListView.html”.
Change the location of the configuration list
If you want to have the configuration list for vLookup in another site you must add a variable to the loader file. If you use vLookup in a DFFS form you must add it to the /SPJS/DFFS/loader/DFFS_loader.html like this (put it below the dffs_folder_location variable):
var vLookup_configListBaseUrl = "/Change/This/Path";
If you use vLookup in a list view you must edit the /SPJS/DFFS/vLookup _ListView.html file by adding the variable above the script path loading vLookup like this:
<script type="text/javascript">
var vLookup_configListBaseUrl = "/Change/This/Path";
</script>
<script type="text/javascript" src="/SPJS/DFFS/plugins/SPJS-vLookup_frontend.js"></script>
Change the path to match the baseUrl of the SITE where you have the configuration list.
First time run
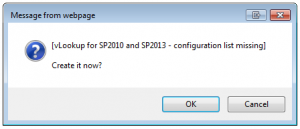
The first time you click to edit a vLookup column in the DFFS backend in a site, you are asked to create the configuration list:
Click OK and you should get this message:
The page will reload and you can now click again to start editing the vLookup field.
Configuration
Configuration example
You find a step-by-step guide here: https://spjsblog.com/vlookup-for-sharepoint/vlookup-setup-example-for-sp-2010-and-2013
Configuration options
To configure vLookup you must enter DFFS backend configuration.
 Figure 4: vLookup tab in DFFS backend
Click the field name to open the configuration screen.
Here is some screenshots of the configuration for the field “vLookupTasks”:
 Figure 5: vLookup configuration: Connect to list
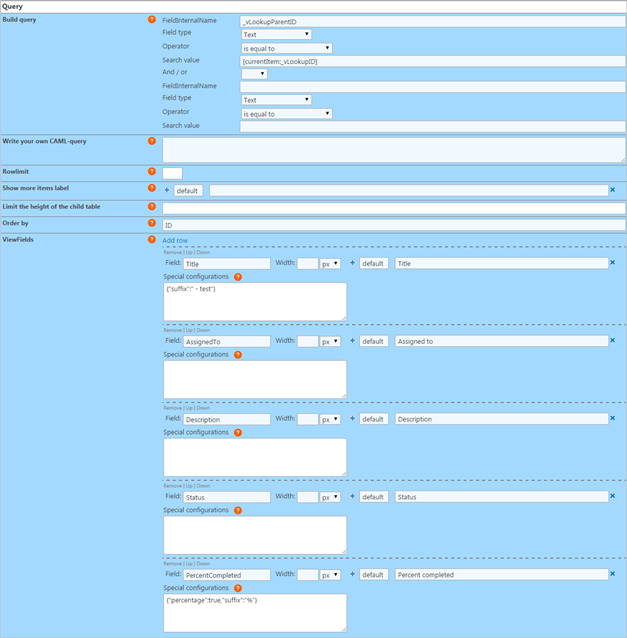 Figure 6: vLookup configuration: Query
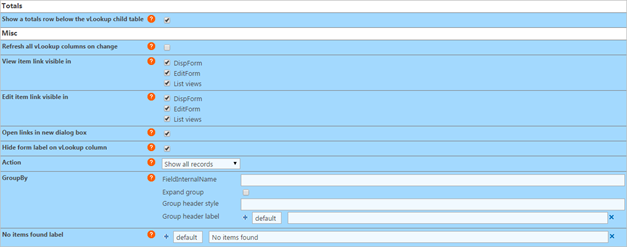 Figure 7: vLookup configuration: Totals and Misc
 Figure 8: vLookup configuration: Add new item
In the following, I will go through all the configuration options. You can hover over the question mark on each section to learn how to use the setting.
List name and base URL
Disable this vLookup field
This checkbox lets you disable the vLookup column. This might be used when configuring the form, or as part of troubleshooting.
Note to self
This textarea can be used as a reminder if there is something special with this vLookup connection.
List base URL
The base URL of the site where the list is located. Example: /Sites/MySite. Use a single forward slash “/” for the root site.
Use {currentSite} to use the current sites base URL. Use this if you plan to save the site as a template.
To find the proper base URL, go to a list view of the list, right click and view source. Search for “webServerRelativeUrl”:
webServerRelativeUrl: "\u002fDFFS"
This value will be escaped so you must change “\u002f” to forward slash “/”:
/DFFS
List GUID, display name or URL name
The list GUID or the display name of the list to query. Please note that you must use the list GUID if you have a MUI environment as the list name can differ for the different languages.
You can also use the URL name of the list like this:
url:The_URL_Name
Keep in mind that this requires an additional query to translate the URL name into the GUID, ad it will therefore add a little bit to the overall load time of the vLookup field.
To find the list GUID go to a list view of the list, right click and view source. Search for “pageListId”. The string you will find is part of the object “_spPageContextInfo”:
pageListId:"{d4df8102-2244-43d6-8f35-fcda05e2bc18}"
The list GUID is this part:
{d4df8102-2244-43d6-8f35-fcda05e2bc18}
Please note that the list view must contain at least one item for the information to exist in the page.
Verify connection to list
Click this button to verify that your list name and base URL is correct.
List of available field for the target list
Click the button to see a list of all available field in the target list. This is the field name you use in the Query and ViewFields section below.
Query
Build query
You can add one or two conditions and nest them together with “And/Or”.
To use a value from the current item, enter the FieldInternalName like this: [currentItem:FieldInternalName]. To use a URL query string variable, enter it like this:
[URL:MyURLKey]
You can also use [me] to filter by current user in a people picker or the “Author” or “Editor” field.
If you query using [me], the “FieldType” input is not used and you can use the operator “is equal to” or “is not equal to”.
If you use the “Write your own CAML-query” section, these settings are not used.
Write your own CAML-query
This will override the “Build query” section above. To use a value from the current item, enter the FieldInternalName like this:
[currentItem:FieldInternalName]
To use a URL query string variable, enter it like this: [URL:MyURLKey]
This section is for advanced users who know how to write a CAML query. I will not give any CAML query examples here.
Rowlimit
Limit the number of returned items. Leave empty to retrieve all.
Show more items label
If you use the rowlimit above, this is the label the user can click to view the full dataset. This setting has MUI support. Se details below.
Limit the height of the child table
Set the height of the child table in pixels. If the height exceeds this setting, you will have vertical scrollbars. Leave empty to view full height.
Order by
The FieldInternalName on which to sort the result. If left empty, the ID column is used. Tick the checkbox to sort ascending. See “How to find the FieldInternalName” below.
ViewFields
See ” List of available field for the target list” above to learn how to identify the proper names to use in the setup.
Add the FieldInternalName to include in the result in the first input. If you have a multilingual user interface, you can add alternate translation by clicking the plus sign, and entering the language LCID and the translated column label. To have a default value regardless of selected language, enter “default” as LCID. See the MUI section below for more details.
In the “Special configuration” textarea, you can add special formatting. Here is an overview of the options.
Substring
This example shows you how you can split a string into an array of substrings, returning the specified array index.
Split the string by the pipe character, and return the first item in the array:
{"separator":"|","part":0}
Comma separated list: Delimiter
When using the action “Comma separated list” you can change the delimiter by adding this setting:
{"delimiter":"<br>"}
Prefix and suffix
Use the prefix and suffix to insert a string before or after any value:
{"prefix":"$","suffix":""}
Date format (date and time columns)
You can format a date and time string like this:
{"dateFormat":"MM/dd/yyyy HH:mm:ss"}
Override the number format
{"decimals":2,"thousandsSeparator":".","decimalSeparator":","}
Show as percentage (value*100)
Use this format to display a number as percentage:
{"percentage":true,"suffix":"%"}
Custom style
Specify the CSS like this:
{"css":"font-size:20px;color:green"}
Replace text
You can replace for example the number returned for the field “_ModerationStatus” like this:
{"replace":{"0":"Approved","1":"Rejected","2":"Pending"}}
You can also use JSON string format to have this text multilingual:
{"replace":{"0":{"1044":"Godkjent","default":"Approved"},"1":{"1044":"Avvist","default":"Rejected"},"2":{"1044":"Avventer","default":"Pending"}}}
Call a custom function
You can use a custom function to process the value returned by the query for this specific field. Use this format in the textarea below:
{"function":"functionName"}
The current field value will be passed as an argument to the function, and whatever the function returns will be rendered in the vLookup table. This function must be present in the page when the vLookup field is rendered – for example by adding it to the Custom JS area of DFFS.
Totals
Check this box to add a totals row below the vLookup table. All number columns will be summed.
You can turn this off for a column like this in the “Special configuration”:
{"showTotals":false}
You can add a prefix and suffix like this:
{"totalsPrefix":{"1044":"Norwegian text","default":"Default text"},"totalsSuffix":{"1044":"Norwegian text","default":"Default text"}}
Misc
Refresh all vLookup columns on change
By default, only the current vLookup column is refreshed when you have changed an item. Check this box to refresh all vLookup columns in the current form when one of them has changed. This applies to “Action: Show all records” only.
View item link
Show “view item link” in front of the row. This applies to “Action: Show all records” only.
Edit item link
Show “edit item link” in front of the row. This applies to “Action: Show all records” only.
Open links in new dialog box
Open the view and edit item links in a new dialog box. If unchecked, it will open in the current page. This applies to “Action: Show all records” only.
Hide form label on vLookup columns
Check this box to hide the formlabel field in NewForm, DispForm and EditForm.
Action
Show all records
Returns a list view of all the records.
Comma separated list
Returns a comma separated list of all the records. Use only one ViewField for the best result.
Sum
Sums the values for all the records.
Average
Sums the values for all the records, and divides the sum on the number of non-empty records.
Count
Counts the non-empty records.
Group by
You can group the result by this column. Please note that this will not work for “Action = Comma separated list”. Leave the FieldInternalName empty to disable groping.
FieldInternalName
The internal name of the field that holds the value you want to group by – like “Status” to group by “New”, “Work in progress” e.g.
Expand group
Check this to expand the groups.
Group header style
You can style the group headers if you want to override the default style.
Group header label
Use this field if you like to add a prefix to the values pulled from the “FieldInternalName” field. E.g. “Status:” if you like the header to show “Status: Work in progress”.
No items found label
If you have a multilingual user interface, you can add alternate translation by clicking the plus sign, and entering the language LCID and the translated column label. To have a default value, enter “default” as LCID.
Add new item
This covers both list items and documents. If you activate this for a document library, you will get an “upload new document” button. The code you must have in the child library will then have to go in EditForm as there is no NewForm in a document library.
Please note that you can only add one document at a time with this method. If you want to upload multiple documents at once, look at the next section “Add new folder”.
Configure “add new item”
Tick this box to enable adding new items in the “Child list” or “Child library”.
Select where the new item button should appear. You can select NewForm, DispForm, EditForm and list views. See separate section on “Adding children from NewForm” below.
Add new item label
If you have a multilingual user interface, you can add alternate translation by clicking the plus sign, and entering the language LCID and the translated column label. To have a default value, enter “default” as LCID.
Open new item link in new dialog box
Check this box to open the new item form in a dialog box. If unchecked, it will open in the current page. The dialog options are described in the configuration screen.
Prefill values in child
You must have the vLookup frontend (if you use DFFS in this list), or the vLookup receiver for NewForm loaded in the NewForm of the child list.
From field – to field
Enter the FieldInternalName you want to pull the value from in the “From field”, and the FieldInternalName you want the value inserted into in the “To field”.
The “From field” is a field in the current item, and the “To field” is a field in the child item.
Insert a string
If you want to insert a string value in a field in the “child list”, enter the value in curly braces in the “From field” like this:
{Add this text to a field in the child}
Current user
You can insert properties of the current user like this:
{currentUser:prop}
Where “prop” is the FieldInternalName of the property from the user list in SharePoint (not the user profile service).
This example will insert the userID:
{currentUser:ID}
This inserts the e-mail:
{currentUser:EMail}.
Date columns
If you want to pull the value from a date column, you must add the date format in the “To field” like this:
MyDateCol[MM/dd/yyyy]
URL
If you want to add an URL parameter to the NewForms URL, use “myUrlKey=something” in the “From field”, and {URL} in the “To field”.
Use variable in the “From” field
You can create your own custom string and store it in a variable in the Custom JS. Use this format in the “From” field:
{{var:VariableName}}
Hide field in NewForm
Tick the checkbox to hide the field in the target NewForm.
Add new folder (Document libraries only)
When you use folders with vLookup, the metadata is set on the folder and not on the individual documents. This means you can create a folder using the “Add new folder” option and add any number of documents to this folder using the regular upload feature of the document library.
Tick this box to enable adding new folder in the “Child library”.
Add new folder label
If you have a multilingual user interface, you can add alternate translation by clicking the plus sign, and entering the language LCID and the translated column label. To have a default value, enter “default” as LCID.
Folder metadata
Use this setting to set metadata on the new folder. Ensure you set the value of whatever field you use to connect to the library (corresponding to the configured query). If you add folders from NewForm you must set up the connection as described in the “Adding children from NewForm” section below.
Save configuration
You must save the settings for each vLookup field separately, and although you access the vLookup configuration from the DFFS backend, you must save vLookup configuration and DFFS configuration individually.
Child list NewForm (or EditForm for Document libraries)
When adding children you must load the vLookup frontend script to the child list NewForm. This is necessary to be able to set the values that you add in the “Prefill values in child”.
If you use DFFS in the child list, this is most likely already loaded (see frontend setup section above). If you don’t user DFFS in the child list, you must use the “vLookup receiver for NewForm” to pick up the values passed from the parent item.
Use code like this in a CEWP below the form web part in the child NewForm to load the “vLookup receiver for NewForm”:
<script type="text/javascript" src="/SPJS/DFFS/plugins/jquery.js"></script>
<script type="text/javascript" src="/SPJS/DFFS/plugins/SPJS-utility.js"></script>
<script type="text/javascript" src="/SPJS/DFFS/plugins/SPJS-vLookup_receiver.js"></script>
<script type="text/javascript">
ExecuteOrDelayUntilScriptLoaded(spjs.vLookup_NewForm.init, "sp.js");
</script>
You must correct the links in the script so that they point to your local files.
Get jQuery here
Get spjs-utilty.js here
How to find the FieldInternalNames
When you have provided the list identifier and the list base URL in the vLookup configuration, you can show a table of all the available fields in the vLookup child list by clicking the button “Show all fields in the child list”.
Multilingual user interface (MUI)
When you use vLookup in a site with multilingual user interface, you can add labels for the individual language. You use the LCID to set the label for the different languages, e.g. 1033 is English and 1044 is Norwegian.
You find the different language LCID here: http://technet.microsoft.com/en-us/library/ff463597(v=office.15).aspx
You must add a fallback LCID of “default” to catch all languages not explicitly defined. This fallback can be e.g. the English value.
Events
vLookupIsLoadedCallback
If you use custom code to do something when a vLookup column has finished loading, you can wrap it in this function:
function vLookupIsLoadedCallback(fin){
if(fin === "Your_FieldInternalName_here"){
// Your code here
}
}
Please note that this code does NOT trigger in a list view, only in NewForm, DispForm and EditForm.
vlookupAddChildPreCheck
If you use custom code to check if it is OK to add a child, use this code:
function vlookupAddChildPreCheck(fin){
if(fin==="Your_FieldInternalName_here"){
// return false if you want to abort the add child function
}
return true;
}
vLookupPresetFromUrlDone
If you use custom code to do something when you add a new item to the child list and the preset of the field value has completed, use this code (in the child NewForm):
function vLookupPresetFromUrlDone(fin){
if(fin==="The_FieldInternalName_you_are_setting"){
// do something
}
}
vlookupChildAddedCallback
Use this function to do something when you return to the parent after you have created a child:
function vlookupChildAddedCallback(){
// Do something
}
This function triggers only if you add a child in a dialog.
vlookupChildNotAddedCallback
Do something when a user clicks add child, and then hit “Cancel”:
function vlookupChildNotAddedCallback(){
// Do something
}
This function triggers only if you attempt to add a child in a dialog.
vlookupChildViewOrEditCallback
Use this code to do something when you return to the form or view after you have opened a child to view it or edit it:
function vlookupChildViewOrEditCallback(fin,result){
    if(fin==="Your_FieldInternalName_here"){
        if(result === 0){
            // The dialog was canceled
        }else if(result === 1){
            // The dialog was saved
        }
    }
}
Please note that the “result” parameter was added in v2.2.118. This function triggers only if you open a link to view or edit a child in a dialog.
Accessing the vLookup data object
From v2.250 of vLookup, you can access the data object containing all vLookup data rendered in the form. Please note that this will contain only vLookup data that is actually loaded in the form.
It will not contain data from vLookup columns that has not been loaded (the DFFS tab with the field has not been accessed).
Use this variable to access the data:
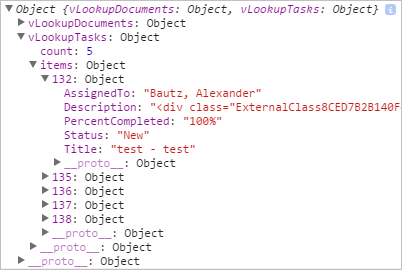
spjs.vLookup.dataObj
This example outputs it to the console:
console.log(spjs.vLookup.dataObj);
The output in the console looks like this:
Adding children from NewForm
To be able to add vLookup children from NewForm, you must add two new columns – one in the parent, and one in the child.
The reason for this is that the not yet saved new item in the parent list does not have an ID to use for the vLookup connection. What this solution then does, is to generate an unique ID in the column “_vLookupID”, and passing this to the child list item in the field “_vLookupParentID”.
Set up the fields for the vLookup connection
The parent list must have a field named “_vLookupID” of type “Single line of text”. This column can be added by expanding the “Using vLookup from NewForm” section in the top of the vLookup tab in DFFS backend.
The child list must have a field named “_vLookupParentID” of type “Single line of text”. This column can be added by expanding the list of available fields in the child list in the vLookup configuration for the field.
If the table does not already contain this field, you will see a link in the top of the field table to open the “Add new field” dialog.
The query
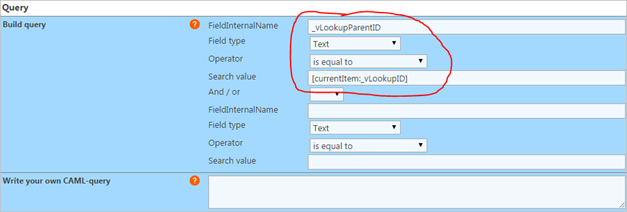
To use vLookup in NewForm, the query must be set up like this:
Prefill values in child
To use vLookup from NewForm, you must prefill the field “_vLookupParentID” in the child item like this:
vLookup receiver for NewForm
This is a light-weight version of the vLookup frontend that is only used to prefill values in child list NewForm when DFFS is NOT configured for this child list.
<script type="text/javascript" src="/SPJS/DFFS/plugins/jquery.js"></script>
<script type="text/javascript" src="/SPJS/DFFS/plugins/SPJS-utility.js"></script>
<script type="text/javascript" src="/SPJS/DFFS/plugins/SPJS-vLookup_receiver.js"></script>
<script type="text/javascript">
ExecuteOrDelayUntilScriptLoaded(spjs.vLookup_NewForm.init, "sp.js");
</script>
You must update the path to the files to reflect your locale storage.
Troubleshooting
If you have trouble setting up the solution, or have other problems, please search the forum https://spjsblog.com/forums/forum/vlooup-for-sharepoint/ and post a new question if you cannot find the answer.
