Hi,
An update broke my old site theme and I had to change it. I’m not happy with the layout, but will try to fix it during the weekend.
Unfortunately the archives page also broke – I will fix it as soon as I can manage.
Alexander
Hi,
An update broke my old site theme and I had to change it. I’m not happy with the layout, but will try to fix it during the weekend.
Unfortunately the archives page also broke – I will fix it as soon as I can manage.
Alexander
I got this request from Rudolf:
Hi Alexander,
Do you have any idea to solve the following problem I have?
We would like to upload formatted text or binary data from a file as an attachment to with an on the fly create form to enter the comment.
I read your blog to spjs-upload-for-sharepoint-custom-upload-page- ….We would like to send this the comment and the attachments via a WebService to a SharePoint list to create a list item with attachments loaded.
Best Regards
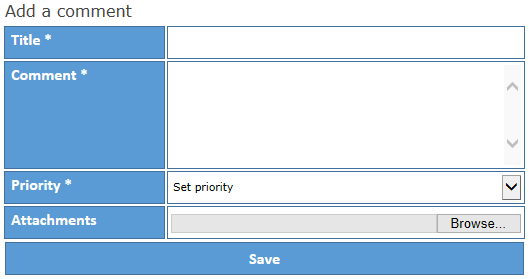
I have created this solution that lets you add a list item with one or more attachments from a custom form that you can place anywhere in your SharePoint site.
You may also be interested in this solution SPJS Upload for SharePoint: Custom upload page for uploading documents to various document libraries in a site collection.

You call the function from the CEWP or the HTML Form Web Part using code like this:
spjs.addItemWithAttachment.init({
	"instanceID":"1",
	"listName":"{1a2bb561-c557-4a28-938f-0fb600b136d7}",
	"listBaseUrl":"",
	"header":"Add a comment",
	"text":{
		"saveBtn":"Save",
		"successMsg":"Saved successfully",
		"browserNotSupported":"Your browser is not supported."
	},
	"fields":
		[
			{
				"fin":"Title",
				"label":"Title",
				"type":"text",
				"required":true
			},
			{
				"fin":"Comment",
				"label":"Comment",
				"type":"note",
				"height":"100px",
				"required":true
			},
			{
				"fin":"Priority",
				"label":"Priority",
				"type":"choice",
				"required":true,
				"emptyLabel":"Set priority",
				"choices":[
					{"v":"0","f":"Priority = low"},
					{"v":"1","f":"Priority = med"},
					{"v":"2","f":"Priority = high"}
				]
			}
		],
	"attachements":true,
	"attLabel":"Attachments",
	"multiple":true
});
An uniquer id for this instance. If you add more than one form the same page you must change this so that each instance is unique. In the CEWP code you find this div:
<div id="spjs_addItemWithAttachment_instanceID_1"></div>
This corresponds with the instanceID to form an unique placeholder where the custom form will be inserted.
The list GUID or display name of the list to add the list item to.
The baseUrl of the site where the list is located. Use “” for the root site, or “/Sites/MySite” for a site named “MySite” on a managed path. This is NOT the URL of the list.
This is the text that goes above the form.
Various text used in the solution.
Array of objects in this format:
{
"fin":"Title",
"label":"Title",
"type":"text",
"required":true
}
“fin”: The FieldIntenalName of the field in the list you are adding the items to.
“label”: The form label in the custom form you are creating.
“type”: Type of field. Supported types are “text”, “note” and “choice”.
“required”: true or false to control whether the field must be filled or not.
“height”: Sets the height of the textarea in pixels.
“emptyLabel”: Sets the default value in the dropdown select.
“choices”: Object format like this:
"choices":[
{"v":"0","f":"Priority = low"},
{"v":"1","f":"Priority = med"},
{"v":"2","f":"Priority = high"}
]
“v” is the value to store in the list and “f” is the displayed value in the dropdown select. These two can be the same.
true or false to allow or disallow attachments.
The form label for the attachments.
true or false to allow for selecting multiple files.
To have multiple forms in the same page, repeat the call to “spjs.addItemWithAttachment.init” and change the “instanceID”.
Let me know if you find any bugs, or you have any comments.
Alexander
February 14. 2014
Updated to v1.2:
January 28. 2014
Updated to v1.1:
I got this request:
Dear Alexander,
I’ve been cruising your blog for a week or so and I have to say – THANKS!
The solutions you posted are wonderful and very helpful!I have a special request that might be useful for many users and I’ll defently buy you a nice cold beer for it !
I need a way to send a feedback from any list item and page in SharePoint. The way I see it is some clickable button in a CEWP inserted in a page and some custom button in the ribbon of a list item.
I’d been asked to allow the users to answer some questions (2-4 pre added) and the ability to add some text of their own.
If there’s a way to have your assistance in that matter I’ll adores you forever and send you a cold beer to chill.
Thanks in advance,
Eron F.
This solution is for SP 2010 or 2013 only and it will NOT work for SP 2007.
This solution will add a banner button or a regular button (details below) that lets your users add feedback to a custom list in the site collection. The solution will fill the “Title” column with the list item title if it is a list item (DispForm or EditForm) and the URL from where the feedback was added. You can add this code to any page in the site collection using a CEWP.
Start with adding a custom list to the site collection. This list must Include the standard “Title” field (already present), a single line of text column called “URL”, and another single line of text column named “SiteTitle”. These columns are used to log where the feedback was added from. You must add additional columns to this list to collect the actual feedback – like a multi line text field. Which columns you want to add is up to you. The relative URL to this list is used in the argument object described below. This custom list does not require any code added to it.
Download the latest version of SPJS-CollectFeedback from here, and put it in a document library where all users have READ ACCESS.
When this list is set up and the file “SPJS-CollectFeedback.js” is downloaded, you can add the code from the code block below to any page in the site collection using a HTML Form Web Part or CEWP. You might want to change the jQuery reference to a local copy, and you must change the reference to “SPJS-CollectFeedback.js” to point to your local copy.
<script src="//ajax.googleapis.com/ajax/libs/jquery/1.10.2/jquery.min.js"></script>
<script src="/Scripts/Feedback/SPJS-CollectFeedback.js"></script>
<script type="text/javascript">

$(document).ready(function(){
	spjs.collectFeedback.initRibbonBtn({
		"feedbackListNewFormURL":"/CommentBox/Lists/Feedback/NewForm.aspx",
		"feedbackAddedAlert":"Thank you for the feedback!",
		"feedbackNotAddedAlert":"",
		"ribbonBtnText":"Send<br>feedback",
		"ribbonBtnImg":"/_layouts/images/ltann.gif"
	});
});
</script>
<input type="button" value="Send feedback" onclick="triggerFeedback();" />
<script src="//ajax.googleapis.com/ajax/libs/jquery/1.10.2/jquery.min.js"></script>
<script src="/Scripts/Feedback/SPJS-CollectFeedback.js"></script>
<script type="text/javascript">

function triggerFeedback(){
	spjs.collectFeedback.init({
		"feedbackListNewFormURL":"/CommentBox/Lists/Feedback/NewForm.aspx",
		"feedbackAddedAlert":"Thank you for the feedback!",
		"feedbackNotAddedAlert":""
	});
}
</script>
feedbackListNewFormURL: The relative URL of the list to store the feedback in.
feedbackAddedAlert: If this is not an empty string you will get an alert after adding the feedback.
feedbackNotAddedAlert: If this is not an empty string you will get an alert if you cancel adding the feedback.
ribbonBtnText: The label of the ribbon button.
ribbonBtnImg: The image of the ribbon button (32×32 px).
Post a comment below if you like the solution or you have any questions.
Alexander
I got this request from @f_Techno:
@SPJavaScripts hello Alexander, I have task list in sps 2010. I want to dim DueDate after create the task. No one should change it except me.
This snippet must be places in the EditForm of the list or library where you want the field to be readonly. What this code does is to check if the logged in user is the author of the list item, and if not, make the field “StartDate” readonly. You can change the fieldnames in the example to target other fields.
<script type="text/javascript" src="/Scripts/jquery-1.10.2.min.js"></script>
<script type="text/javascript" src="/Scripts/spjs-utility/spjs-utility.js"></script>
<script type="text/javascript">
var thisItemDBdata = spjs_getItemByID({"listName":_spPageContextInfo.pageListId,"id":GetUrlKeyValue("ID"),"viewFields":["Author"]});
if(thisItemDBdata !== null){
	var authorID = thisItemDBdata.Author.split(";#")[0];
	if(_spPageContextInfo.userId.toString() !== authorID){
		var fields = init_fields_v2();
		$(fields["StartDate"]).find("td.ms-formbody").hide().after("<td id='readOnly_StartDate' class='ms-formbody'> </td>");
		$(document).ready(function(){
			// Build the fields object again for SP 2013
			fields = init_fields_v2();
			var sDate = getFieldValue("StartDate");
			$("#readOnly_StartDate").html(sDate);
		});
	}
}
</script>
Please note that this code in for SP 2010 or SP 2013. If you want to use it for SP 2007 you must change “_spPageContextInfo.pageListId” for the list DisplayName or GUID.
For more advanced options, check out Dynamic Forms for SharePoint her.
Alexander
// Go to EditForm after upload
var showEditFormAfterUpload = true;
Set to false to skip this feature.This new feature requires a few extra fields added to the list with the upload destination – and you must update your function call with these new fields.
If you are crating the <option> manually you must add a few extra attributes – see description in the code where you specify the <option> tags.
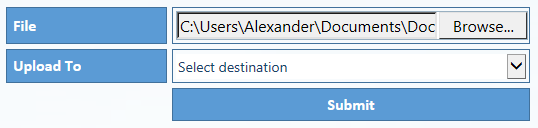
I got a request from Gilbert Okello regarding a custom upload solution for submitting documents to various document libraries in a site collection. This solution uses the “CopyIntoItems” method to let the user select a document from the local computer and upload it to a document library / folder within the site collection.
I must start off emphasizing that this solution requires Internet Explorer 10 or another modern browser to work. There is NO WAY you can make it work in any Internet Explorer version below 10. I have tested it in SP 2010 and SP 2013, but I guess it should work in SP 2007 as well.
The code provided at the bottom of this article builds the upload control by reading a set of predefined upload locations from a custom list. This is the code that builds the dropdown select containing the predefined options:
$(document).ready(function(){
	spjs.upload.getUploadDestinations({
		"listName":"UploadDestination",
 		"listBaseUrl":"",
 		"friendlyNameField":"Title",
 		"relPathField":"RelPath",
 		"baseUrlField":"BaseUrl",
 		"guidField":"DocLibraryGUID",
 		"editFormRelUrlField":"EditFormRelUrl",
 		"orderByField":"Title"
	});
});
listName: The GUID or the display name of the list where the upload destinations are stored.
listBaseUrl: The base URL of the list. If it is in the root site, use “”. If it is in a subsite, use “/MySubsite” or “/Sites/MySubsite” depending on your setup. The list name should NOT be included in this variable.
friendlyNameField: The FieldInternalName of the field that holds the friendly name of the destination.
relPathField: The FieldInternalName of the field that holds the relative URL to the library or folder to upload the files.
BaseUrl: Holds the base URL of the SITE where the document library is located. For example “/Sites/Site1/YourSiteName”
DocLibraryGUID: The GUID of the document library you are uploading into. View source and search for “ctx.listName” to find it.
EditFormRelUrl: The relative URL to the EditForm of your library. For example “/Sites/Site1/YourSiteName/Shared documents/Forms/EditForm.aspx”.
orderByField: The FieldInternalName of the field to sort by.
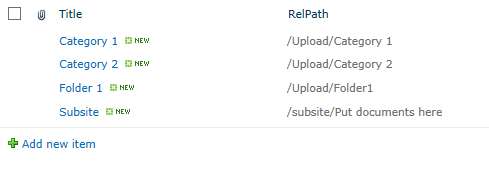
Create a custom list with one additional single line of text field “RelPath”. Enter the friendly name in the Title field, and the relative path to the library or folder in the field “RelPath”.
In addition to the above fields you must add the following if you like to use the new “Go to EditForm after upload” feature.
BaseUrl: Single line of text.
DocLibraryGUID: Single line of text.
EditFormRelUrl: Single line of text.
Using this list is optional. If you like, you can enter the destination directly in the code in the <select> control with id “fileUploadTo”. If you prefer to use the manual approach, ensure you comment out the function call to “getUploadDestinations” in the code example.
The script file “spjs-utility.js” is only used for the function “getUploadDestinations” an you can remove it if you enter the destinations manually.
Get the file “spjs-utility.js” from here. You will also need jQuery. Put this code in a HTML Form Web part where you want the upload control to appear – change the path to the scripts in the top of the code to match you locale files:
<!--
/* SPJS Upload for SharePoint
 * ---------------------------------------------
 * Created by Alexander Bautz
 * alexander.bautz@gmail.com
 * https://spjsblog.com
 * Copyright (c) 2013-2016 Alexander Bautz (Licensed under the MIT X11 License)
 * ---------------------------------------------
 * Include reference to:
 * jquery - http://jquery.com
 * spjs-utility.js - http://spjsfiles.com
 * ---------------------------------------------
*/
 -->

<script type="text/javascript" src="/SPJS/DFFS/plugins/jquery.js"></script>
<script type="text/javascript" src="/SPJS/DFFS/plugins/spjs-utility.js"></script>
<script type="text/javascript">
/*
 Pull the upload destinations from this list
 If you prefer, you can add the destinations manuelly in the <select> with id "fileUploadTo".
 In that case, comment out this function call

 Ensure the list you pull the upload destination from has all the fields specified in this article: http://wp.me/p3eibN-1nr
*/
$(document).ready(function(){
 spjs.upload.getUploadDestinations({
 "listName":"UploadDestination",
 "listBaseUrl":"",
 "friendlyNameField":"Title",
 "relPathField":"RelPath",
 "baseUrlField":"BaseUrl",
 "guidField":"DocLibraryGUID",
 "editFormRelUrlField":"EditFormRelUrl",
 "orderByField":"Title"
 });
});

// Go to EditForm after upload
var showEditFormAfterUpload = true;

</script>
<style type="text/css">
td.spjs_fileUploadLabel{
 width:150px;
 height:25px;
 font-size:16px !important;
 font-weight:bold;
 font-family:Calibri;
 color:#ffffff;
 vertical-align:middle;
 background-color:#5B9BD5;
 border:1px #41719C solid;
 padding:3px 3px 3px 6px;
 cursor:default;
}
td.spjs_fileUploadBody{
 width:350px;
 font-size:16px !important;
 border:1px #41719C solid;
 padding:3px;
 cursor:default;
}
input.spjs_fileUploadBtn{
 width:100%;
 height:33px;
 font-size:16px !important;
 font-weight:bold;
 font-family:Calibri;
 color:#ffffff;
 border:1px #41719C solid;
 background-color:#5B9BD5;
 cursor:pointer;
 margin:0px;
 padding:0px;
 display:none;
}
input.spjs_fileUploadBtn:hover{
 color:#5B9BD5;
 background-color:#ffffff;
}
.spjs_fileUploadSelect{
 width:100%;
 height:25px;
 background-color:#ffffff !important;
 border:none;
 font-size:14px;
}
.spjs_empty{
 border:1px #FF0000 dashed !important;
}
</style>
<table cellpadding="0" cellspacing="5" style="border-collapse:separate;">
 <tr>
 <td class="spjs_fileUploadLabel">File</td>
 <td class="spjs_fileUploadBody">
 <input type="file" id="filePicker" style="width:100%;padding:0px;">
 <span style="display:none;color:red;font-size:12px;">Your browser is not supported!<br>Use Internet Explorer 10 or another modern browser.</span>
 </td>
 </tr>
 <tr>
 <td class="spjs_fileUploadLabel">Upload To</td>
 <td class="spjs_fileUploadBody">
 <select id="fileUploadTo" class="spjs_fileUploadSelect">
 <!--
 // guid attribute must be guid of destination document library
 // baseurl attribute must be baseURL of site wher the document library is located
 // editformurl attribute must be relative url to the EditForm of this library
 <option value="">Select destination</option>
 <option guid='' baseurl='/Upload' editformurl='/Upload/Forms/EditForm.aspx' value="/Upload/Folder1">Folder 1</option>
 <option guid='' baseurl='/Upload' editformurl='/Upload/Forms/EditForm.aspx' value="/Upload/Folder2">Folder 2</option>
 -->
 </select>
 </td>
 </tr>
 <tr>
 <td></td>
 <td class="spjs_fileUploadBtn">
 <input id="uploadFileBtn" type="button" class="spjs_fileUploadBtn" onclick="spjs.upload.submitFile();" value="Submit" />
 <span id="uploadError" style="display:none;color:red;"></span>
 </td>
 </tr>
</table>
<script type="text/javascript">

/******************************************************
 Do not change anything below this line
*******************************************************/
var spjs = spjs || {};

spjs.upload = {
 "version":"1.1",
 "versionDate":"August 04, 2016",
 "data":{"fileDataStr":""},
 "handleFileSelect":function(evt){
 // Modified from http://jsfiddle.net/eliseosoto/JHQnk/
 var files = evt.target.files, file = files[0], reader;
 if(files && file){
 reader = new FileReader();
 reader.onload = function(readerEvt) {
 var binaryString = readerEvt.target.result;
 spjs.upload.data.fileDataStr = binaryString.substring(binaryString.indexOf(",")+1);
 $("#uploadFileBtn").show();
 };
 reader.readAsDataURL(file);
 }
 },
 "submitFile":function() {
 if($("#fileUploadTo").val() === ""){
 $("#fileUploadTo").addClass("spjs_empty");
 return;
 }else{
 $("#fileUploadTo").removeClass("spjs_empty");
 }
 var filePath, fileName, destination, b;
 filePath = $("#filePicker").val();
 fileName = filePath.substring(filePath.lastIndexOf("\\")+1);
 destination = location.protocol+"//"+location.host+$("#fileUploadTo").val()+"/"+fileName;
 b = [];
 b.push("<soap:Envelope xmlns:xsi='http://www.w3.org/2001/XMLSchema-instance' xmlns:xsd='http://www.w3.org/2001/XMLSchema' xmlns:soap='http://schemas.xmlsoap.org/soap/envelope/'>");
 b.push("<soap:Body>");
 b.push("<CopyIntoItems xmlns='http://schemas.microsoft.com/sharepoint/soap/'>");
 b.push("<SourceUrl>" + fileName + "</SourceUrl>");
 b.push("<DestinationUrls>");
 b.push("<string>"+destination+"</string>");
 b.push("</DestinationUrls>");
 b.push("<Fields>");
 b.push("<FieldInformation Type='Text' DisplayName='Title' InternalName='Title' Value='"+fileName+"' />");
 b.push("</Fields>");
 b.push("<Stream>"+spjs.upload.data.fileDataStr+"</Stream>");
 b.push("</CopyIntoItems>");
 b.push("</soap:Body>");
 b.push("</soap:Envelope>");
 $.ajax({
 url: "/_vti_bin/copy.asmx",
 beforeSend: function (xhr) { xhr.setRequestHeader("SOAPAction", "http://schemas.microsoft.com/sharepoint/soap/CopyIntoItems"); },
 type: "POST",
 dataType: "xml",
 data: b.join(""),
 complete: spjs.upload.processResult,
 contentType: "text/xml; charset=\"utf-8\""
 });
 },
 "processResult":function(data, status) {
 var errorCode, errorMessage;
 errorCode = $(data.responseText).find("CopyResult").attr("ErrorCode");
 errorMessage = $(data.responseText).find("CopyResult").attr("ErrorMessage");
 if(errorCode !== "Success"){
 $("#uploadFileBtn").fadeOut(400,function(){
 $("#uploadError").html("Ensure the selected destination exists!<br><br>Error message: "+errorMessage).show();
 setTimeout(function(){
 $("#uploadError").fadeOut();
 $("#fileUploadTo").val("");
 $("#uploadFileBtn").fadeIn();
 },10000);
 });
 }else{
 $("#uploadFileBtn").attr("disabled","disabled").val("File successfully uploaded");
 if(typeof showEditFormAfterUpload !== "undefined" && showEditFormAfterUpload){
 var fileDir = $(data.responseText).find("CopyResult").attr("DestinationUrl");
 var docLibBaseUrl = $("#fileUploadTo option:selected").attr('baseurl');
 var docLibGuid = $("#fileUploadTo option:selected").attr('guid');
 var docLibEditFormUrl = $("#fileUploadTo option:selected").attr('editformurl')
 var fileMetadata = spjs.utility.queryItems({"listName":docLibGuid,"listBaseUrl":docLibBaseUrl,"query":"<Where><Eq><FieldRef Name='EncodedAbsUrl' /><Value Type='Text'>"+fileDir+"</Value></Eq></Where>","scope":"RecursiveAll","viewFields":["FileLeafRef","FileDirRef"]})
 if(fileMetadata.count > 0){
 var id = fileMetadata.items[0].ID;
 SP.UI.ModalDialog.showModalDialog({"url":makeAbsUrl(docLibEditFormUrl+"?ID="+id+"&Mode=Upload")});
 }
 }
 setTimeout(function(){
 $("#uploadFileBtn").fadeOut(400,function(){
 $(this).removeAttr("disabled").val("Submit");
 $("#fileUploadTo").val("");
 })
 },3000);
 $("#filePicker").val("");
 }
 },
 "getUploadDestinations":function(args){
 var res, q, b;
 b = ["<option value=''>Select destination</option>"];
 q = "<Where><IsNotNull><FieldRef Name='ID' /></IsNotNull></Where><OrderBy><FieldRef Name='"+args.orderByField+"' /></OrderBy>";
 res = spjs_QueryItems({"listName":args.listName,"listBaseUrl":args.listBaseUrl,"query":q,"viewFields":[args.friendlyNameField,args.relPathField,args.baseUrlField,args.guidField,args.editFormRelUrlField]});
 $.each(res.items,function(i,item){
 b.push("<option editformurl='"+item.EditFormRelUrl+"' baseurl='"+item.BaseUrl+"' guid='"+item.DocLibraryGUID+"' value='"+item[args.relPathField]+"'>"+item[args.friendlyNameField]+"</option>")
 });
 $("#fileUploadTo").html(b.join(""));
 }
};

if(window.File && window.FileReader && window.FileList && window.Blob){
 document.getElementById('filePicker').addEventListener('change', spjs.upload.handleFileSelect, false);
}else{
 $("#filePicker").hide().next().show();
 $("#fileUploadTo").hide();
}
</script>
Post questions and feedback in the comments section below, and if you use this solution, please consider sending me a few beers by clicking the “beer button” in the top right corner of this page.
Enjoy,
Alexander
#spjs_previewTable{
/* your css here */
}
April 21. 2014
Updated to v1.37:
April 1. 2014
Updated to v1.36:
Fixed an issue with having multiple lists in a web part page. Let me know if there are still issues as I cannot test every possible combination.
March 30. 2014
Updated to v1.35:
Fixed a type in the script that affected IE8 when using the cross list functionality.
March 12. 2014
Updated to v1.32:
January 29. 2014
Updated to v1.31:
Fixed a bug when using in a calendar view on a web part page.
You must add a new variable to the CEWP code alongside the “spjs_listItemPreviewFIN” like this:
var spjs_listItemPreviewFIN = "HoverMe";
var spjs_listItemPreviewList = "{2b6961fc-2e5d-420e-b6d9-3ce7d1bb88b2}";
January 16. 2014
Updated to v1.3:
Fixed a bug that slowed the loading significantly due to a query being executed for each list item in stead of only once per list view.
December 15. 2013
Updated to v1.2 with these changes:
{"fin":"Attachments","label":true,"icon":true}
December 09. 2013
v1.1: Updated the code for the file “PreviewItem.js” and the code example for the calculated column to support list view web parts in web part pages. The change to the calculated column is that the list GUID must be included. This is necessary only if you plan to use a list view web part, and not if you use the code in a proper list view. See details in the code for the calculated column below.
I have previously made several solutions for previewing information for list items by hovering over them in a list view. This is one supports SP2010 and SP2013 – and possibly SP2007 as well. I no longer have access to a SP2007 site and cannot test it there, but I have made an effort to adapt the code to (hopefully) work in SP2007 as well. If you find any problems with the SP2007 support, please post a comment below, and I’ll try my best to fix it.
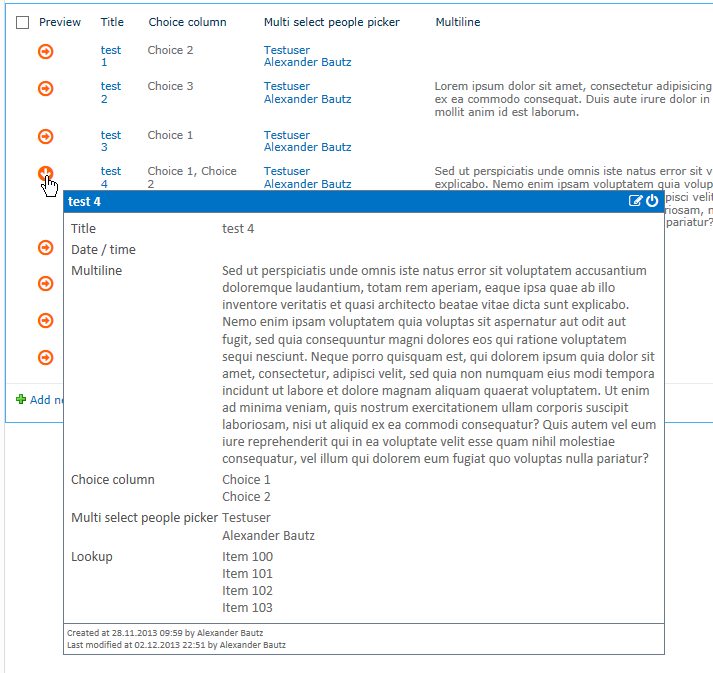
This solution uses the well known trick of inserting an image tag in a calculated column, and selecting “number” as the format for the calculated column. This is the code that triggers the solution in a list view (see separate section for calendar view):
="<img src='/_layouts/images/loadingcirclests16.gif' fin='Preview' list='xxxxxxxx-xxxx-xxxx-xxxx-xxxxxxxxxxxx' configindescription='1' onload='spjs.listItemPreview.init(this)'>"
The attribute “list” must be added if you want to use the solution in a list view web part outside the list itself. This attribute is the GUID of the list. You must change the string xxxxxxxx-xxxx-xxxx-xxxx-xxxxxxxxxxxx to match your list. You can find the GUID in SP 2010 or SP 2013 by right clicking a list view in the list > view source > search for “pageListId”. In SP 2007 you must search for “ctx.Listname”.
Please note the FieldInternalName of the field in the “fin” attribute, and the “configindescription” set to “1” indicating that the configuration should be read from the field description. Set “configindescription=’0′” to configure the setup in the HTML Form Web Part (required for SP 2007, optional for SP 2010 and SP 2013).
Ensure you use the “Number” format to trick SharePoint into rendering it as proper HTML:
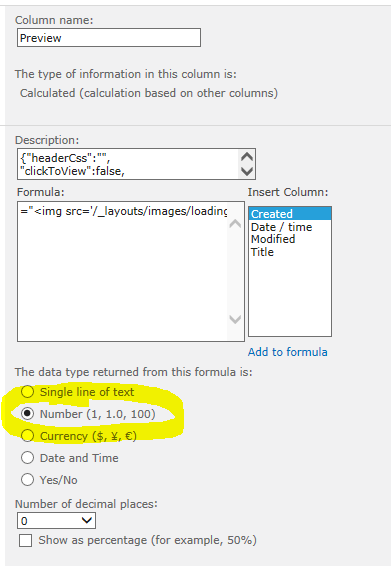
When you set “configindescription=’1′” in the calculated column, the configuration is read from the description of the calculated column itself. This way you do not need to edit the setup in a separate file. Please note that you still need to refer the code in the list views where you want to use this solution – or you could put it in the master page to access it in the entire site or site collection. When this is done, the actual configuration for this particular field is done in the list settings!
I’ll get back to the configuration later, but first the general setup.
I have used a “icon font” called Font Awesome for all the icons in this solution. Go get it here: Font Awesome.
Here is how Dave Gandy describes Font Awesome:
Font Awesome gives you scalable vector icons that can instantly be customized — size, color, drop shadow, and anything that can be done with the power of CSS.
In my example code I have linked the font awesome css file from bootstrapcdn, but you can download it locally if you like.
Download the file “spjs-utility.js” from here. Ensure you get the latest version.
Get jQuery from here. Use v1.10.x as the 2.x series in not compatible with IE below 9.
Get the code for the file “PreviewItem.js” from here. Ensure you get the latest version.
Add this code to a HTML form web part in the list view where you want the solution activated. Please note that you must insert it ABOVE the list view for the code to be accessible during page load.
<link href="//netdna.bootstrapcdn.com/font-awesome/4.0.3/css/font-awesome.css" rel="stylesheet">
<script type="text/javascript" src="/Scripts/jQuery-1.10.2.js"></script>
<script type="text/javascript" src="/Scripts/spjs-utility/spjs-utility.js"></script>
<script type="text/javascript" src="/Scripts/PreviewListItem3/PreviewItem.js"></script>
Now the initial setup is completed and you can configure the calculated column.
First start by creating a calculated column with this formula:
="<img src='/_layouts/images/loadingcirclests16.gif' fin='Preview' list='xxxxxxxx-xxxx-xxxx-xxxx-xxxxxxxxxxxx' configindescription='1' onload='spjs.listItemPreview.init(this)'>"
The attribute “list” must be added if you want to use the solution in a list view web part outside the list itself. This attribute is the GUID of the list. You must change the string xxxxxxxx-xxxx-xxxx-xxxx-xxxxxxxxxxxx to match your list. You can find the GUID in SP 2010 or SP 2013 by right clicking a list view in the list > view source > search for “pageListId”. In SP 2007 you must search for “ctx.Listname”.
Insert the FieldInternalName of the newly created field in the attribute “fin” in the formula.
This is the settings you have access to when storing the setup in a the description of the calculated column:
{"headerCss":"",
"clickToView":false,
"hoverDelay":200,
"showEditBtn":true,
"editInDlg":true,
"hoverIcon":{
	"off":"fa-arrow-circle-o-right",
	"on":"fa-arrow-circle-down",
	"css":"color:#FF6103;"
},
"dlgTitleField":"Title",
"maxHeight":400,
"maxWidth":600,
"dateFormat":"dd.MM.yyyy",
"fields":[
	{"fin":"Title","label":true},
	{"fin":"DateAndTime","label":true},
	{"fin":"Multiline","label":true},
	{"fin":"MyChoiceCol","label":true},
	{"fin":"MultiUser","label":true},
	{"fin":"Lookup","label":true},
	{"fin":"Attachments","label":true,"icon":true}
],
"footer":{
	"show":true,
	"css":"",
	"dateFormat":"dd.MM.yyyy hh:mm",
	"strings":{
		"default":["Created at","by","Last modified at","by"],
		"1044":["Opprettet","av","Sist endret","av"]
	}
},
"editFormUrl":null,
"listGuid":null,
"listBaseUrl":null
}
First start by creating a calculated column with this formula:
="<img src='[Path to image]' fin='Preview' configindescription='0' iid='"&_ID&"' onload='spjs.listItemPreview.init(this)'>"
Insert the FieldInternalName of the newly created field in the attribute “fin” in the formula. You must also provide the URL to an image you want to show while the solution is loading. The image used in the SP2010 and SP2013 setup is not available in SP2007.
Please note the reference to the _ID field. To use this solution in a list view you must provide the item ID in the calculated column as this is not accessible in the list view table in SP 2007. You cannot use the ID directly in a calculated column as new items will get “0” for ID.
You can use the method described in this article to get the _ID column populated, or you can create a workflow that inserts the ID into the _ID field.
The configuration options for SP2007 can be found below in the section “Setting up the configuration in the HTML form web part”.
This section describes how you can set up the configuration in the HTML Form Web Part and not in the calculated columns description field. This is a requirement for SP 2007 and optional for SP 2010 and SP 2013.
var spjs_listItemPreviewConfig = {
	"Preview":{
		"headerCss":"",
		"clickToView":false,
		"hoverDelay":200,
		"showEditBtn":true,
		"editInDlg":true,
		"hoverIcon":{
			"off":"fa-arrow-circle-o-right",
			"on":"fa-arrow-circle-down",
			"css":"color:#FF6103;"
		},
		"dlgTitleField":"Title",
		"maxHeight":400,
		"maxWidth":600,
		"dateFormat":"dd.MM.yyyy",
		"fields":[
			{"fin":"Title","label":true},
			{"fin":"DateAndTime","label":true},
			{"fin":"Multiline","label":true},
			{"fin":"MyChoiceCol","label":true},
			{"fin":"MultiUser","label":true},
			{"fin":"Lookup","label":true},
			{"fin":"Attachments","label":true,"icon":true}
		],
		"fieldData":{
			"Title":{"disp":{"default":"Title","1044":"Tittel"},"type":"Text"},
			"DateAndTime":{"disp":{"default":"Date / time","1044":"Dato / klokkeslett"},"type":"DateTime"},
			"Multiline":{"disp":{"default":"Multiline","1044":"Flerlinje tekst"},"type":"Text"},
			"MyChoiceCol":{"disp":{"default":"Choice column","1044":"Valgkolonne"},"type":"MultiChoice"},
			"MultiUser":{"disp":{"default":"Multi select people picker","1044":"Flervalgs personvelgerfelt"},"type":"UserMulti"},
			"Lookup":{"disp":{"default":"Lookup","1044":"Oppslag"},"type":"Lookup"},
			"Attachments":{"disp":{"default":"Attachments","1044":"Vedlegg"},"type":"Attachments"}
		},
		"footer":{
			"show":true,
			"css":"",
			"dateFormat":"dd.MM.yyyy hh:mm",
			"strings":{
				"default":["Created at","by","Last modified at","by"],
				"1044":["Opprettet","av","Sist endret","av"]
			}
		},
		"editFormUrl":"/Lists/ListItemPreview3/EditForm.aspx",
		"listGuid":null,
		"listBaseUrl":null
	}
};
As you see, the configuration is mostly the same, but it is defined as an object named “spjs_listItemPreviewConfig” with the configuration for each of the separate calculated columns in it. In this example the FieldInternalName is “Preview”.
When setting up the configuration in the HTML From Web Part you must add the label and the field type for the fields you want to include in the preview. See the “fieldData” key in the code above. As you can see, the text values can be configured for MUI setup, but this will not affect SP 2007 – use the “default” key for the values.
You must provide the relative URL for the EditForm in the “editFormUrl” key. For SP2007 you have to provide the listGuid and the listBaseUrl as well.
In a calendar view you cannot rely on the calculated column to initiate the code for us. For SP 2010 and SP 2013 I have added support for automatically initiating the code, but you must insert two variables in the HTML Form Web Part like this:
var spjs_listItemPreviewFIN = "Preview";
var spjs_listItemPreviewList = "{xxxxxxxx-xxxx-xxxx-xxxx-xxxxxxxxxxxx}";
“Preview” is the FieldInternalName of the calculated column where the configuration is stored. Change the GUID to the one from your list.
I do not have access to a SP 2007 site and cannot ensure it works. If anyone wants to test it and possibly fix it, I’m sure many will be happy. Look at the function “calendar” in the file “PreviewItem.js” to see how I have tried to support month view of a calendar in SP 2007.
In a SP 2007 calendar view, you will have to call the code “manually” from the HTML Form Web Part like this:
<link href="//netdna.bootstrapcdn.com/font-awesome/4.0.3/css/font-awesome.css" rel="stylesheet">
<script type="text/javascript" src="/Scripts/jQuery-1.10.2.js"></script>
<script type="text/javascript" src="/Scripts/spjs-utility/spjs-utility.js"></script>
<script type="text/javascript" src="/Scripts/PreviewListItem3/PreviewItem.js"></script>
<script type="text/javascript">
$(document).ready(function(){
   spjs.listItemPreview.calendar();
});
</script>
To be able to do a cross list “preview” you must add the configuration to the HTML Form Web part / CEWP in the “spjs_listItemPreviewConfig” object, and set the “editFormUrl”, “listGuid” and “listBaseUrl” to address the list you want to pull the information from.
You must also supply the ID or another identifier of the item you want to pull the info from in the calculated column in the “iid” attribute in the calculated column.
The default is to lookup an item using the ID for that item. In this case you must have the parent item ID in a column you can use in a calculated column:
="<img iid='"&[TheColumnNameWhereTheIDIsFound]&"' src='/_layouts/images/blank.gif' fin='CrossList' configindescription='0' onload='spjs.listItemPreview.init(this)'>"
* “CrossList” is the FieldInternalName of my calculated column.
* “[TheColumnNameWhereTheIDIsFound]” is the name of the column in the current list item where the ID of the linked item is found.
You can also match the item you want to preview in another column – like the “Standard” column in this example:
="<img iid='Standard:"&Standard&"' src='/_layouts/images/blank.gif' fin='CrossList' configindescription='0' onload='spjs.listItemPreview.init(this)'>"
In the iid attribute in this example I pull the value from the column “Standard” from the current list item, and will match this with the column with the same name in the “lookup list”.
When using this cross list preview you cannot know if the target list will contain an item to preview. If there are no items, the icon will turn gray when you hover over it.
Let me know if you like the solution, have trouble, or find any bugs! – use the comment section below.
Alexander
In many of my solutions I have used two variables (L_Menu_BaseUrl and L_Menu_LCID) that SharePoint provides trough the master page. Unfortunately these variables disappeared when I updated to IE 11, thus halting all the scripts using them with this error:
This problem is present in SP2013 in IE11 only, and the strange thing is that if you switch on the compatibility mode (or changes the user agent string using F12) the variables return.
As a workaround, put the site in compatibility mode (Tools menu in IE), or insert this code in the top of the script that produces this error:
if(typeof _spPageContextInfo !== "undefined" && _spPageContextInfo.webUIVersion === 15){
	var L_Menu_BaseUrl = L_Menu_BaseUrl || _spPageContextInfo.webServerRelativeUrl !== "/" ? _spPageContextInfo.webServerRelativeUrl : "";
	var L_Menu_LCID = L_Menu_LCID || _spPageContextInfo.currentLanguage.toString();
}
I will update scripts as soon as I can manage.
Alexander
You find the updated code below.
Updating from a previous version?
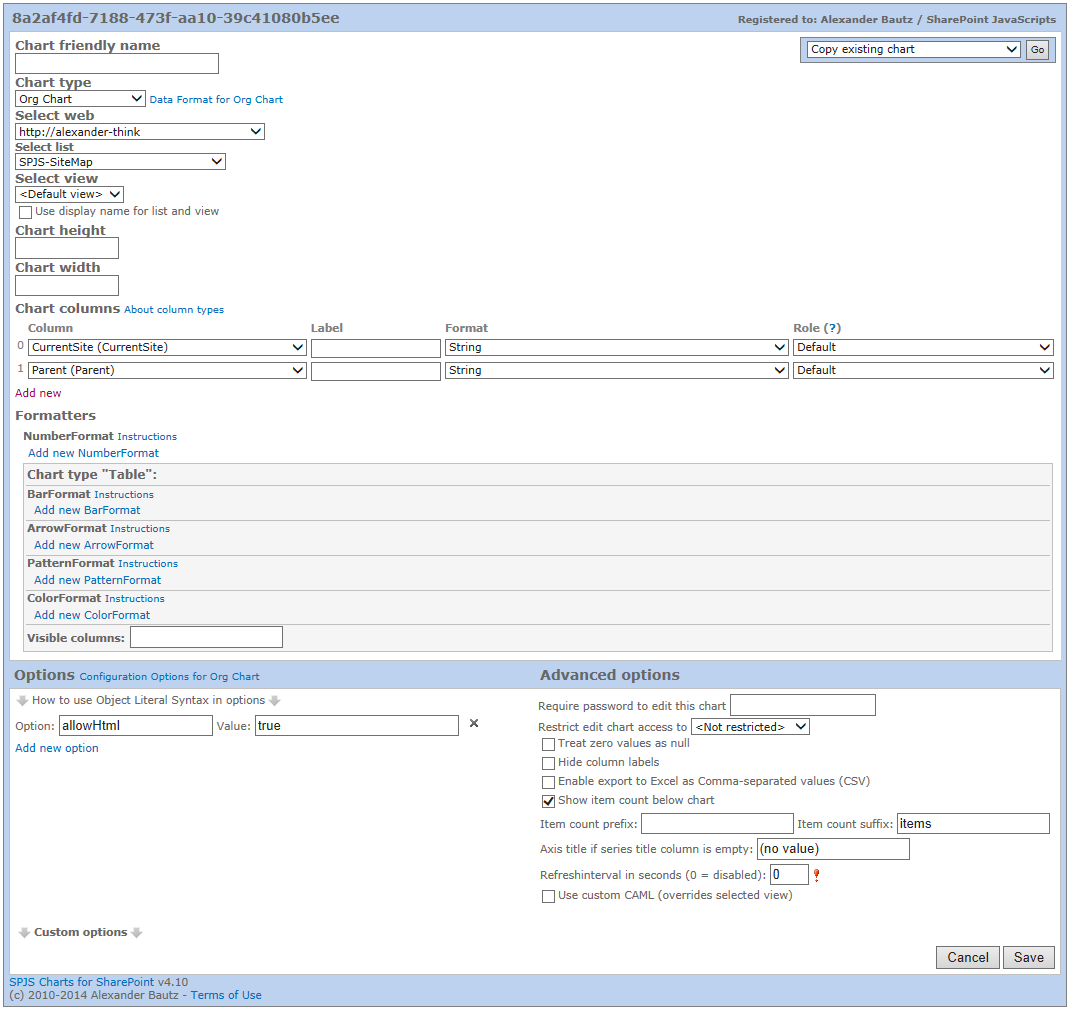
Please note that you must delete the existing list and rerun the script to recreate it with the new fields. When the script has recreated the list, you must enter setup of your chart to reselect the list and fields for your SiteMap chart. See image below for changes in the chart setup (new field used in stead of the Title field).
@SPJavaScripts do you have something that makes a site map? Using the logged in perms instead of having to be a site col admin would be nice
Unfortunately I do not know of a method of doing this without Site collection Administrator (SCA) rights, but thought I should post a solution anyways. This solution iterates trough all sites in the site collection and writes to a custom list in a format that can be rendered as a clickable organization chart using SPJS Charts for SharePoint.
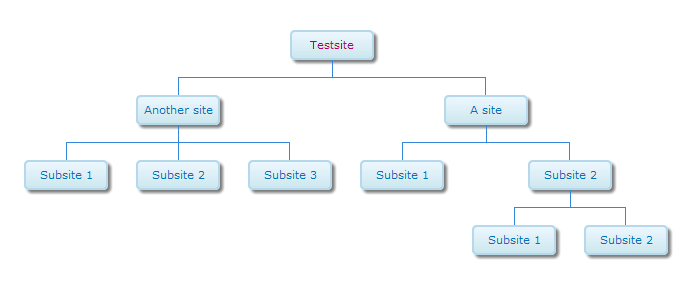
The map must be created or updates by a SCA, but can be read by all users.
You can also use a CEWP if you use the content link option to link to the code. Do not add the code directly in the source editor of the CEWP.
When you reload the page, you will see a button named “Add or update site map”. Click this to set up the list. You should get a confirmation message when the list has been created. You need appropriate permissions to add a list. If you are a SCA, go ahead and populate the list with information about all sites in the site collection. This is done by clicking the same button again.
You will get a confirmation message with the count of items added, updated and removed. The information in the list SPJS-SiteMap is now static and will not reflect changes in the site structure live. To update the site map when a site has been added / updated or removed, an SCA must click the button “Add or update site map” again.
You must update the script src to point to your local files.
<div id="siteMapBtn"></div>
<script type="text/javascript" src="/Scripts/jquery-1.10.2.min.js"></script>
<script type="text/javascript" src="/Scripts/spjs-utility/spjs-utility.js"></script>
<script type="text/javascript">

var spjs = spjs || {};

spjs.siteMap = {
	"version":"1.2",
	"data":{
		"listName":"SPJS-SiteMap",
		"listBaseUrl":typeof _spPageContextInfo !== "undefined" ? _spPageContextInfo.siteServerRelativeUrl !== "/" ? _spPageContextInfo.siteServerRelativeUrl : "" : L_Menu_BaseUrl,
		"listDescription":"SPJS-SiteMap for SharePoint by Alexander Bautz / SharePoint JavaScripts: https://spjsblog.com. This list is used as datasource for SPJS Charts for SharePoint."
	},
	"showButton":function(){
		$("#siteMapBtn").html("<input type='button' onclick='spjs.siteMap.update()' value='Add or update site map' />");
	},
	"update":function(){
		if(!confirm("You must be Site Collection Administrator to add or update the site map. Click OK to continue.")){
			return;
		}
		var b, webs, thisBaseUrl, p, currItems, currItemsObj, newList, uList, data, res, noChangeCount, uCount, nCount, dCount, error;
		b = '<GetAllSubWebCollection xmlns="http://schemas.microsoft.com/sharepoint/soap/" />';
		webs = {};
		spjs_wrapSoapRequest(spjs.siteMap.data.listBaseUrl+'/_vti_bin/webs.asmx', 'http://schemas.microsoft.com/sharepoint/soap/GetAllSubWebCollection', b, function(data){
			$('Web', data).each(function(i,o){
				thisBaseUrl = $(o).attr("Url").replace(location.protocol+"//"+location.host,"");
				if(thisBaseUrl === ""){
					thisBaseUrl = "/";
				}
				p = $(o).attr("Url").replace(location.protocol+"//"+location.host,"");
				p = p.substring(0,p.lastIndexOf("/"));
				if(p === ""){
					p = "/";
				}
				webs[thisBaseUrl] = {"title":$(o).attr("Title"),"parent":p};
			});
		});
		// Get current items
		currItems = spjs_QueryItems({"listName":spjs.siteMap.data.listName,"listBaseUrl":spjs.siteMap.data.listBaseUrl,"query":"<Where><IsNotNull><FieldRef Name='ID' /></IsNotNull></Where>","viewFields":["ID","CurrentSite","Parent","URL"]});
		if(currItems.count === -1){
			if(confirm("It looks like the list named "+spjs.siteMap.data.listName+" does not exist.\n\nCreate it now?")){
				newList = spjs_AddList(spjs.siteMap.data.listName,spjs.siteMap.data.listBaseUrl,spjs.siteMap.data.listDescription);
				if(newList.success){
					uList = spjs_UpdateList(newList.id,L_Menu_BaseUrl,[{'Type':'Note','DisplayName':'CurrentSite'},{'Type':'Note','DisplayName':'Parent'},{'Type':'Note','DisplayName':'URL'}],[]);
					if(!uList.success){
						alert(uList.errorText);
						return;
					}else{
						if(confirm("The list was created successfully. Click OK to populate the list.")){
							spjs.siteMap.update();
						}
					}
				}else{
					alert("[spjs_AddList]\n\n"+newList.errorText);
					return;
				}
				return;
			}else{
				return;
			}
		}
		currItemsObj = {};
		noChangeCount = 0;
		uCount = 0;
		nCount = 0;
		dCount = 0;
		$.each(currItems.items,function(i,item){
			currItemsObj[item.URL === null ? "" : item.URL] = {"ID":item.ID,"CurrentSite":item.CurrentSite,"Parent":item.Parent,"URL":item.URL};
		});
		error = false;
		$.each(webs,function(url,o){
			data = {"Title":"[...]","CurrentSite":"{\"v\":\""+url+"\",\"f\":\"<a href='"+url+"' target='_blank'>"+o.title+"</a>\"}","URL":url,"Parent":o.parent}
			if(currItemsObj[url] !== undefined){
				if(currItemsObj[url].CurrentSite === data.CurrentSite && currItemsObj[url].Parent === o.parent && currItemsObj[url].URL === url){
					delete currItemsObj[url];
					noChangeCount += 1;
					return;
				}
				res = spjs_updateItem({"listName":spjs.siteMap.data.listName,"listBaseUrl":spjs.siteMap.data.listBaseUrl,"id":currItemsObj[url].ID,"data":data});
				delete currItemsObj[url];
				if(!res.success){
					error = {"errorText":res.errorText,"code":res.errorCode};
					return false;
				}else{
					uCount += 1;
				}
			}else{
				res = spjs_addItem({"listName":spjs.siteMap.data.listName,"listBaseUrl":spjs.siteMap.data.listBaseUrl,"data":data});
				if(!res.success){
					error = {"errorText":res.errorText,"code":res.errorCode};
					return false;
				}else{
					nCount += 1;
				}
			}
		});
		if(error !== false){
			alert("SPJS-SiteMap: An error occurred\n---------------------------------------\nAre you updating from a previous version? If the below error message tells you that one or more field types are not installed correctly, please delete the list \"SPJS-SiteMap\" and rerun this script. The list will be recreated with the missing fields.\n\nPlease note that you must edit the SiteMap chart to reselect the list and fields.\n\nError message\n---------------------------------------\n"+error.errorText);
		}
		$.each(currItemsObj,function(url,obj){
			res = spjs_deleteItem({"listName":spjs.siteMap.data.listName,"listBaseUrl":spjs.siteMap.data.listBaseUrl,"id":obj.ID});
			if(!res.success){
				alert("[spjs.siteMap]\n\n"+res.errorText);
				return false;
			}else{
				dCount += 1;
			}
		});
		alert("SPJS-SiteMap\n\nUpdated: "+uCount+"\nAdded: "+nCount+"\nRemoved: "+dCount);
		location.href = location.href;
	}
};

spjs.siteMap.showButton();
</script>
Refer the SPJS Charts for SharePoint v4 article for setup instructions, and select the list “SPJS-SiteMap” as data source. Add an option “allowHtml = true” to render the links as HTML. Here is a screenshot of the Edit Chart GUI:
Let me know what you think of this solution in the comments section below.
Alexander