Category Archives: SharePoint 2013

KPI for SharePoint 2010 and 2013

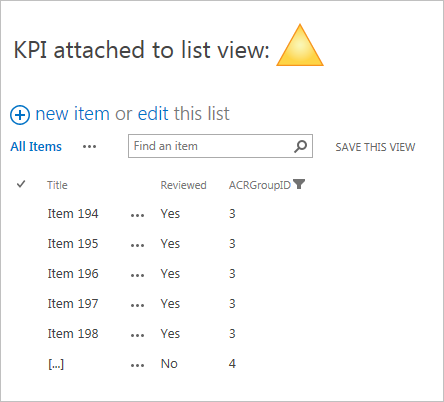
I received a question about the built in KPI in SP 2010. The user added the KPI to a list view that was filtered with a Query String Filter, but the KPI didn’t respect the filter and kept calculating based on the unfiltered view.

I don’t know if you can do anything about the built in KPI, but It’s a good opportunity to write some JavaScript!

Here is a solution you can drop in any list view to create a KPI that respects both Query String Filters and filters applied by the end user to the columns. The solution requires SP 2010 or 2013 (foundation or server), as it uses the JavaScript Client Object Model. It does NOT require jQuery.

IMG

Get the code for the file “SPJS-KPI.js” from here

Upload it to a document library where all users have read access, and add a HTML Form Web Part with this code in the list view or the web part page:

<table cellpadding="3" cellspacing="0">
	<tr style="font-size:24px;">
		<td valign="middle">KPI attached to list view:</td>
		<td valign="middle" id="kpi_1" style="height:55px;"><img style="margin:12px;" src="/_layouts/images/hig_progcircle_loading24.gif"></td>	
	</tr>

</table>
<script type="text/javascript" src="/SPJS/SimpleKPI/SPJS-KPI.js"></script>
<script type="text/javascript">

ExecuteOrDelayUntilScriptLoaded(function(){
	// KPI example 1
	var args = {
		// Placeholder for the KPI must be an existing HTML element in the page with this ID
		"placeholderID":"kpi_1",
		// Target list and base URL
		"listGUID":_spPageContextInfo.pageListId,
		"listBaseUrl":_spPageContextInfo.webServerRelativeUrl,
		// Target view - must be filled in to use "consumeFiltersFromList"
		"consumeFiltersFromViewGUID":"23233f84-531c-4096-b23b-d6711f117a2d",
		// URL Filter
		"URLfilterKey":"",
		"URLfilterTargetField":"",
		// KPI Indicator field and value
		"kpiIndicatorField":"Reviewed",		
		"kpiIndicatorFieldValue":true,
		// Text
		"noFilterMessage":"The URL filter \"{0}\" is missing.",
		"noItemsFoundMessage":"No items match the filter",
		// Threshold
		"greenThreshold":98,
		"yellowThreshold":80,
		// Icons
		"greenIcon":"/_layouts/images/kpidefaultlarge-0.gif",
		"yellowIcon":"/_layouts/images/kpidefaultlarge-1.gif",
		"redIcon":"/_layouts/images/kpidefaultlarge-2.gif"		
	};	
	spjs.kpi.init(args);	
}, "sp.js");
</script>

Update the link to the file “SPJS-KPI.js” in the code example.

Variables explained
  • placeholderID: This is the ID of a HTML element in the page where you want the KPI to appear.
  • listGUID: This is the list GUID of the list you want to attach the KPI to. If you are using a list view from the list itself (not a web part page), you can use the variable from the example. If not, add the GUID to the list here. To find the GUID, go to a list view, right click and view source. Look for “pageListId”.
  • listBaseUrl: If the KPI list is in the same site, use the variable from the example. If not, add the path like this: “/Sites/NameOfTheSite”
  • consumeFiltersFromViewGUID: To have the filter consume the filters from a list view, add the GUID of the view you are applying the filter to here. Find the list GUID by filtering the view and look at the URL. In SP 2010 you see “View=xxxxxxxx-xxxx-xxxx-xxxx-xxxxxxxxxxxx”, in SP 2013 you see it like this: InplviewHashxxxxxxxx-xxxx-xxxx-xxxx-xxxxxxxxxxxx. The GUID is where the x’es are.
  • URLfilterKey: If you are using an URL filter, this is the key from the URL like this: …/AllItems.aspx?key=value
  • URLfilterTargetField: This is the FieldInternalName of the field in the list where the filter is applied.
  • kpiIndicatorField: This is the FieldInternalName of the field you calculate the KPI from.
  • kpiIndicatorFieldValue: This is the value found in the field you calculate the KPI from. If it is a Yes/No column, use boolean value true or false.
  • greenThreshold: The percentage needed to show the green icon.
  • yellowThreshold: The percentage needed to show the yellow icon (the rest is red).
  • greenIcon, yellowIcon and redIcon: URL to the images.

Ask if you need help or you find a bug.

Alexander

Resource management: Now compatible with DFFS

Change log
July 13, 2015
Changes in v2.42:
Added option to use {currentsite} in baseUrl variable.March 15, 2015
Changes in v2.37:
Fixed a bug where booked time range was missing the minutes – displayed as :00 – when using AM / PM time format.

August 20, 2014
Changes in v2.36:
Fixed bug where the validation messages did not show when the resource field was set to read only.

June 07, 2014
Changes in v2.35:

  • Fixed a bug in the field xml when creating or updating the list as the choices for the hours could not be set in datasheet view due to wrong case on the CHOICES tag. Update the list to fix this issue.
  • Added support for multiple ranges of bookable dates. A big thanks to Rudolf Vehring for extensive testing on this feature!

Please note that you must update the configuration list to the latest version. You find the instructions in the article below.

May 15, 2014
Changes in v2.2:
I have added back the missing features from v1.3. related to restricting bookable time range individually for each weekday. If you are upgrading form v2.1 you must look at the details below as you will have to update the configuration list with new fields (this is done automatically by the script when you trigger the update).

Please note that you must have the latest version of spjs-utility.js. If you use it with DFFS you must have v3.344 or later of dffs_min.js.

May 8, 2014
Changes in v2.1:
Added an option to configure bookable time ranges in a separate list. See detail below.

I have previously posted a solution for preventing double booking of resources. This is a remake of the resource management solution that is more lightweight, and can be used with DFFS. It can also be used as a standalone solution.
IMG

Please note:
This solution is made for unmodified SharePoint forms.
How to set it up with DFFS

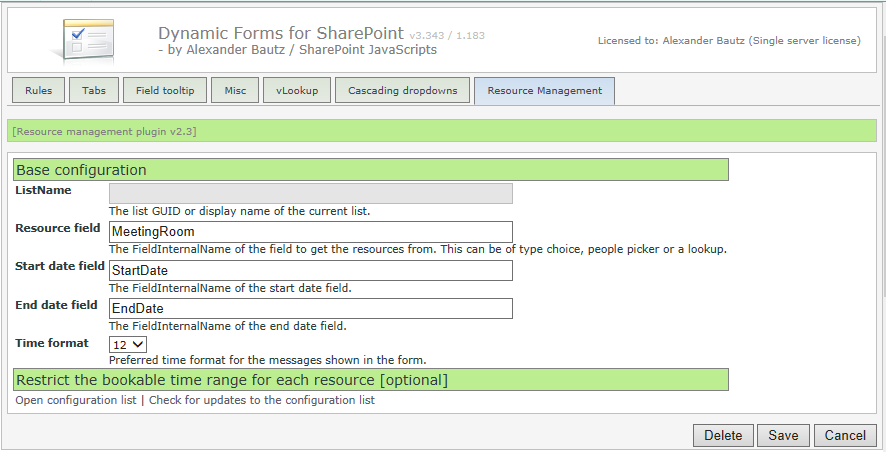
Add a reference to SPJSRM_min.js from the CEWP or HTML Form Web Part where you include the DFFS solution. When using this with DFFS (v3.344 or above) you find the configuration in a separate tab like this:
IMG

If you have an older version of DFFS you can activate it by adding this code to the Custom JS section in the Misc tab:

var spjsRmArgs = {
"resourceField":"MeetingRoom",
"dateFrom":"StartDate",
"dateTo":"EndDate",
"timeFormat":24,
"bookableTimeRangeActive":false
};
spjs.rm.init(spjsRmArgs);
Use it as a standalone solution

You must include spjs-utility.js and add the code to the bottom of the form web part like this:

<script type="text/javascript" src="/Scripts/jquery-1.11.2.min.js"></script>
<script type="text/javascript" src="/Scripts/spjs-utility/spjs-utility.js"></script>
<script type="text/javascript" src="/Scripts/SPJSRM/SPJSRM.js"></script>
<script type="text/javascript">

var spjsRmArgs = {
"resourceField":"MeetingRoom",
"dateFrom":"StartDate",
"dateTo":"EndDate",
"timeFormat":24,
"bookableTimeRangeActive":false
};
spjs.rm.init(spjsRmArgs);
</script>
Setup
  • resourceField: This is the FieldInternalName of the field you have the “resource” in. This can be a lookup column (single choice), a people picker (single choice) or any other single choice field present in the form.
  • dateFrom and dateTo: This is the FieldInternalName of the date fields. This solution will NOT handle recurring events.
  • timeFormat: This is either 12 or 24 and is for displaying the time ranges in the overlap message in the correct format.
  • bookableTimeRangeActive: true or false to control whether or not to use a separate list to restrict the bookable time range for the resources. See below.
Bookable time range

When this is used as a standalone solution you must “manually” create the list to hold the bookable time range settings. This is done by calling a function like this:

// Use this to set up the "SPJS-RM-BookableTimeRange" list.
spjs.rm.verifyTimeRangeList();

When this is done you find the list in “All site contents”. Do not let this code persist after the list is initially created as it will slow things down due to an unnecessary request.

SharePoint 2007

If you are using SP2007 you must provide the list GUID or DisplayName in the argument like this:

var spjsRmArgs = {
"listName":"TheListGuidOfThisList",
"resourceField":"MeetingRoom",
...
Download

Get spjsrm.js here (ensure you use v2.2 or above) and spjs-utility.js here.

Localization

To localize the text in the various messages from this solution, add this object to the CEWP alongside the function call:

spjs.rm.text = {
	"overlapMsg":"{0} has already been booked by {1} between {2} and {3}.",
	"endBeforeStartMsg":"End time cannot be less than or equal to start time.",
	"empty":"{0} cannot be left empty!",
	"wrongDateFormat":"Please use this date format: {0}",
	"notInTimeRange":["{0} can be booked from {1} on a {2}.","{0} can be booked to {1} on a {2}."],
	"notInDateRange":["{0} cannot be booked before {1}.","{0} cannot be booked after {1}."],
	"bookableDateRange":"The bookable date ranges for {0} are:
{1}",
	"dayNumObj":{0:"Sunday",1:"Monday",2:"Tuesday",3:"Wednesday",4:"Thursday",5:"Friday",6:"Saturday"}
};

Translate the text as you like, but keep the {placeholders}.

Update from a previous version

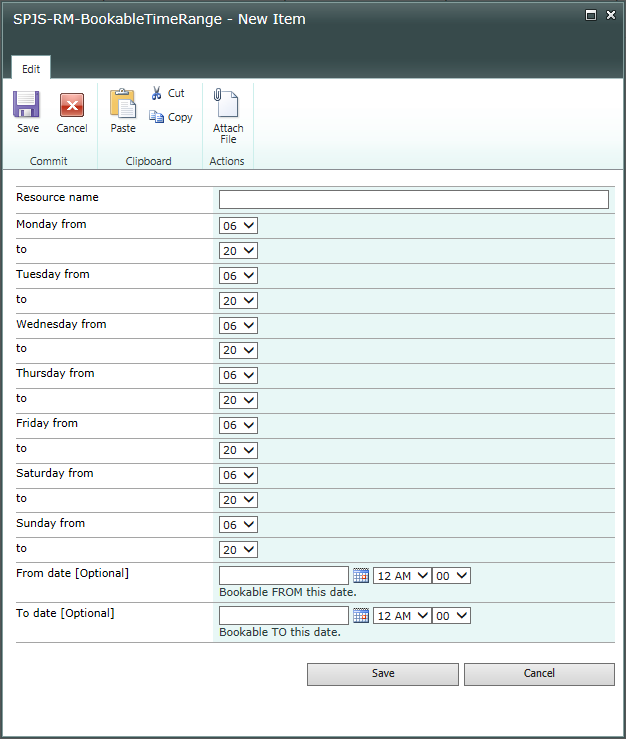
The configuration list in v2.2 looks like this (please note that v2.35 has removed the time selector from the dates):
IMG

This list is created automatically for you by the script the first time you set up the solution, but to upgrade you must check “manually” like this:

With DFFS

Click the “Check for updates to the configuration list” text:
IMG

Standalone

Add this function call to the CEWP below where you have loaded the file SPJSRM.js:

spjs.rm.verifyTimeRangeList();

Please note that this code must be commented out when the update is done.

I hope you enjoy the solution. Please post any bugs below.

Alexander

Autocomplete for text and people picker fields

You find updated documentation here

Change log
Always test a new version to see that it works as expected before adding it to a production environment.

You find the latest change log here: https://spjsblog.com/dffs/dffs-change-log/

May 19, 2016

I have released v1.4.3 with a new feature that lets you pre-filter the data-source with a CAML query. To do this, add a new key-value pair to the argument object like this (see more details below):

"filterCAML":"<Eq><FieldRef Name='Author' LookupId='TRUE' /><Value Type='Integer'><UserID/></Value></Eq>"

This example will show only items created by current user. You can provide any valid CAML.

March 20, 2016

I have released v1.41 with this bugfix:
I have fixed a bug occurring when using the new option to add  new values to the lookup list, and it is a “isLookupInSelf”. If you had already moved the cursor away from the autocomplete field so the field had the “error class”, going back to add it to the list did not clear this class so it appeared as if the error was still there. The value would however be saved to the list as it should.

February 19, 2016

I have released v1.4 with these new features:

  • Added option to add a custom function to parse the returned value before setting it using the “setFields” option. Here is an example (see parseFunction):
    spjs.ac.textField({
    "applyTo":"Project",
    "helpText":"Project name or number...",
    "listGuid":"ProjectList",
    "listBaseUrl":"/DFFS",
    "showField":"Title",
    "enforceUniqueValues":true, // New in v1.33
    "rowLimit":15,
    "listOptionsOnFocus":false,
    "reValidateOnLoad":false,
    "allowAddNew":false, // New in v1.4
    "isLookupInSelf":true, // New in v1.4
    "setFields":[
    {
    "fromFIN":"ProjectNumber",
    "toFIN":"PNumber",
    "parseFunction":"",
    "skipIfEmpty":false
    },
    {
    "fromFIN":"Created",
    "toFIN":"ProjectCreatedDate",
    "parseFunction":"parseDateFunc",
    "skipIfEmpty":false
    }
    ]
    });

    // This function converts the ISO8601 date returned from the query to a format ready for inserting in the field

    function parseDateFunc(a){
    // Set the desired format in the variable "f"
    var f = "MM/dd/yyyy hh:mm" , d = new Date(a);
    f = f.replace("MM",(d.getMonth()+1) < 10 ? "0"+(d.getMonth()+1) : (d.getMonth()+1));
    f = f.replace("dd",d.getDate() < 10 ? "0"+d.getDate() : d.getDate());
    f = f.replace("yyyy",d.getFullYear());
    f = f.replace("yy",d.getFullYear().toString().substring(2));
    f = f.replace("hh",d.getHours() < 10 ? "0"+d.getHours() : d.getHours());
    f = f.replace("mm",d.getMinutes() < 10 ? "0"+d.getMinutes() : d.getMinutes());
    return f.split(/ |:/);
    }
  • Added option to add new items to the autocomplete if you cannot find a match. Please look at the description of the parameters “allowAddNew” and “isLookupInSelf” below.

The autocomplete solution is part of the DFFS package, and you will find updated versions in the “plugins” folder in the DFFS download package, or in the “incrementalReleases” folder. Get the files here

February 09, 2016

I have released v1.33 with support for returning only unique values. You set this up in the argument object like this:

spjs.ac.textField({
	"applyTo":"Project",
	...
	"enforceUniqueValues":true, // New
	...
	...

The autocomplete solution is part of the DFFS package, and you will find updated versions in the “plugins” folder in the DFFS download package, or in the “incrementalReleases” folder. Get the files here

October 31, 2014

v1.31:
Fixed a bug with using single quotes in the lookup field.

May 1, 2014

v1.21:
Added event triggering for the fields set by “setFields” in the autocomplete function call – for use with DFFS “is changed” trigger.

April 25, 2014

v1.2:

  • Added option to prevent validation of the selected value on load. This will allow for duplicate entries in the lookup list. See function call example below for details.
  • Fixed a bug that prevented a selected people picker form being cleared.

April 6, 2014

v1.1: Added option to bypass the SP2013 check when applying the people picker autocomplete in SP2013. This must only be used when having SP2010 style people pickers with the “validate user” and “address book” icons.

To use this option, change the argument object like this:

spjs.ac.peoplePicker({
	"applyTo":"Responsible",
	"forceOn2013":true,
	...

I have previously posted a few solutions here and here, but those are old and does not work for new SharePoint versions.

I have redone the solution to bring it up to support SP2007, SP2010 and SP2013. This is a total remake that does not rely upon jQueryUI for the autocomplete part.

In this example, I have added autocomplete to the single line of text field “Project”, and to the single choice people picker “Responsible”.
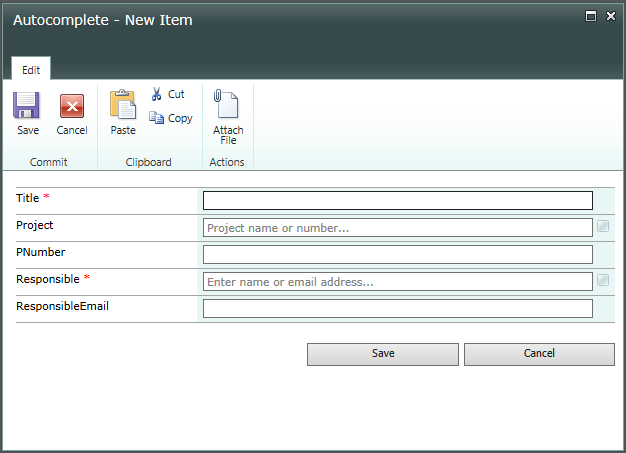
IMG

Here I have started typing in the Project field:
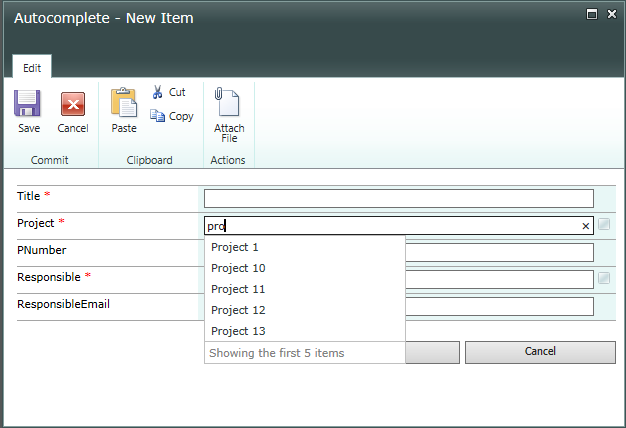
IMG
You can use this solution with single line of text columns and single choice people picker columns. I have not built in support for multi choice people pickers.

Please note that this solution is made for unmodified SharePoint forms (NewForm and EditForm) and will not work for custom forms modified in SPD or InfoPath. It will however play nice with DFFS.

The people picker autocomplete is not available in SP 2013 as this version already have this built in.

How to set it up
  1. If you don’t have jQuery already, get it here
  2. Get the latest version of spjs-utility.js from here.
  3. Download the file “spjs-autocomplete.js” from here.
  4. Add the code below the form in NewForm and EditForm as described below.
Setup for a single line of text column

Add this code below the form web part in NewForm and EditForm using a HTML form Web Part, Script Editor or link to a file containing the code from a Content Editor Web Part using the content link option.

<script type="text/javascript" src="/Scripts/jquery-1.11.0.min.js"></script>
<script type="text/javascript" src="/Scripts/spjs-utility/spjs-utility.js"></script>
<script type="text/javascript" src="/Scripts/Autocomplete/spjs-autocomplete.js"></script>
<script type="text/javascript">
var fields = init_fields_v2();

spjs.ac.textField({
	"applyTo":"Project",
	"helpText":"Project name or number...",
	"listGuid":"ProjectList",
	"listBaseUrl":"/test",
	"showField":"Title",
	"optionDetailFields":"[], // New in v 1.4.12
	"enforceUniqueValues":true, // New in v1.33
	"rowLimit":15,
	"listOptionsOnFocus":false,
	"minLengthBeforeSearch":3, // New in v 1.4.12
	"reValidateOnLoad":false,
	"allowAddNew":false, // New in v1.4
	"isLookupInSelf":false, // New in v1.4
	"filterCAML":"", // New in v1.4.3
	"multiselect":true, // New in v1.4.4. If this is true, the "setFields section will not apply",
	"multiselectSeparator":"; ", // New in v1.4.4.
	"orderBy":[{"fin":"Title","ascending":true}], // New in v1.4.5
	"setFields":[
		{
			"fromFIN":"ProjectNumber",
			"toFIN":"PNumber",
			"parseFunction":"",
			"skipIfEmpty":false
		}
	]					
});					
	
</script>
Options explained:
  • applyTo: The FieldInternalName of the field to add autocomplete to.
  • helpText: The text in the autocomplete field when it is empty
  • listGuid: The list GUID or the display name of the list you are pulling the options from.
  • listBaseUrl: The base url of the list. For a subsite named “Test”, this is the correct base url: “/test”. For the root site, use an empty string like this: “”.
  • showField: This is the field to show in the autocomplete.
  • optionDetailFields: Additional fields to show more details in the drodown.
  • enforceUniqueValues new in v1.33: true or false to only return unique values.
  • rowLimit: This is the max number of items to pull back. Use a low number to keep the query lightweight and fast.
  • listOptionsOnFocus: true or false determines whether or not to pull in the first batch when the field gets focus. Setting this to true will mimic a dropdown with an arrow to the right.
  • minLengthBeforeSearch: This settings controls how many characters the user needs to enter before the search is triggered.
  • reValidateOnLoad new in v1.2: true or false to determine whether or not to validate the selection when loading the form in EditForm. If this is set to true, you cannot have duplicates in the lookup list, and if you delete an item in the lookup list, the selected value will be invalid when you edit an item that has this value selected.
  • allowAddNew new in v1.4: true or false to specify whether or not to allow adding new values to the “dataset”. If you set the below “isLookupInSelf” parameter to false, you MUST use the GUID in the parameter “listGuid” above.
  • isLookupInSelf new in v1.4: Used with the above “allowAddNew” parameter. Use true or false to specify whether or not the autocomplete is a lookup in the the current list. Please note that setting this to false is only supported in SharePoint 2013. This will open a dialog for adding the new item.
  • filterCAML new in v1.4.3: Add your own CAML here to prefilter the data-source. You can use an valid CAML – for example this to get items created by current user:
    "filterCAML":"<Eq><FieldRef Name='Author' LookupId='TRUE' /><Value Type='Integer'><UserID/></Value></Eq>",
  • setFields: This in an array of objects containing additional fields to pull in and set based on the selection. It has these properties:
    • fromFIN: The FieldInternalName of the field in the list you are pulling from.
    • toFIN: The FieldInternalName of the field in the list you are writing to.
    • parseFunction: This is used to parse the returned value before inserting it in the “toFIN” field. See example on parsing a date value in the change log in the top of this page (February 19, 2016).
    • skipIfEmpty: true or false determines whether or not to skip this option if this field is empty.
Setup for a single choice people picker

Add this code below the form web part in NewForm and EditForm using a HTML form Web Part, Script Editor or link to a file containing the code from a Content Editor Web Part using the content link option.

<script type="text/javascript" src="/Scripts/jquery-1.11.0.min.js"></script>
<script type="text/javascript" src="/Scripts/spjs-utility/spjs-utility.js"></script>
<script type="text/javascript" src="/Scripts/Autocomplete/spjs-autocomplete.js"></script>
<script type="text/javascript">
var fields = init_fields_v2();

spjs.ac.peoplePicker({
	"applyTo":"Responsible",
	"forceOn2013":false,
	"helpText":"Enter name or email address...",
	"showField":"Title",
	"enforceUniqueValues":true, // New in v1.33
	"chooseFromUserGroup":null,
	"showUsersOnly":true,
	"rowLimit":5,
	"listOptionsOnFocus":false,
	"reValidateOnLoad":false,
	"setFields":[
		{
			"fromFIN":"EMail",
			"toFIN":"ResponsibleEmail",
			"parseFunction":"",
			"skipIfEmpty":false
		}
	]
});
	
</script>
Options explained:

The shared options are explained in the previous section.

  • chooseFromUserGroup: If you want to limit the selection to a specific user group, add the name or the ID here. The ID must be added as an integer. Leave as null to search all users. Please note that you cannot let the autocomplete search among all users while the people picker itself (in the list settings) is restricted to a certain group.
  • showUsersOnly: true or false determines whether or not to show users and groups, or users only.
Override the labels and text

Add this to the CEWP code (above the function call to spjs.ac.peoplePicker or spjs.ac.textField) to override the standard texts. Translate as you like.

spjs.ac.text = {
	"imgTitle":"The list of valid choices is updated automatically when you type",
	"noItems":"No items match your search",
	"addNewItem":"Add {0} to the list?",
	"noValidItems":"No valid items match your search",
	"invalid":"Invalid value",
	"moreItemsLabel":"Showing the first {0} items",
	"moreItemsMouseover":"Continue typing to narrow your search",
	"searching":"Searching for: "
};
How to use this with DFFS

To use this with DFFS you must add the script reference to “spjs-autocomplete.js” in the CEWP code for DFFS, and wrap the function call like this:

function dffs_Ready(){
	spjs.ac.peoplePicker({
		"applyTo":"Responsible",
		"helpText":"Enter name or email address...",
		"showField":"Title",
		"enforceUniqueValues":true, // New in v1.33
		"chooseFromUserGroup":null,
		"showUsersOnly":true,
		"rowLimit":5,
		"listOptionsOnFocus":false,
		"reValidateOnLoad":false,		
		"setFields":[
			{
				"fromFIN":"EMail",
				"toFIN":"ResponsibleEmail",
				"parseFunction":"",
				"skipIfEmpty":false
			}
		]
	});
}

You can also add the function call to the Custom JS section in the Misc tab. In this case you do not wrap it in dffs_Ready().

Post any bugs or feedback in the comments below.

Alexander

Edit SharePoint Field properties in SP2010 and SP2013

Change log
August 1, 2014
Updated to v3.2 with these changes:
Fixed a bug where you could not change a text field that had a default value, or a choice field. The status would read “TRUE” indicating success, but the setting would not be changed. I have also changed the “TRUE” and “FALSE” message to “On” and “Off”.

April 2, 2014
Updated to v3.1 with these changes:
Added option to control ReadOnly and AllowDeletion.

I have previously posted a similar solution here. I have therefore started this solution in v3.0.

This solution lets you change field properties that are not accessible from list settings. Use it with caution as you can break a list or library if you change the wrong property. You should test it in a test list before you do any changes to a production environment.

Please note that this solution is for SP2010 and SP2013. You find a link to a similar solution for SP2007 in the top of this article.

How to set it up

Download the file “spjs_editFieldProperties.js” from here and add a HTML Form Web Part to a web part page in the site where you want to use it.

The HTML Form Web Part source should look like this:

<script type="text/javascript" src="/Scripts/jquery-1.10.2.min.js"></script>
<script type="text/javascript" src="/Scripts/ChangeFieldProperties/spjs_editFieldProperties.js"></script>

If you need to download jQuery, you find it here.

This is what it will look like:

IMG

Select list to see all fields:

IMG
Hover over the options to reveal the toggle buttons.

The options

I will not go into details on each of the options as it should be self explaining by the header. I will however mention a few of them.

ShowInFileDlg

This controls whether or not the field is shown in the Document Information Panel in Microsoft Word.

SourceID

In a scenario where you are using “Quick parts” to show metadata in a Word file, and you are copying the file to another library, you must change the “SourceID” in the destination library to match the value in the source library. If you do not, the “Quick part” will be disabled – leaving the value as plain text.

Let me know in the comments below if you have questions – and send me a beer form the “beer button” in the right side of the screen if you like and use the solution.

Alexander

CommentBox for SharePoint 2010 and 2013

This version is old – the latest version can be found here

I have updated my CommentBox for SharePoint solution to use the Client Object Model found in SP 2010 and 2013 to make it faster and smoother. This update does unfortunately not support SP 2007.

Change log
August 12. 2014
v2.2.1: Fixed error with TinyMCE not being reapplied to the textarea after cancel or submit.April 18. 2014
Fixed download link as there was something wrong with the folder rights to the original folder.April 4. 2014
Updated to v2.2:
Added option to store the comments in a list in the root site. The setting is controlled in the argument object like this:

var argObj = {
	"placeholderID":"cBox_A",
	"threadID":threadID,
	"storeCommentsOnRootSite":true,
	...
Please note that you must index the columns “Title” and “Parent” in the list “SPJS-CommentBox” to prevent errors when you reach 5000 comments in the list. This list is hidden from browsers, and you must add this index manually by entering list setup like this this URL: http://YourSiteURL.com/Lists/SPJSCommentBox

March 6. 2014
Updated to v2.1:
Added support for changing the TinyMCE language when using a local installed version of the TinyMCE solution. You must download the language package you want to use, and set the parameter “tinyMCE_Language” in the argument object. Refer the TinyMCE web page for details on downloading the language js file.

If you refer TinyMCE from //tinymce.cachefly.net all you have to do to change the language is to add a reference to the correct language.js file in the CEWP.

Updated to v2.01:
Fixed a bug where level 3 and deeper comments does not show when setting “threadInitiallyCollapsed” to true.

What is this solution used for?

You can add this solution to any page or form in a site to let users comment on the page or list item.

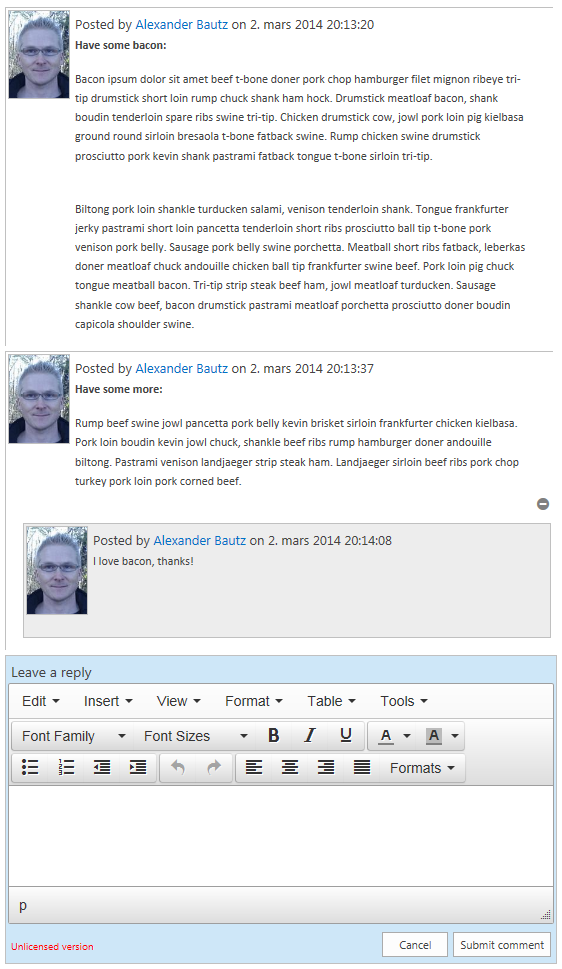
Here is an example thread

IMG

Hover over the comment to show the available options:

IMG
Here you see “Edit”, “Delete” and “Reply”. The available options will vary depending on the configuration.

Third party solutions:

This release utilizes Font Awesome Created by Dave Gandy and if you activate rich text input in the comments, TinyMCE from Moxiecode Systems AB

Some of the features
  • Multi level comments.
  • Option to use plain text or rich text input.
  • Moderators can be specified by group ID or user ID. Moderators (and site collection administrators) have full control and can edit or delete any comments.
  • Sorting ascending of descending.
  • Page size form 1-500 root comments. Load the next page by a click on a button.
  • Option to restrict write access to specified groups (by group ID)
  • You can have multiple parallel threads in one page.
  • And more…
Behind the scenes

The comments are stored in a list in the site where you set up the solution. This list is automatically created by the script, and is hidden from browsers. You can access it by navigating to “/Lists/SPJSCommentBox”. This list has a Title field for storing the page ID, a “Parent” field for the ID of the parent comment (if it is a reply), a “Comment” field to hold the actual comment, a “EMail” field and a “ProfileImg” field. There is no need to hand edit this list.

How to set it up
  1. Download “CEWP.txt”, “spjs-cBox.css” and “spjs-cBox_min.js” from here.
  2. If you like to use a local copy of Font Awesome, get it here, and follow the instructions found here.
  3. If you want to use a local copy of jQuery, get it here.
  4. If you want to use a local copy of TinyMCE, get it here, and follow the instructions found here.
  5. Upload “spjs-cBox.css” and “spjs-cBox_min.js” and any local versions of the above solutions to a document library or a folder created in the root of the site using SharePoint Designer. Ensure all users have read access to this library or folder.
  6. Edit the file “CEWP.txt” and change the links to target your local files. Update the configuration by looking at the CEWP code example below. Upload the file to the same location you created above.
    DO NOT add the code directly to the CEWP, but use the Content link option to link to the file. You can also add the code to the page using a HTML form web part or “Embed code”, but I prefer the Content link option as you can access the code without editing the page.
  7. Add the code to a page or form (like DispForm) using the preferred method and reload the page. You are prompted to create the list to hold all the comments, and after another page reload you are ready to add comments.
CEWP code
<div id="cBox_A"></div>
<link href="//netdna.bootstrapcdn.com/font-awesome/4.0.3/css/font-awesome.css" rel="stylesheet">
<link rel="stylesheet" href="/scripts/cBox/spjs-cBox.css">
<script type="text/javascript" src="https://code.jquery.com/jquery-1.11.0.min.js"></script>
<script type="text/javascript" src="/scripts/cBox/spjs-cBox_min.js"></script>
<script type="text/javascript" src="//tinymce.cachefly.net/4.0/tinymce.min.js"></script>
<script type="text/javascript">

var spjs_cBox_license = "Put your license code here";

var threadID = location.pathname;
if(GetUrlKeyValue("ID") !== ""){
	threadID += "?ID="+GetUrlKeyValue("ID")
}

var argObj = {
	"placeholderID":"cBox_A",
	"threadID":threadID,
	"multiInstanceMode":true, // Must be set to false when upgrading from v1.x
	"text":{
		"createdByPrefix":"Posted by ",
		"createdPrefix":" on ",
		"modifiedPrefix":"Modified: ",
		"modifiedByPrefix":" by ",
		"expandCollapse":["expand","collapse"],
		"newCommentText":"Leave a reply",
		"notSignedInText":"You must sign in to comment",
		"replyText":"Reply",
		"editText":"Edit",
		"submitText":"Submit comment",
		"canceText":"Cancel",
		"deleteThreadText":"Delete comment",
		"confirmDeletePrompt":"Please confirm that you want to delete the selected item and all replies below it.",
		"showMoreCommentsText":"Show more comments"
	},	
	"textareaVisible":true,
	"containerWidth":"550px",
	"replyLevels":3,
	"pageSize":25,
	"threadInitiallyCollapsed":false,
	"threadedCommentsIndent":15,
	"textareaHeight":100,
	"showProfileImage":true,	
	"showUserEmail":true,	
	"richTextInputUsingTinyMCE":false,
	//"tinyMCE_Language":"nb_NO", // New in v2.1
	"sendToRecycleBinWhenDeleting":true,				
	"sortAscending":false,
	"colorMyComments":false,
	"authorCanEdit":false,	
	"moderatorGroupIDorUserID":[],
	"restrictWriteAccessToGroups":[]
};

ExecuteOrDelayUntilScriptLoaded(function(){
	spjs.cBox.init(argObj);
},"sp.js");

</script>
Arguments details

Here is some details on a selection of argument properties.

  • placeholderID: This is the unique identifier for this instance. You must have a placeholder in the page with this ID – like the div in the top of the code example above. To use multiple instances, change the placeholderID and add placeholders in the page.
  • threadID: This is by default the relative URL of the page or list item. Change this if you like, but remember that you must use an unique identifier for each thread.
  • multiInstanceMode: Set this to true if you want to have multiple instances in one page. For users upgrading from a previous version this must be “false” for the comments to show up.
  • textareaVisible: This setting specifies whether the textarea should be visible initially, or to display a button to show it.
  • replyLevels: How deep can the replies go in one thread.
  • pageSize: How many root comments to show in each page. The more the comments, the longer the page takes to load.
  • richTextInputUsingTinyMCE: If set to true you must refer the TinyMCE solution.
  • tinyMCE_Language: For example “nb_NO”. Refer the TinyMCE web page for details on downloading the language js file.
  • sendToRecycleBinWhenDeleting: true to use recycle bin, false to permanently delete.
  • colorMyComments: Add a special css class “cBoxMyComments” to the comments created by the logged in user. You can edit this class in the file “spjs-cBox.css”
  • authorCanEdit: true to let the author edit their own comments. Delete is for moderator only.
  • moderatorGroupIDorUserID: Comma separated list of group ID (number) or user ID (number). To find the group ID go to “People and Groups” and click on the group you want the ID of. Look at the URL for this string: /_layouts/people.aspx?MembershipGroupId=5. To find the user id use the same approach by clicking on a user and looking for “ID=123” in the URL.
  • restrictWriteAccessToGroups: Comma separated list of group ID for the groups that is allowed to comment. Leave blank for no restrictions.
Are upgrading form version 1.x?

You must update all the files. Some of the files used in v1.x is no longer needed. You must also change the function call argument object as the configuration has changed. When all the files are in place, all you have to do is to rename the configuration list from “CommentBoxForSharePoint” to “SPJS-CommentBox”. When this is done all existing comments will reappear.

Obtain a license code

Go to the page Obtain license code.

Please let me know if you have trouble setting this up, or you have feature requests.

Alexander

Custom form for adding list item with attachments

Change log

March 6, 2018
Clarified the setup instructions as suggested by Rob Mason.

April 5. 2014

Updated to v1.1:
Fixed a bug where “args.listBaseUrl” was missing in the function “submitFile”. This made it impossible to add items to another site than the one you triggered the code on. Thanks to Jean-Jacques for pointing out this bug.

I got this request from Rudolf:

Hi Alexander,

Do you have any idea to solve the following problem I have?

We would like to upload formatted text or binary data from a file as an attachment to with an on the fly create form to enter the comment.
I read your blog to spjs-upload-for-sharepoint-custom-upload-page- ….

We would like to send this the comment and the attachments via a WebService to a SharePoint list to create a list item with attachments loaded.

Best Regards

The solution

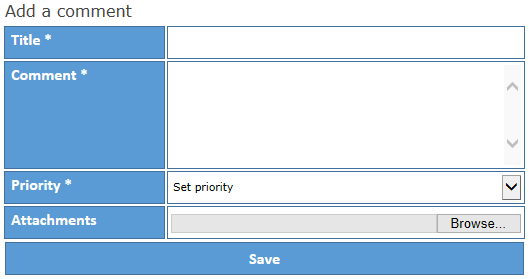
I have created this solution that lets you add a list item with one or more attachments from a custom form that you can place anywhere in your SharePoint site.
IMG

You may also be interested in this solution SPJS Upload for SharePoint: Custom upload page for uploading documents to various document libraries in a site collection.

Please note:
* This solution requires you to be logged in with a user with the necessary privileges to add a list item.
* This solution requires IE 10 or above. This may be a problem for users with SharePoint 2007 or 2010 as this versions forces IE 8 mode for newer versions of IE. Change the document mode or use Chrome or Firefox.

How to add this solution to a page

  1. Download jQuery from here. Please note that you should use v1.x as v2.x does NOT support IE versions below 9.
  2. Download spjs_utility.js from here
  3. Download the files spjs_addItemWithAtt.css, spjs_addItemWithAtt.js and spjs_addItemWithAtt_CEWP.txt from here.
  4. Upload all the files but spjs_addItemWithAtt_CEWP.txt to a document library in the site collection, or a folder created using SharePoint Designer on the root of the site collection.
  5. Edit the file spjs_addItemWithAtt_CEWP.txt
    A.
    Update the path to the files you have uploaded

    B. Edit the argument object (starting at spjs.addItemWithAttachment.init({) to create the framework of your form using the guide described below.
    C. Save and Upload the file to the same location as the other files.
    D. Create a CEWP and refer the URL for the .txt file you just edited using the “Content link” option in the CEWP. DO NOT ADD THE CODE DIRECTLY IN THE CEWP AS HTML. You can also use the code directly in a HTML form Web Part in the page where you want the form to appear.

The arguments for the function

You call the function from the CEWP or the HTML Form Web Part using code like this:

spjs.addItemWithAttachment.init({
	"instanceID":"1",
	"listName":"{1a2bb561-c557-4a28-938f-0fb600b136d7}",
	"listBaseUrl":"",
	"header":"Add a comment",
	"text":{
		"saveBtn":"Save",
		"successMsg":"Saved successfully",
		"browserNotSupported":"Your browser is not supported."
	},
	"fields":
		[
			{
				"fin":"Title",
				"label":"Title",
				"type":"text",
				"required":true
			},
			{
				"fin":"Comment",
				"label":"Comment",
				"type":"note",
				"height":"100px",
				"required":true
			},
			{
				"fin":"Priority",
				"label":"Priority",
				"type":"choice",
				"required":true,
				"emptyLabel":"Set priority",
				"choices":[
					{"v":"0","f":"Priority = low"},
					{"v":"1","f":"Priority = med"},
					{"v":"2","f":"Priority = high"}
				]
			}
		],
	"attachements":true,
	"attLabel":"Attachments",
	"multiple":true
});

instanceID

An uniquer id for this instance. If you add more than one form the same page you must change this so that each instance is unique. In the CEWP code you find this div:

<div id="spjs_addItemWithAttachment_instanceID_1"></div>

This corresponds with the instanceID to form an unique placeholder where the custom form will be inserted.

listName

The list GUID or display name of the list to add the list item to.

listBaseUrl

The baseUrl of the site where the list is located. Use “” for the root site, or “/Sites/MySite” for a site named “MySite” on a managed path. This is NOT the URL of the list.

header

This is the text that goes above the form.

text

Various text used in the solution.

fields

Array of objects in this format:

{
"fin":"Title",
"label":"Title",
"type":"text",
"required":true
}

“fin”: The FieldIntenalName of the field in the list you are adding the items to.
“label”: The form label in the custom form you are creating.
“type”: Type of field. Supported types are “text”, “note” and “choice”.
“required”: true or false to control whether the field must be filled or not.

For type = note you have one extra setting

“height”: Sets the height of the textarea in pixels.

For type = choice you have two extra settings

“emptyLabel”: Sets the default value in the dropdown select.
“choices”: Object format like this:

"choices":[
{"v":"0","f":"Priority = low"},
{"v":"1","f":"Priority = med"},
{"v":"2","f":"Priority = high"}
]

“v” is the value to store in the list and “f” is the displayed value in the dropdown select. These two can be the same.

attachements

true or false to allow or disallow attachments.

attLabel

The form label for the attachments.

multiple

true or false to allow for selecting multiple files.

Multiple forms in the same page

To have multiple forms in the same page, repeat the call to “spjs.addItemWithAttachment.init” and change the “instanceID”.

Let me know if you find any bugs, or you have any comments.

Alexander

Collect feedback from pages or list items

Change log
February 07. 2015
Updated to v1.3:

  • Fixed a bug introduced in v1.1. When triggering this from a list item, you ended up with two entries for “itemID” in the URL.

February 14. 2014
Updated to v1.2:

  • Added option to store the site title in an additional field in the list. To activate this, add a field with FieldInternalName “SiteTitle” to the list.

January 28. 2014
Updated to v1.1:

  • Include site title in the Title field in the feedback if it is collected from a page and not a list item.
  • Changed from locationl.pathname to the full location.href in the URL for collected feedback.

I got this request:

Dear Alexander,
I’ve been cruising your blog for a week or so and I have to say – THANKS!
The solutions you posted are wonderful and very helpful!

I have a special request that might be useful for many users and I’ll defently buy you a nice cold beer for it !

I need a way to send a feedback from any list item and page in SharePoint. The way I see it is some clickable button in a CEWP inserted in a page and some custom button in the ribbon of a list item.

I’d been asked to allow the users to answer some questions (2-4 pre added) and the ability to add some text of their own.

If there’s a way to have your assistance in that matter I’ll adores you forever and send you a cold beer to chill.

Thanks in advance,
Eron F.

The solution

This solution is for SP 2010 or 2013 only and it will NOT work for SP 2007.

This solution will add a banner button or a regular button (details below) that lets your users add feedback to a custom list in the site collection. The solution will fill the “Title” column with the list item title if it is a list item (DispForm or EditForm) and the URL from where the feedback was added. You can add this code to any page in the site collection using a CEWP.

How to set it up

Start with adding a custom list to the site collection. This list must Include the standard “Title” field (already present), a single line of text column called “URL”, and another single line of text column named “SiteTitle”. These columns are used to log where the feedback was added from. You must add additional columns to this list to collect the actual feedback – like a multi line text field. Which columns you want to add is up to you. The relative URL to this list is used in the argument object described below. This custom list does not require any code added to it.

Not using English language?
You must change the display name for the localized Title field to the English “Title” in the list you want to store the feedback in. This because the script addresses the field by display name.

Download the latest version of SPJS-CollectFeedback from here, and put it in a document library where all users have READ ACCESS.

When this list is set up and the file “SPJS-CollectFeedback.js” is downloaded, you can add the code from the code block below to any page in the site collection using a HTML Form Web Part or CEWP. You might want to change the jQuery reference to a local copy, and you must change the reference to “SPJS-CollectFeedback.js” to point to your local copy.

Use this code to insert a ribbon button
<script src="//ajax.googleapis.com/ajax/libs/jquery/1.10.2/jquery.min.js"></script>
<script src="/Scripts/Feedback/SPJS-CollectFeedback.js"></script>
<script type="text/javascript">

$(document).ready(function(){
	spjs.collectFeedback.initRibbonBtn({
		"feedbackListNewFormURL":"/CommentBox/Lists/Feedback/NewForm.aspx",
		"feedbackAddedAlert":"Thank you for the feedback!",
		"feedbackNotAddedAlert":"",
		"ribbonBtnText":"Send<br>feedback",
		"ribbonBtnImg":"/_layouts/images/ltann.gif"		
	});
});
</script>
Or use this code to insert a regular button
<input type="button" value="Send feedback" onclick="triggerFeedback();" />
<script src="//ajax.googleapis.com/ajax/libs/jquery/1.10.2/jquery.min.js"></script>
<script src="/Scripts/Feedback/SPJS-CollectFeedback.js"></script>
<script type="text/javascript">

function triggerFeedback(){
	spjs.collectFeedback.init({
		"feedbackListNewFormURL":"/CommentBox/Lists/Feedback/NewForm.aspx",
		"feedbackAddedAlert":"Thank you for the feedback!",
		"feedbackNotAddedAlert":""
	});
}
</script>
The various arguments

feedbackListNewFormURL: The relative URL of the list to store the feedback in.
feedbackAddedAlert: If this is not an empty string you will get an alert after adding the feedback.
feedbackNotAddedAlert: If this is not an empty string you will get an alert if you cancel adding the feedback.
ribbonBtnText: The label of the ribbon button.
ribbonBtnImg: The image of the ribbon button (32×32 px).

Post a comment below if you like the solution or you have any questions.

Alexander

Make field read-only for other than the author

I got this request from @f_Techno:

@SPJavaScripts hello Alexander, I have task list in sps 2010. I want to dim DueDate after create the task. No one should change it except me.

This snippet must be places in the EditForm of the list or library where you want the field to be readonly. What this code does is to check if the logged in user is the author of the list item, and if not, make the field “StartDate” readonly. You can change the fieldnames in the example to target other fields.

<script type="text/javascript" src="/Scripts/jquery-1.10.2.min.js"></script>
<script type="text/javascript" src="/Scripts/spjs-utility/spjs-utility.js"></script>
<script type="text/javascript">
var thisItemDBdata = spjs_getItemByID({"listName":_spPageContextInfo.pageListId,"id":GetUrlKeyValue("ID"),"viewFields":["Author"]});
if(thisItemDBdata !== null){
	var authorID = thisItemDBdata.Author.split(";#")[0];
	if(_spPageContextInfo.userId.toString() !== authorID){
		var fields = init_fields_v2();
		$(fields["StartDate"]).find("td.ms-formbody").hide().after("<td id='readOnly_StartDate' class='ms-formbody'> </td>");
		$(document).ready(function(){
			// Build the fields object again for SP 2013
			fields = init_fields_v2();
			var sDate = getFieldValue("StartDate");
			$("#readOnly_StartDate").html(sDate);
		});
	}
}
</script>

You find spjs-utiliy.js here.

Please note that this code in for SP 2010 or SP 2013. If you want to use it for SP 2007 you must change “_spPageContextInfo.pageListId” for the list DisplayName or GUID.

For more advanced options, check out Dynamic Forms for SharePoint her.

Alexander