Category Archives: List view modification

List view: Preview item on hover – SharePoint 2010

03.12.2013: New version found here

14.06.2012 I forgot something in v2.2 – to avoid confusion i add another version v2.3 with support for mixed setup with calendars and lists in one page.
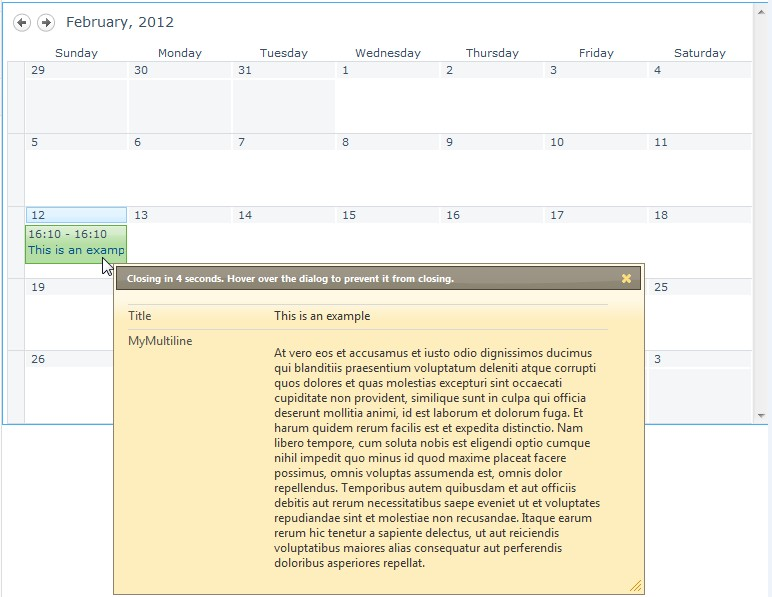
14.06.2012 v2.2 adds support for calendar day and week view, and adds an optional “Edit item” button. See updated CEWP code and description of the new “argObj parameters” below.


29.02.2012 v2.1. Fixed a bug when adding a document library view outside a document library.
14.02.2012 Fixed a missing </script> tag in the CEWP code example.


I have previously posted two articles on this topic:
Preview metadata in list view on mouseover and Preview metadata in list view on mouseover – updated version.

Note that this one is for SharePoint 2010 only.

This solution does the same as the previous solutions, but it is rewritten for SharePoint 2010 and is cleaner and simpler.

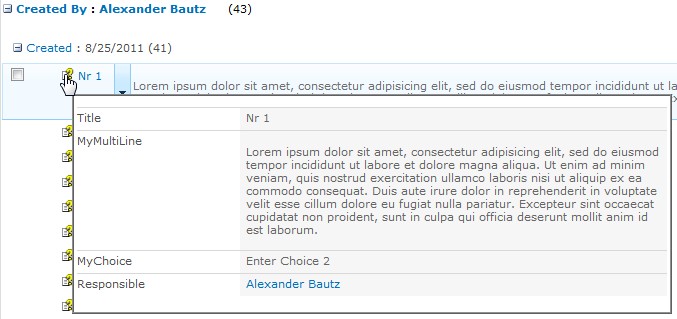
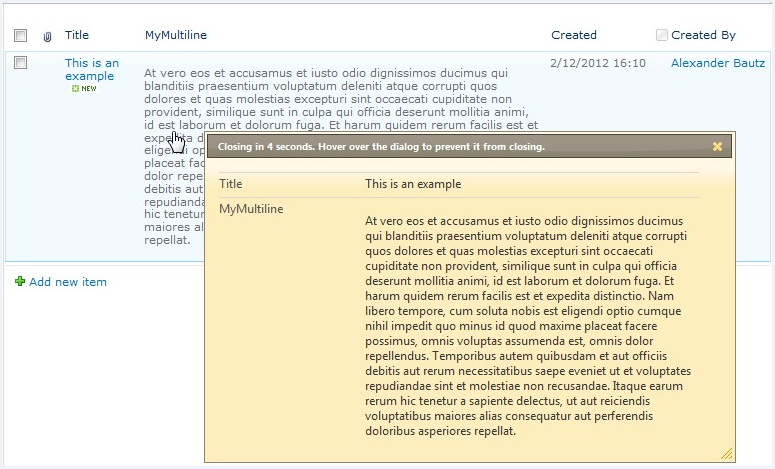
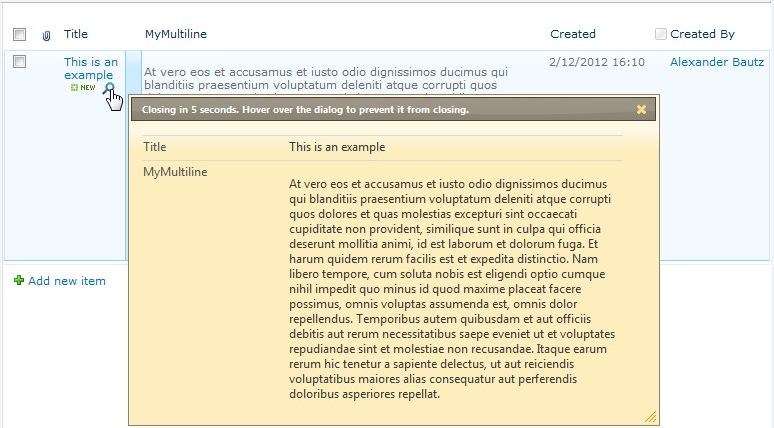
This solution uses the jQueryUI-widget “dialog” to show the preview. The theme used in the images is “sunny”. You can find all themes here. You can change the theme by pointing to another css-file in the CEWP code.

You can have the preview trigger when you hover over the entire row, over one specific column, or over an image prepended or appended to a specific column.

Images
Hover over the entire <tr>

IMG

Hover over the first <td>

IMG
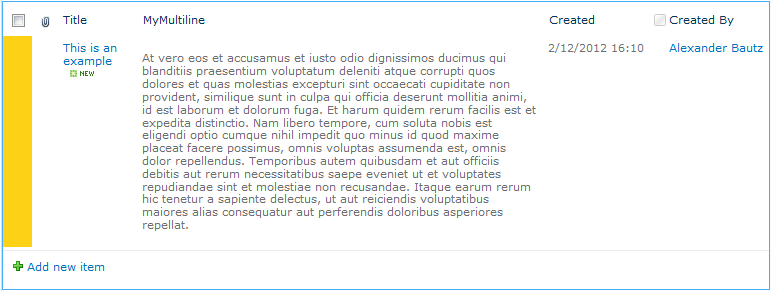
The background-color of the <td> can be controlled in the CEWP code

IMG

Hover over the an image

IMG

Calendar view

IMG

How to use
  1. Download the file “PreviewItemOnHover.js” from here.
  2. Upload the file to a document library, or a folder created using SharePoint designer.
  3. Get the the CEWP code from the code block below. Change the jQuery and jQueryUI script src to refer local files if you prefer that. Get the files here and here
  4. Change the script src to the file “PreviewItemOnHover.js” to reflect your local file location.
  5. Change the “argObj” in the function “init_preview” as described below.
  6. Place a CEWP in the page where you want the code to apply.
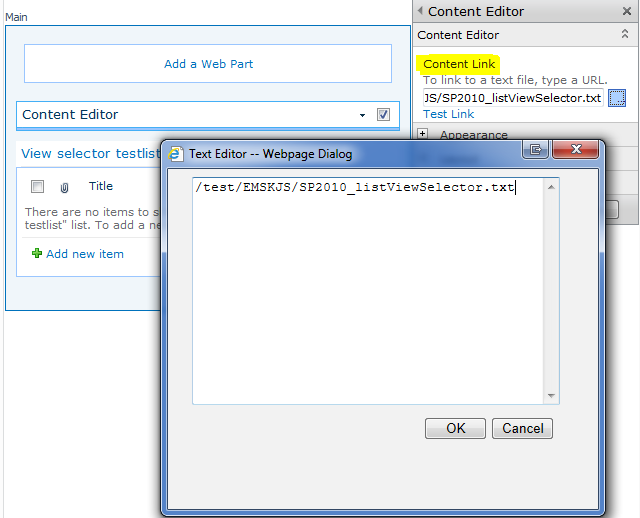
  7. Put this code in a text-file alongside the file “PreviewItemOnHover.js”, and refer it trough the content link option of the CEWP.
<style type="text/css">
td.hoverMe{
	background-color:#FCD116;;
}
td.hoverMe:hover{
	background-color:transparent;
}
</style> 
<link rel="stylesheet" href="https://ajax.googleapis.com/ajax/libs/jqueryui/1.8.17/themes/sunny/jquery-ui.css">
<script type="text/javascript" src="https://ajax.googleapis.com/ajax/libs/jquery/1.7.1/jquery.min.js"></script>
<script type="text/javascript" src="https://ajax.googleapis.com/ajax/libs/jqueryui/1.8.17/jquery-ui.js"></script>
<script type="text/javascript" src="/test/Scripts/PreviewItemOnHover.js"></script>
<script type="text/javascript">
function init_preview(){
	var argObj = {arrOfFieldsToShow:[],
				 dlgWidth:500,
				 timeout:6000,				 
				 autoCloseLabel:'Closing in {0} seconds. Hover over the dialog to prevent it from closing.',
				 hoverFirstTD:true,
				 hoverImg:false,
				 hoverImgSetup:{hoverTdIndex:2,
				 		prepend:false,
				 		imgSrc:'/_layouts/images/gosearch.gif'},
				 editButton:{active:true,
				 		btnText:"Edit item"}
				 };
	previewItems(argObj);
}
</script>
Parameters in the “argObj”
  • arrOfFieldsToShow: If you do NOT want all fields to show, you can add all fields you want to show here, Note that if you add fields to this array, it’s ONLY those added here that will show.
  • dlgWidth: The width of the preview dialog.
  • timeout: The timeput before the dialog auto-closes in milliseconds (1000 = 1 second).
  • autoCloseLabel: The dialog title with countdown (before hovering over it).
  • hoverFirstTD: true or false. If true, the first column will be highlighted to indicate that it can be hovered. The style can be controlled in the style-tag in the CEWP code (td.hoverMe).
  • hoverImg: true or false. If the above parameter is false, and this is true, use the next parameter “hoverImgSetup” to decide where to insert the image, and what image to insert.
  • hoverImgSetup:
    • hoverTdIndex: The column index (0 is first column) from the left where the hoverImg will be added.
    • prepend: true or false. Determines whether to append or prepend the image to the text in the target <td>.
    • imgSrc: The url to the image to usee as “hoverImg”.

New in v2.2:

  • editButton:
    • active: true or false.
    • btnText: The text on the edit item button.

If both “hoverFirstTD” and “hoverImg” are false, hovering anywhere in the row will trigger a preview.

Learn how to find FieldInternalNames here or here


If i have forgot something, please let me know by leaving a comment below.


Buy me a beer!
If you like the solution – buy me a beer!
Please note:
To make this work in a list view, please verify that the setting
Tabular view > Allow individual item checkboxes is activated in the “Modify View settings”.

What this setting does is to add the checkbox in front of the row. This solution depends upon this control to pick up the item ID.

Alexander

Bring back the missing list tools menu in list view with multiple webparts

In my latest project I added a web part to a list view and needed to have the list tools visible. I had to look for a fix to the disappearing list tools menu.

Yes you can bring it back by clicking the web part you want to focus on, but it will be hidden initially if there are more than one web part in the page.

I digged into the sp.ribbon.js and found the “WpClick” function. Knowing that this function is called upon click on a web part, it was only a matter of finding a way to call it by code when the page loaded.

The parameter passed to the function is a click-event and i found the missing parts regarding creating a dummy click event here: http://stackoverflow.com/questions/4848892/list-tools-tab-is-no-longer-available-after-adding-webpart-to-the-page

The code looks like this:

ExecuteOrDelayUntilScriptLoaded(init_defaultWP, "sp.ribbon.js");

function init_defaultWP(){
	setTimeout(function(){
		var defaultWP = document.getElementById("MSOZoneCell_WebPartWPQ1");
		WpClick({target:defaultWP,srcElement:defaultWP});
	},100);	
}

This code must be placed in the CEWP in the list view. Change the “WebPartWPQ1” to whatever webpart you want to activate.

Add this code to a CEWP in the page.

You might also be interested in how to show the view selector that disappears as soon as you add another webpart to a list view

Alexander

Truncate text in list view and add mouseover preview

Change log
19.06.2015
v1.2 for SP2007: By request fixed a bug occurring when using this in a list view with multiple web parts from the same list (same fieldinternalname), and the column position of the field is not the same for all the web parts.

19.07.2014
v1.2 for SP2010 and 2013: Small update to address a bug in IE9 and add support for paging in SP2013. Please note that I have not gone all in here – it is updated only to try to fix these bugs so there might be bugs I have not addressed. Use this code as a starting point and adapt it as you like.

08.12.2011
I have updated to v1.1 to fix a bug preventing the use of FieldInternalName for addressing the fields. Thanks to Ed MacIntosh (@cosmo132) for finding the bug.

I have previously done this article Multi line text field in list view: Shorten text and add hovereffect to view full text.

This post is an updated version to support both SharePoint 2007 and SharePoint 2010.

Features

This solution will shorten any text column (single line or multi line) in a list view to a preset length, and append “…” to indicate that the text is truncated. If the text is shorter than the “trigger length”, the cell is skipped.

How to set up

Go get jQuery v1.6.4 from here.
Note that this is NOT the latest version. I have not had the time to find out why v1.7+ does not work.

Download the code for the file “TruncateTextInListView.js” from here Note the different versions for SharePoint 2007 and SharePoint 2010.

Upload both files to a shared document library – or a folder in the root of the site (created with SharePoint Designer). Ensure all users have read access to the location.

Put a CEWP below the list view web part, and insert this code:

<script type="text/javascript" src="/test/English/Javascript/jquery-1.6.4.min.js"></script>
<script type="text/javascript" src="/test/English/Javascript/TruncateTextInListView.js"></script>
<script type="text/javascript">
	
function init_TruncateText(){
	truncateText('MultilineText',50,'');
}

</script>

Note:
You must change the “src” attribute of the script tags to point to your local copies of jQuery and “TruncateTextInListView.js”.

Parameters for the function “truncateText”

  • fieldName: The FieldInternalName for single line text fields or display name for Multi line text fields.
  • initialLength: The number of character to display.
  • inPlaceHoverText: This argument is optional and can be a text to show in place of the original text – like “hover to read”.

Ask if something is unclear.

Alexander

Compare date with today: status indicator in list view

Change log
May 03. 2013
Changes in v1.3:
Changed how the dateformat is read from “settings.dateFormat” to handle formats with four digit yyyy.

10.11.2012 Updated to v1.2 to add mouseover displaying days, hours and minutes. This update also includes the time portion of the “DueDate” in the calculation. Please note that the calculated column code must be changed if you want the time taken into account.

The CEWP code has not changes since the last release, but if you want to override the English text used in the mouseover, include this in your CEWP code (or modify in the file “HighlightRowByDueDate.js”:

var prefix = ["Due in ", "Overdue by "];
var tDays = ['day','s'];
var tHours = ['hour','s'];
var tMinutes = ['minute','s'];

30.11.2011 I had a bug that made it work for grouped views only. This is fixed in v1.1.
Only the code for the file “HighlightRowByDueDate.js” needs updating. Sorry for the inconvenience.


The first solution i posted in this blog was the Compare DueDate with Today in list view.

I have redone the solution and added support for SharePoint 2010 grouped views.

I have NOT included the mouseover “overdue by” text. If there is a demand for it, i could add it back in.

IMG

How to use

You put a CEWP below the list view web part. The actual code has been put in a separate file for use in multiple lists. The “function call” itself is placed in a CEWP below the list view web part.

The code for the file “HighlightRowByDueDate.js” is found here

Download the code and put in a text-file and place it in a shares document library (all users must have read access), or in a folder created in SharePoint Designer.

You should also put the CEWP-code in a text file in the same location and use the “Content Link” field in the “Edit web part” panel of the CEWP. This is most important in SharePoint 2010.

CEWP code

<script type="text/javascript" src="https://ajax.googleapis.com/ajax/libs/jquery/1.8.2/jquery.min.js"></script>
<script type="text/javascript" src="/test/English/Javascript/HighlightRowByDueDate.js"></script>
<script type="text/javascript">
/* Hightlight row by due date
 * ---------------------------------------------
 * Created by Alexander Bautz
 * alexander.bautz@gmail.com
 * https://spjsblog.com
 * ---------------------------------------------
 * This script depends upon functionality provided by jQuery - http://jquery.com
 * ---------------------------------------------
 * v1.2 - 10.11.2012
*/

function init_highlightOverdue(){
	var settings = {greenDays:'', // Green color for everything not yellow or red
					greenColor:"<img src='/_layouts/images/imnon.png' border='0'> ", // green image
					yellowDays:1, // Yellow color one day after due date has passed
					yellowColor:"<img src='/_layouts/images/imnaway.png' border='0'> ", // yellow inage
					redDays:2, // Red color two days after due date has passed
					redColor:"<img src='/_layouts/images/imnbusy.png' border='0'> ", // red image				
					dateFormat:'mm/dd/yy',
					identifierText:'Due:',
					replace:true};
	highlightOverdue(settings);
}
</script>

NOTE

You must change the “src” in the script tag referring the script “HighlightRowByDueDate.js” to reflect your local copy.

Parameters explained

  • greenDays: either an empty string ” to indicate “green for everything not yellow or red” or an integer (positive or negative) to indicate the “offset” to highlight green.
  • greenColor: The image or text / HTML yo mark the items as “green”.
  • yellowDays: The number of days (positive or negative) to offset the yellow marker.
  • yellowColor: The image or text / HTML yo mark the items as “yellow”.
  • redDays: The number of days (positive or negative) to offset the red marker.
  • redColor: The image or text / HTML yo mark the items as “red”.
  • dateFormat: The date format used in your calculated column (see details below).
  • identifierText: The lead-in text in the calculated column. This value is used to identify the cells to “treat”.
  • replace: true or false – should the “image” replace the text in the cell, or prepend to the value.

The calculated column

The “trigger” for the script is the lead in text in the calculated column – this text must match in the calculated column AND in the attribute “identifierText” in the settings object in the CEWP.

Note the text “Due:” in the calculated column in this example:
IMG

Note: The calculated column must be in the view to make the solution work.


Let me know if something is unclear

Alexander

SharePoint 2010 – The view selector is back!

In SharePoint 2010 you loose the list view selector in a list view if there are more than 1 web part in the page. This makes navigating the list views very cumbersome.

I have previously created a solution for adding a view selector in these list views, but that solution was a bit clunky.

I looked at this again today, and came up with a solution for re-enabling the missing list view selector that was clean and simple – and it doesn’t even require jQuery…

This is the first article where I’m using the “SharePoint 2010 Client Object Model”.

This solution is placed in a ContentEditorWebPart (CEWP) somewhere in the page you want the list view menu re-enable in. I recommend using the “Content Link” option in the CEWP as the code might be messed with by SharePoint if you paste it directly in the CEWP’s HTML-source.

To achieve this, put the code in a text-file and place it in a shares document library (all users must have read access), or in a folder created in SharePoint Designer. You then copy the file’s url and paste it into the “Content Link” field in the “Edit web part” panel like this:
IMG

You do not get any pictures of the menu itself as it is no different from the standard list view selector.

Here is the code:
Get the code here

List all attachments when clicking the paperclip in a list view – updated version

13.09.2014 v1.71 fixes a bug where the attachment have an apostrophe in the name.


05.06.2012 v1.7 adds support for jQuery v1.7.x.


I have previously posted a solution for listing all attachments when clicking on the paper clip in a list view, you find it here.

This is an updated version with a few new features – and SharePoint 2010 support. I post it in a new article to keep it tidy.

The new features are:

  • Option to display the attachments on hover.
  • Shows the icon and the file name.
How to use

Put the code in a ContentEditorWebPart (CEWP) below the list view.

There are two different scripts, one for SharePoint 2007 and one for SharePoint 2010, but the CEWP code is shared.

<script src="http://ajax.googleapis.com/ajax/libs/jquery/1.6.4/jquery.min.js" type="text/javascript"></script>
<script src="/test/English/Javascript/PreviewAtt/ListAttachments.js" type="text/javascript"></script>
<script type="text/javascript">

var argObj = {hideIdColumn:true,
			  clickToOpen:false,
			  clickMouseover:"Click to open",
			  oneClickOpenIfSingle:true};
			  
customListAttachments(argObj);
</script>

I have referred jQuery from Google. If you prefer a local copy, you find the file here.

Parameters explained

The argument object is an object literal with these attributes:

  • hideIdColumn: true to hide the ID column, false to leave it visible.
  • clickToOpen: true to open the list by clicking, false to open it on hover.
  • clickMouseover: If the previous attribute is set to true, this is the text shown when the mouse hovers over the paper clip.
  • oneClickOpenIfSingle: true to open a single attachment directly, false to list it. This requires the attribute “clickToOpen” to be set to true.
Download

Ensure you pick the correct version – for SharePoint 2007 or SharePoint 2010. You find the file “ListAttachments.js” here

Please post any bugs below.
Alexander

Preview metadata in list view on mouseover – updated version

18.09.2011 I have added a bit more functionality. The CEWP code and the file “PreviewMetadata.js” has changed. Re-read this article for details.


This is a remake of a previously posted solution for previewing an item in a list when hovering over the table row or a custom image. You find the code below, but first an overview of the features.

List view
IMG

Preview on hover
IMG

This solution works in both SharePoint 2007 and in SharePoint 2010, but the code is different for the two. It is tested in plain list (and document library) views with grouping and paging, and in calendar views. You can specify which columns to preview, or have the full DispForm array of fields. If you have multiple list view web parts in one page, you can specify which lists to activate this feature on.

How to use

Download the code for the file “PreviewMetadata.js” from here. Ensure you pick the right version (SP2007 or SP2010). Upload the file to a shared document library, or put it in a folder using SharePoint Designer. You then insert a ContentEditorWebPart (CEWP) below the list view web parts in the page. You must modify the script src to the file “PreviewMetadata.js”, and if you like, to the jQuery library.

Hints

Read here how to find the list Guid and the FieldInternalName for your list fields.

CEWP code for SharePoint 2007
&lt;script type=&quot;text/javascript&quot; src=&quot;https://ajax.googleapis.com/ajax/libs/jquery/1.6.4/jquery.min.js&quot;&gt;&lt;/script&gt;
&lt;script type=&quot;text/javascript&quot; src=&quot;/test/English/Javascript/PreviewListItems/PreviewMetadata.js&quot;&gt;&lt;/script&gt;
&lt;script type=&quot;text/javascript&quot;&gt;
config = {arrOfFieldsToShow:[],
		  hideIdColumn:true,
		  activeListGuids:[],
		  hideCreatedAndModified:true,
		  hideFormLabel:false,
		  hoverDelay:100,
		  hoverImg:{active:true,
		  			path:'/_layouts/images/chm16.gif',
		  			height:'12',
		  			width:'12',
		  			prependTo:'LinkTitle',
		  			hoverImgDescription:'Hover over this image in the list to preview the list item'}};
initjLoadMe(config);
&lt;/script&gt;
CEWP code for SharePoint 2010
&lt;script type=&quot;text/javascript&quot; src=&quot;https://ajax.googleapis.com/ajax/libs/jquery/1.6.4/jquery.min.js&quot;&gt;&lt;/script&gt;
&lt;script type=&quot;text/javascript&quot; src=&quot;/test/EMSKJS/PreviewMetadata/PreviewMetadata.js&quot;&gt;&lt;/script&gt;
&lt;script type=&quot;text/javascript&quot;&gt;
config = {arrOfFieldsToShow:[],
		  hideIdColumn:true,
		  activeListGuids:[],
		  hideCreatedAndModified:true,
		  hideFormLabel:false,
		  hoverDelay:100,
		  hoverImg:{active:true,
		  			path:'/_layouts/images/chm16.gif',
		  			height:'12',
		  			width:'12',
		  			prependTo:'LinkTitle',
		  			hoverImgDescription:'Hover over this image in the list to preview the list item',
		  			openInDlg:true}};
		  			
initjLoadMe(config);
&lt;/script&gt;

Note to SharePoint 2010 users:
Add this code to a text file and put it in a document library, then use the content link option on the CEWP to link to this code. This is necessary to overcome a possible “bug” in the CEWP handling when editing a SP2010 page where the HTML is accumulated when editing the page.

This tip is also recommended for SharePoint 2007 users, but is not absolutely necessary.

Parameters explained
  • arrOfFieldsToShow: Array of FieldInternalNames to show. Leave empty to show all fields from DispForm. (*) To hide the field name for individual fields in the preview, put # as a suffix to the name like this: [‘Title#’].
  • hideIdColumn: true or false. If true, the ID column must be placed to the far right in the view.
  • activeListGuids: Array of the Guids of the lists to activate this feature in. If left empty, all list view web parts will be active. Use this if you have more than one list view web part in the page and does not want to activate this feature for all web parts.
  • hoverImg: If the parameter “active” is true, the preview will be shown when the user hovers over the image specified. If false, the preview will be shown when the user hovers over the table row.
  • hideCreatedAndModified (*): true or false. Determines whether or not to show the “Creates by” and “Modified by” at the bottom of the preview.
  • hideFormLabel (*): true or false. Determines whether or not to hide the field names column entirely. When set to true, this one overrides individual field settings under “arrOfFieldsToShow”
  • hoverDelay (*): The delay in milliseconds from the user hovers over the image / row until the preview is triggered. If used with “hover” over the entire row, set this higher to prevent shoving all previews when the user swipes the mouse over multiple rows.
    • active: true or false.
    • path: The path to the image used as “hover image”.
    • height: Image height in pixels.
    • width: Image width in pixels.
    • prependTo: The FieldInternalName of the field to prepend the hover image to. The Title field with menu has FieldInternalName “LinkTitle”
    • hoverImgDescription: The Description text on the “instructions” shown above the list view.
    • openInDlg: (SharePoint 2010 only) Defines whether the form is opened in a dialog when the user clicks the hover image.

(*) New in v2.3 for SharePoint 2007 and v1.1 for SharePoint 2010.


Ask if something is unclear.
Alexander

Remove group label in grouped list view

17.09.2011 I have updated the script to support lookup columns and people pickers.


I got a request from Djamel asking for a solution for removing the group label (the field name) in a grouped list view.

Add this code to a Content Editor Web Part (CEWP) in the list view. Adding a CEWP in a SharePoint 2010 list view will unfortunately remove the list view selector.

SharePoint 2007

&lt;script type=&quot;text/javascript&quot; src=&quot;https://ajax.googleapis.com/ajax/libs/jquery/1.6.2/jquery.min.js&quot;&gt;&lt;/script&gt;
&lt;script type=&quot;text/javascript&quot;&gt;
$(document).ready(function(){	
	$(&quot;table.ms-listviewtable td[class^='ms-gb']&quot;).each(function(){
		var aLen = $(this).find('a').length;
		switch(aLen){
			case 2:
				var newLabel = $(this).find(&quot;a:last&quot;)[0].nextSibling.nodeValue;
				$(this).find(&quot;a:last&quot;)[0].nextSibling.nodeValue = '';
				$(this).find(&quot;a:last&quot;).text(&quot; &quot;+newLabel.substring(3));
			break;
			case 3:
				var newLabel = $(this).find(&quot;a:last&quot;).text();				
				$(this).find(&quot;a:eq(1)&quot;)[0].nextSibling.nodeValue = '';
				$(this).find(&quot;a:eq(1)&quot;).text(newLabel+&quot; &quot;);
				$(this).find(&quot;a:eq(2)&quot;).remove();
			break;			
			case 4:
				var newLabel = $(this).find(&quot;a:eq(2)&quot;).text();
				$(this).find(&quot;a:eq(1)&quot;)[0].nextSibling.nodeValue = '';
				$(this).find(&quot;a:eq(1)&quot;).text(newLabel+&quot; &quot;);
				$(this).find(&quot;nobr:last&quot;).remove();
			break;
		}
	});	
});
&lt;/script&gt;

SharePoint 2010

&lt;script type=&quot;text/javascript&quot; src=&quot;https://ajax.googleapis.com/ajax/libs/jquery/1.6.2/jquery.min.js&quot;&gt;&lt;/script&gt;
&lt;script type=&quot;text/javascript&quot;&gt;
$(document).ready(function(){
	$(&quot;table.ms-listviewtable td[class^='ms-gb']&quot;).each(function(){
		var newLabel;
		var aLen = $(this).find('a').length;
			switch(aLen){
			case 1:
				newLabel = $(this).find(&quot;a:last&quot;)[0].nextSibling.nodeValue;
				$(this).find(&quot;a:last&quot;)[0].nextSibling.nodeValue = '';
				$(this).find(&quot;img:last&quot;)[0].nextSibling.nodeValue = &quot; &quot;+newLabel.substring(3);
			break;
			case 2:
				newLabel = $(this).find(&quot;a:last&quot;)[0].nextSibling.nodeValue;
				if(newLabel === null){		
					newLabel = $(this).find(&quot;a:last&quot;).text();				
					$(this).find(&quot;a:last&quot;).remove();
					$(this).find(&quot;a:first&quot;)[0].nextSibling.nodeValue = '';
					$(this).find(&quot;img:first&quot;)[0].nextSibling.nodeValue = &quot; &quot;+newLabel;
				}else{
					$(this).find(&quot;a:last&quot;)[0].nextSibling.nodeValue = '';
					$(this).find(&quot;a:last&quot;).text(&quot; &quot;+newLabel.substring(3));
				}
			break;
			case 3:
				newLabel = $(this).find(&quot;nobr:last&quot;).text();
				$(this).find(&quot;nobr:last&quot;).remove();
				$(this).find(&quot;a:eq(0)&quot;)[0].nextSibling.nodeValue = '';
				$(this).find(&quot;img:last&quot;)[0].nextSibling.nodeValue = &quot; &quot;+newLabel;
			break;			
		}
	});	
});
&lt;/script&gt;

Ask if anything is unclear.

Alexander